Ga door naar hoofdinhoud

Turtle Beach Elite Pro Left Speaker Replacement

Wat je nodig hebt

  1. Turtle Beach Elite Pro Left Speaker  Replacement, Ear Cushions: stap 1, afbeelding 1 van 1
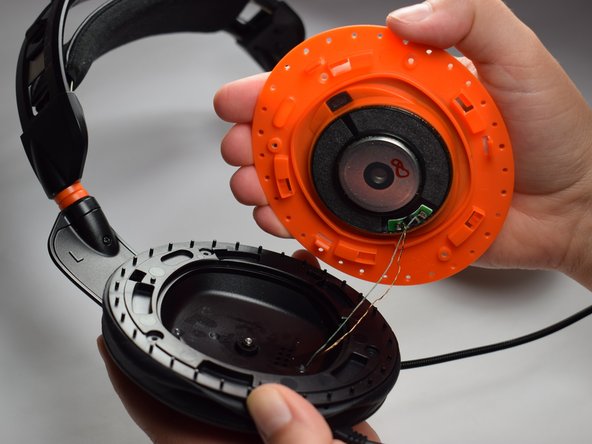
    • Firmly pinch ear cushion between thumb and forefinger.

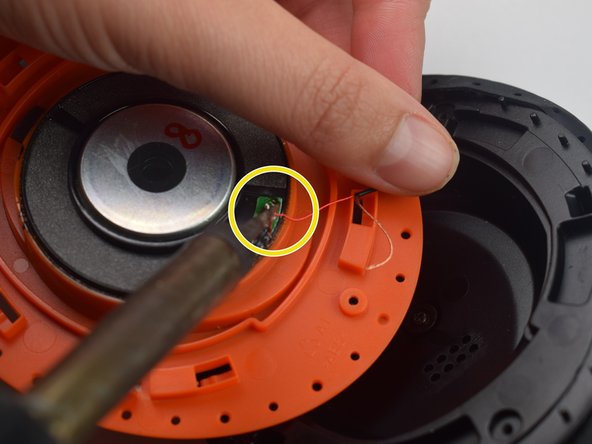
    • Using the hand not holding the ear cushion, grasp the orange plate that is below the ear cushion.

    • If the black rubber lining on the orange plate is grasped, then the rubber lining on the ear piece may tear.

  2. Turtle Beach Elite Pro Left Speaker  Replacement: stap 2, afbeelding 1 van 2 Turtle Beach Elite Pro Left Speaker  Replacement: stap 2, afbeelding 2 van 2
    • Rotate ear cushion counter-clockwise about half an inch.

    • The ear cushion should audibly snap out of place.

    • After it has audibly snapped out of place, lift the ear cushion off of the device.

    • During reassembly, rotate the ear cushion clockwise.

  3. Turtle Beach Elite Pro Left Speaker  Replacement: stap 3, afbeelding 1 van 2 Turtle Beach Elite Pro Left Speaker  Replacement: stap 3, afbeelding 2 van 2
    • Using the new cushion, align the pegs located on both the orange plate and ear cushion.

    • Make sure that both the ear cushion and the orange plate have the same designation.

    • Once the pegs are aligned, push the new ear cushion in place.

  4. Turtle Beach Elite Pro Left Speaker  Replacement, Left Speaker: stap 4, afbeelding 1 van 1
    • Remove the left ear cushion completely from the headset.

    • The left ear cushion will be on the side of the headset where the microphone and audio control is attached.

  5. Turtle Beach Elite Pro Left Speaker  Replacement: stap 5, afbeelding 1 van 2 Turtle Beach Elite Pro Left Speaker  Replacement: stap 5, afbeelding 2 van 2
    • Using the Phillips #0 screwdriver, remove the 6.0 mm screws on the orange plate.

  6. Turtle Beach Elite Pro Left Speaker  Replacement: stap 6, afbeelding 1 van 2 Turtle Beach Elite Pro Left Speaker  Replacement: stap 6, afbeelding 2 van 2
    • Use the opening tool to separate the orange plate from the black base plate.

    • Focus on the wires that are connected to the speaker.

  7. Turtle Beach Elite Pro Left Speaker  Replacement: stap 7, afbeelding 1 van 1
    • Using wire cutters, cut the two wires that are attached to the speaker.

    • Make sure to cut the wires as close to the speaker as possible, because these wires will be used in the next step.

  8. Turtle Beach Elite Pro Left Speaker  Replacement: stap 8, afbeelding 1 van 2 Turtle Beach Elite Pro Left Speaker  Replacement: stap 8, afbeelding 2 van 2
    • Replace the old speaker with the new speaker.

    • Using the soldering iron, solder the wires to the new speaker.

    • Make sure to solder the wires to their original locations on the speaker.

Conclusie

To reassemble your device, follow these instructions in reverse order.

Één andere persoon heeft deze handleiding voltooid.

Alexis Uribe

Lid sinds: 03/24/17

510 Reputatie

4 handleidingen geschreven

Team

Baylor, Team S5-G1, Williams Spring 2017 Lid van Baylor, Team S5-G1, Williams Spring 2017

BU-WILLIAMS-S17S5G1

3 Leden

8 handleidingen geschreven

0 opmerkingen

Voeg opmerking toe

Weergavestatistieken:

Afgelopen 24 uren: 0

Afgelopen 7 dagen: 4

Afgelopen 30 dagen: 16

Altijd: 3,077