Ga door naar hoofdinhoud

Trio Stealth G4 Battery Replacement

Wat je nodig hebt

  1. Trio Stealth G4 Battery Replacement, Back Panel: stap 1, afbeelding 1 van 1
    • Working on your device while it is turned on may result in electric shock. Be sure to shut down and unplug your device before you begin.

    • Flip your tablet over so that the back panel is facing up.

  2. Trio Stealth G4 Battery Replacement: stap 2, afbeelding 1 van 2 Trio Stealth G4 Battery Replacement: stap 2, afbeelding 2 van 2
    • Use a plastic opening tool to gently pry the back panel assembly apart from the front casing.

    • Start on one edge of the device by inserting the plastic opening tool between the back panel and the front casing using a gentle rocking motion.

  3. Trio Stealth G4 Battery Replacement: stap 3, afbeelding 1 van 1
    • Once you have successfully separated one edge of the back panel from the front casing, slide the plastic opening tool along the other edges to detach them as well.

    • The latches keeping the back panel attached to the front casing can sometimes be a little difficult to separate, so don't be afraid to use some force.

  4. Trio Stealth G4 Battery Replacement: stap 4, afbeelding 1 van 2 Trio Stealth G4 Battery Replacement: stap 4, afbeelding 2 van 2
    • Remove the back panel from the rest of the tablet and set it aside.

  5. Trio Stealth G4 Battery Replacement: stap 5, afbeelding 1 van 1
    • The plastic volume button cover may fall out when you remove the back panel. Set it aside.

  6. Trio Stealth G4 Battery Replacement, Battery: stap 6, afbeelding 1 van 1
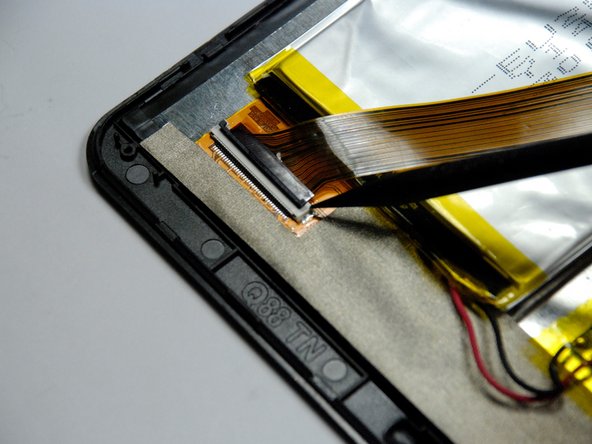
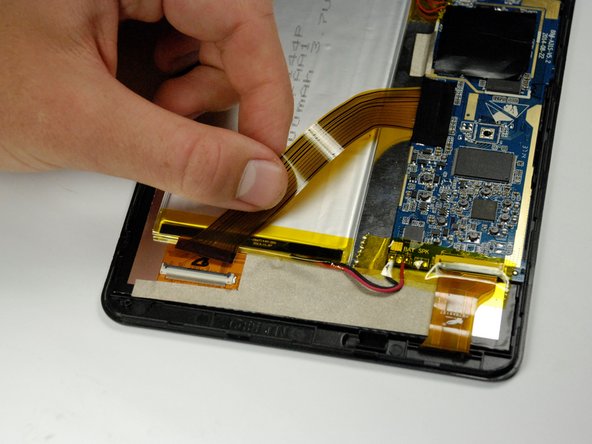
    • Remove the black tape covering the zero insertion force (ZIF) connector that holds down the end of the yellow colored ribbon wire that lies across the battery.

  7. Trio Stealth G4 Battery Replacement: stap 7, afbeelding 1 van 3 Trio Stealth G4 Battery Replacement: stap 7, afbeelding 2 van 3 Trio Stealth G4 Battery Replacement: stap 7, afbeelding 3 van 3
    • Wedge a spudger underneath the black flap on the ZIF connector and flip it up.

    • Once the flap is up, use your fingers to disconnect the end of the ribbon wire from the connector.

  8. Trio Stealth G4 Battery Replacement: stap 8, afbeelding 1 van 1
    • Carefully remove the yellow tape from the red and black wires connecting the battery to the motherboard.

  9. Trio Stealth G4 Battery Replacement: stap 9, afbeelding 1 van 1
    • Use the soldering iron to melt away the solder from the motherboard connections.

    • Once the solder is completely removed, pull the wires away from the motherboard.

  10. Trio Stealth G4 Battery Replacement: stap 10, afbeelding 1 van 2 Trio Stealth G4 Battery Replacement: stap 10, afbeelding 2 van 2
    • Use the spudger to gently dislodge the battery from the tablet.

    • Do not bend the lithium-ion battery. This can cause a fire.

Conclusie

To reassemble your device, follow these instructions in reverse order.

2 andere personen hebben deze handleiding voltooid.

Matt Arnold

Lid sinds: 09/22/15

607 Reputatie

5 handleidingen geschreven

Team

Baylor, Team 4-1, Williams Fall 2015 Lid van Baylor, Team 4-1, Williams Fall 2015

BU-WILLIAMS-F15S4G1

4 Leden

10 handleidingen geschreven

Één opmerking

trio stealth g4 10.1 v2 tablet replacement battery what battery is that number , please thank you

jone paul - Antwoord

Voeg opmerking toe

Weergavestatistieken:

Afgelopen 24 uren: 0

Afgelopen 7 dagen: 0

Afgelopen 30 dagen: 2

Altijd: 5,518