Ga door naar hoofdinhoud

Toshiba Tecra 8200 Hard Drive Replacement

Wat je nodig hebt

  1. Toshiba Tecra 8200 Hard Drive Replacement, Battery: stap 1, afbeelding 1 van 1
    • Turn off the device and unplug the power cord.

    • To remove the battery, flip the device, so that the bottom is facing upward.

  2. Toshiba Tecra 8200 Hard Drive Replacement: stap 2, afbeelding 1 van 3 Toshiba Tecra 8200 Hard Drive Replacement: stap 2, afbeelding 2 van 3 Toshiba Tecra 8200 Hard Drive Replacement: stap 2, afbeelding 3 van 3
    • Slide the battery to the right side until you hear a click.

    • Carefully remove the battery from its compartment.

  3. Toshiba Tecra 8200 Hard Drive Replacement, Hard Drive: stap 3, afbeelding 1 van 3 Toshiba Tecra 8200 Hard Drive Replacement, Hard Drive: stap 3, afbeelding 2 van 3 Toshiba Tecra 8200 Hard Drive Replacement, Hard Drive: stap 3, afbeelding 3 van 3
    • Locate the hard drive panel.

    • Remove the single screw labeled F4 by using a Philips size #00 screwdriver.

    • Save the screw, as it will be needed for reassembly.

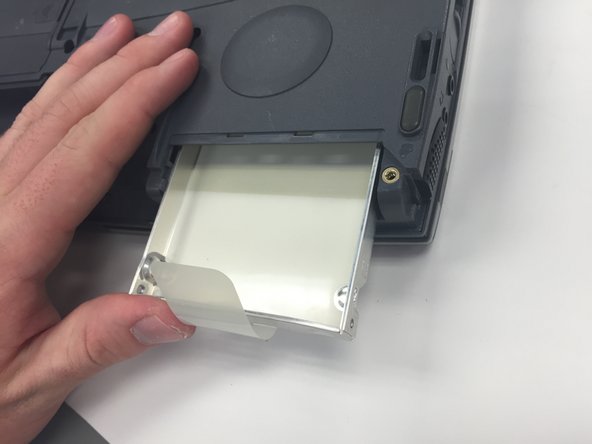
    • Remove the panel, exposing the hard drive.

  4. Toshiba Tecra 8200 Hard Drive Replacement: stap 4, afbeelding 1 van 2 Toshiba Tecra 8200 Hard Drive Replacement: stap 4, afbeelding 2 van 2
    • Pull the tab to remove the hard drive.

    • Insert the new hard drive by pushing it into the compartment, leaving the new "pull" tab exposed.

  5. Toshiba Tecra 8200 Hard Drive Replacement: stap 5, afbeelding 1 van 2 Toshiba Tecra 8200 Hard Drive Replacement: stap 5, afbeelding 2 van 2
    • Tuck the "pull" tab back into the hard drive compartment.

    • Replace the panel.

    • Replace the single F4 screw.

  6. Toshiba Tecra 8200 Hard Drive Replacement: stap 6, afbeelding 1 van 3 Toshiba Tecra 8200 Hard Drive Replacement: stap 6, afbeelding 2 van 3 Toshiba Tecra 8200 Hard Drive Replacement: stap 6, afbeelding 3 van 3
    • Identify the connector pins on the battery.

    • Line up the connector pins on the battery with the connector pins on the computer and push inward to reconnect the battery.

    • Slide the exterior panel towards the center of the computer to lock the battery in place.

Eindstreep

Sally

Lid sinds: 02/17/15

306 Reputatie

3 handleidingen geschreven

Team

Ohio State, Team 1-3, Buehl Winter 2015 Lid van Ohio State, Team 1-3, Buehl Winter 2015

OSU-BUEHL-W15S1G3

3 Leden

9 handleidingen geschreven

Één opmerking

Awesome Thanks!

Erin Dulac - Antwoord

Voeg opmerking toe

Weergavestatistieken:

Afgelopen 24 uren: 3

Afgelopen 7 dagen: 12

Afgelopen 30 dagen: 17

Altijd: 2,233