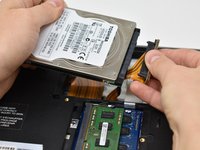
Ga door naar hoofdinhoud

Toshiba TECRA R940 Fan Replacement

Wat je nodig hebt

  1. Toshiba TECRA R940 Fan Replacement, Battery: stap 1, afbeelding 1 van 2 Toshiba TECRA R940 Fan Replacement, Battery: stap 1, afbeelding 2 van 2
    • Slide lock 1, located on the right side, to the unlocked position.

  2. Toshiba TECRA R940 Fan Replacement: stap 2, afbeelding 1 van 2 Toshiba TECRA R940 Fan Replacement: stap 2, afbeelding 2 van 2
    • While holding lock 2 (left side) in the unlocked position, pull out the battery pack.

    • It is not necessary to hold open lock 2 for re-installation.

  3. Toshiba TECRA R940 Fan Replacement, Back Panel: stap 3, afbeelding 1 van 2 Toshiba TECRA R940 Fan Replacement, Back Panel: stap 3, afbeelding 2 van 2
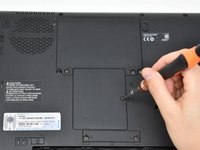
    • Unscrew the single screw on the RAM access panel using a Phillips #0 screwdriver.

    • The screw will not come apart from the panel.

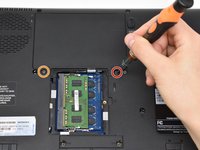
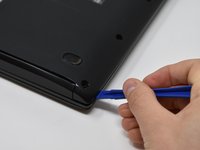
    • Use a plastic opening tool to pry off the access panel.

  4. Toshiba TECRA R940 Fan Replacement: stap 4, afbeelding 1 van 2 Toshiba TECRA R940 Fan Replacement: stap 4, afbeelding 2 van 2
    • Remove the 11 mm screw from the right side of the hard drive access panel using a Phillips #0 screwdriver.

    • Remove the 3.5 mm screw from the left side of the access panel using a Phillips #0 screwdriver.

    • Use a plastic opening tool to pry off the access panel from the bottom.

  5. Toshiba TECRA R940 Fan Replacement: stap 5, afbeelding 1 van 1
    • Remove twelve 5.5 mm screws from the main back cover using a Phillips #0 screwdriver.

    • Remove three 11 mm screws from main back cover and mini access panel using a Phillips #0 screwdriver.

    • Remove two 9.5 mm screws from the main back cover using a Phillips #0 screwdriver.

  6. Toshiba TECRA R940 Fan Replacement: stap 6, afbeelding 1 van 2 Toshiba TECRA R940 Fan Replacement: stap 6, afbeelding 2 van 2
    • Lift the hard drive out of the access panel.

    • Disconnect the SATA connector from the hard drive by pulling straight out.

  7. Toshiba TECRA R940 Fan Replacement: stap 7, afbeelding 1 van 2 Toshiba TECRA R940 Fan Replacement: stap 7, afbeelding 2 van 2
    • Insert the plastic opening tool into the edge of the laptop and pry off the back cover.

  8. Toshiba TECRA R940 Fan Replacement, Fan: stap 8, afbeelding 1 van 1
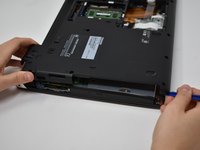
    • Remove two 3.5 mm screws with a Phillips #0 screwdriver from either side of the fan.

  9. Toshiba TECRA R940 Fan Replacement: stap 9, afbeelding 1 van 1
    • Disconnect the fan from its port.

Conclusie

To reassemble your device, follow these instructions in reverse order.

0 opmerkingen

Voeg opmerking toe

Weergavestatistieken:

Afgelopen 24 uren: 1

Afgelopen 7 dagen: 4

Afgelopen 30 dagen: 15

Altijd: 1,404