Ga door naar hoofdinhoud

Toshiba Satellite S55t-C5225 Optical Disk Drive Replacement

Wat je nodig hebt

  1. Toshiba Satellite S55t-C5225 Optical Disk Drive Replacement, Battery: stap 1, afbeelding 1 van 1
    • Shut down the computer and disconnect all cables

    • Flip the computer over so the bottom is facing up.

  2. Toshiba Satellite S55t-C5225 Optical Disk Drive Replacement: stap 2, afbeelding 1 van 2 Toshiba Satellite S55t-C5225 Optical Disk Drive Replacement: stap 2, afbeelding 2 van 2
    • Remove the two 7.0 mm Phillips #0 screws that hold the battery in place.

  3. Toshiba Satellite S55t-C5225 Optical Disk Drive Replacement: stap 3, afbeelding 1 van 2 Toshiba Satellite S55t-C5225 Optical Disk Drive Replacement: stap 3, afbeelding 2 van 2
    • Carefully remove the battery by wedging a plastic opening tool in-between the battery and back cover.

  4. Toshiba Satellite S55t-C5225 Optical Disk Drive Replacement, Back Panel: stap 4, afbeelding 1 van 2 Toshiba Satellite S55t-C5225 Optical Disk Drive Replacement, Back Panel: stap 4, afbeelding 2 van 2
    • Remove the eleven 7.0 mm Phillips #0 screws that secure the back cover.

  5. Toshiba Satellite S55t-C5225 Optical Disk Drive Replacement: stap 5, afbeelding 1 van 2 Toshiba Satellite S55t-C5225 Optical Disk Drive Replacement: stap 5, afbeelding 2 van 2
    • Wedge the tip of a plastic opening tool between the back cover and metal frame.

    • Twist the plastic tool, while wedged, to release the retaining tabs from the frame.

    • Repeat these steps around the laptop to release all retaining tabs.

  6. Toshiba Satellite S55t-C5225 Optical Disk Drive Replacement: stap 6, afbeelding 1 van 2 Toshiba Satellite S55t-C5225 Optical Disk Drive Replacement: stap 6, afbeelding 2 van 2
    • Once all retaining tabs are released, pull up on the cover to remove.

  7. Toshiba Satellite S55t-C5225 Optical Disk Drive Replacement, Optical Disk Drive: stap 7, afbeelding 1 van 2 Toshiba Satellite S55t-C5225 Optical Disk Drive Replacement, Optical Disk Drive: stap 7, afbeelding 2 van 2
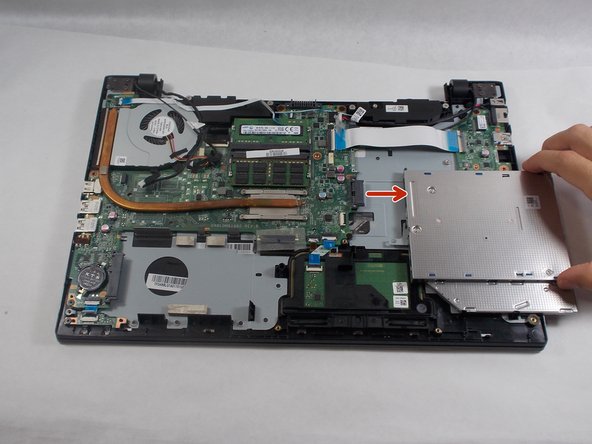
    • Carefully slide the optical disk drive to the right to remove from the motherboard.

Conclusie

To reassemble your device, follow these instructions in reverse order.

Één andere persoon heeft deze handleiding voltooid.

Nicholas Costa

Lid sinds: 10/21/19

321 Reputatie

1 Handleiding geschreven

Team

UMass Dartmouth, Team S1-G5, Botvin Fall 2019 Lid van UMass Dartmouth, Team S1-G5, Botvin Fall 2019

UMASSD-BOTVIN-F19S1G5

3 Leden

15 handleidingen geschreven

0 opmerkingen

Voeg opmerking toe

Weergavestatistieken:

Afgelopen 24 uren: 1

Afgelopen 7 dagen: 1

Afgelopen 30 dagen: 7

Altijd: 315