Inleiding
A common problem with this particular model of the Toshiba Satellite is that the screen starts to go bad. The infamous solidly-colored lines start appearing over time and soon things become unreadable. In my case half the screen was unusable.
This repair requires a rather delicate hand. There are only 8 screws to remove, and a lot of tape and tiny connectors. I took about an hour to finish this repair, but I'm sure it can be done in at least half that time.
Wat je nodig hebt
-
-
Before you do anything, make sure the AC adapter is unplugged and the battery removed from the laptop.
-
There will be 4 rubber grommets on the plastic bezel surrounding the screen, 2 square and 2 circular. You will have to pry these out or remove them somehow. They are small so set them aside where you will be able to find them later.
-
Directly behind the grommets will be 4 Phillips screws holding the bezel to the screen. These can be removed with a Phillips #00 screwdriver. As with the grommets, put these in a safe place where you can find them later.
-
-
-
GENTLY pull the bezel off. I used a small flat-blade screwdriver out of a glasses repair kit to do this. First I gently pried the bezel corners to loosen them, then slowly worked my way around, carefully tugging and pulling the bezel out of the plastic locks.
-
After you have the bezel off, there will be 4 Phillips screws on each side of the screen, near the edges (the picture shown here only shows 1 side). Again, use a Phillips #00 screwdriver to remove them.
-
-
-
-
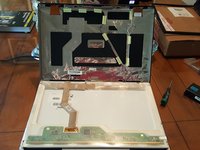
At this point, the screen assembly will be free to move. Gently pull it out and lay it on the keyboard.
-
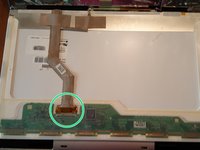
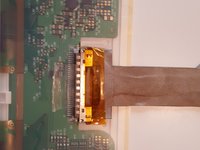
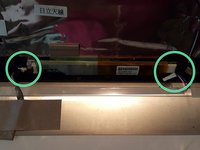
Near the bottom-right of the screen will be a connector which is secured with clear tape. Remove the tape, pull the cable gently out of the connector and set it to the side.
-
-
-
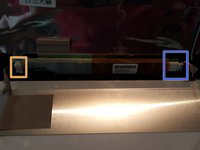
At the top of the screen, near the center will be the inverter. On the left is the power cable and on the right is the backlight power source.
-
Power supply
-
Backlight power source
-
Carefully pull the connectors out of the inverter. Do not pull on the wires, only the plastic connector. It may take a bit of maneuvering to get a solid grip on them.
-
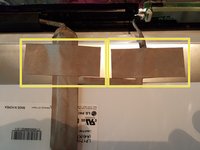
Holding the power supply and video cable in place are two strips of tape. Carefully peel them off, and then lift the cables up. The old screen can now be removed and the new screen installed.
-


To reassemble your device, follow these instructions in reverse order.
To reassemble your device, follow these instructions in reverse order.
Annuleren: ik heb deze handleiding niet afgemaakt.
3 andere personen hebben deze handleiding voltooid.
