Deze versie kan foutieve bewerkingen bevatten. Schakel over naar de recentste gecontroleerde momentopname.
Wat je nodig hebt
-
Deze stap is niet vertaald. Help het te vertalen
-
Turn the computer off and disconnect the power supply from the power supply port in the back of the computer.
-
Slide the two battery locks to disconnect the battery.
-
Pull the battery (with casing) horizontally away from the computer to remove it.
-
-
Deze stap is niet vertaald. Help het te vertalen
-
Remove the RAM cover panel screws with a #1 Phillips screwdriver.
-
Then pry the RAM cover panel off with an opening tool.
-
Push the tabs that secure the RAM outward (away from the RAM) using your fingers. The RAM should then pop up.
-
Pull the RAM away from the connection to remove. Continue this process until all RAM sticks have been removed from the device.
-
-
Deze stap is niet vertaald. Help het te vertalen
-
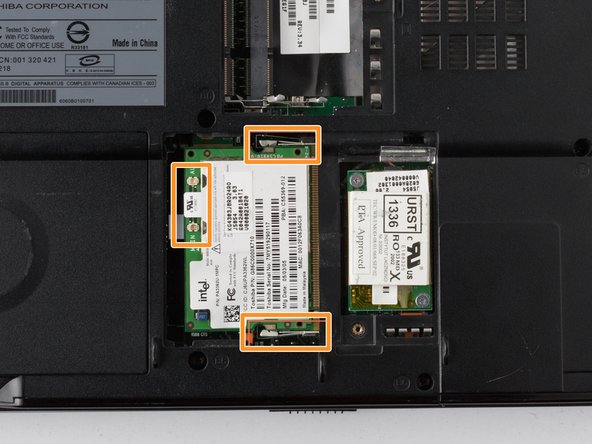
Remove the Wi-Fi panel screw with a Phillips #1 screwdriver.
-
Pry the cover panel off with an opening tool.
-
Disconnect the black and white wires. Then push the tabs outward (away from the Wi-Fi card) using your fingers. The card should then pop up.
-
Pull the Wi-Fi card out from the device at a slight angle (horizontal with the casing).
-
-
Deze stap is niet vertaald. Help het te vertalen
-
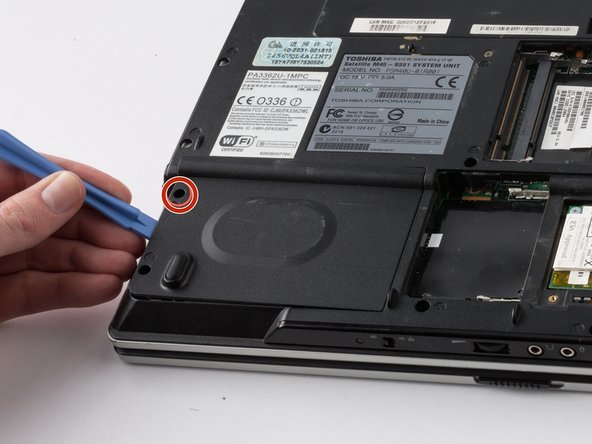
Remove the hard drive panel screw with a Phillips #1 screwdriver.
-
Use an opening tool to pry the cover off.
-
Grasp the plastic flap on the hard drive and lift the hard drive out of its slot.
-
-
-
Deze stap is niet vertaald. Help het te vertalen
-
Remove the ODD screw with a Phillips #1 screwdriver.
-
Pry the ODD drive out of its slot from the side of the casing using an opening tool.
-
Pull the drive the rest of the way out of the laptop with your hands.
-
-
Deze stap is niet vertaald. Help het te vertalen
-
Pry off the panel above each side of the keyboard using an opening tool.
-
Turn the laptop screen so that it is horizontal with the laptop base.
-
Remove the clips on the screen hinges that hold the panel. Take off the panel.
-
-
Deze stap is niet vertaald. Help het te vertalen
-
Remove the two screws on the upper outer edges of the keyboard with a Phillips #1 screwdriver.
-
Pry the upper outer edges of the keyboard from the laptop using an opening tool.
-
Lift the keyboard away from the laptop and remove the ribbon that connects the keyboard to the laptop base.
-
-
Deze stap is niet vertaald. Help het te vertalen
-
Pull the video cable near the left speaker upwards to disconnect the cable.
-
Pull the brown ribbon away from the connector located in the middle of the laptop base.
-
Pull the two other white ribbons away from the connector located near the top right half of the laptop base.
-
-
Deze stap is niet vertaald. Help het te vertalen
-
Remove all the screws using a micro-screwdriver.
-
Remove the three additional screws located in the optical drive.
-
-
Deze stap is niet vertaald. Help het te vertalen
-
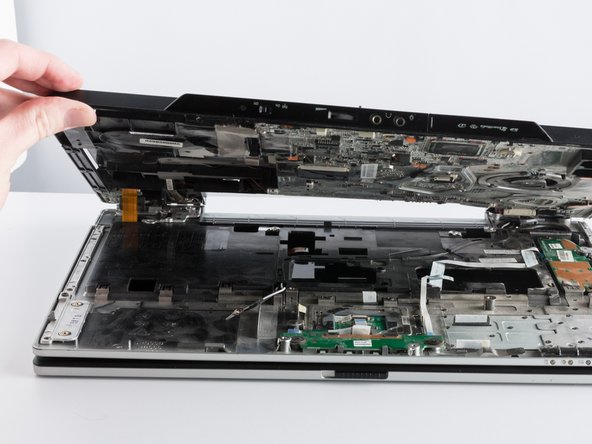
Pry the case upward using an opening tool to remove the case from the laptop base.
-
Disconnect the large white ribbon, and let the ribbon slide through the top half of the case as you lift the case away from the laptop base.
-
-
Deze stap is niet vertaald. Help het te vertalen
-
Remove the two screws located above the power button board using a Phillips #1 screwdriver.
-
Move the board slowly out of its slot using an opening tool and your index finger.
-
Pull the white ribbon upwards to disconnect the ribbon from the power button board.
-


Team

UMass Dartmouth, Team 1-3, Cichon Spring 2014 Lid van UMass Dartmouth, Team 1-3, Cichon Spring 2014
UMASSD-CICHON-S14S1G3
3 Leden
1 handleiding geschreven