Deze versie kan foutieve bewerkingen bevatten. Schakel over naar de recentste gecontroleerde momentopname.
Wat je nodig hebt
-
Deze stap is niet vertaald. Help het te vertalen
-
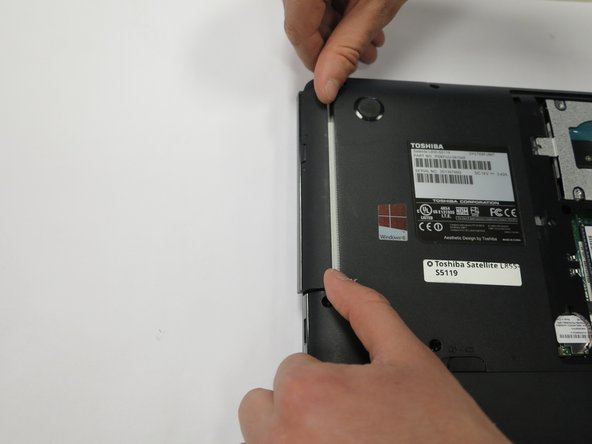
Turn the laptop over to place it top down.
-
Use a Phillips #1 screwdriver to remove the screw holding in the back plate. This screw does not come out of the plate.
-
Lift the back plate off the laptop, exposing the RAM and Hard Disk.
-
-
Deze stap is niet vertaald. Help het te vertalen
-
Turn the laptop face down to expose the back.
-
Locate the battery.
-
-
Deze stap is niet vertaald. Help het te vertalen
-
Push the latch on the right to the right to unlock the battery latch locking mechanism.
-
Push the battery latch on the left to the left to unlock the battery.
-
-
Deze stap is niet vertaald. Help het te vertalen
-
With the left battery latch pushed left, remove the battery from its port by lifting the battery from the middle of the battery.
-
The battery will come free.
-
-
Deze stap is niet vertaald. Help het te vertalen
-
Using a Phillips #0 screwdriver, remove the single 3mm screw.
-
-
-
Deze stap is niet vertaald. Help het te vertalen
-
Rotate the laptop so that you have access to the optical drive.
-
Remove the drive.
-
-
Deze stap is niet vertaald. Help het te vertalen
-
Unscrew the hard drive.
-
Carefully push the hard drive away from its port. This should not require substantial force.
-
Lift the hard drive out.
-
-
Deze stap is niet vertaald. Help het te vertalen
-
Unscrew the screws circled in red. This includes eleven 6mm screws, and one 5mm screw underneath where the optical drive was housed. All screws can be removed with a Phillips #0 screwdriver.
-
Carefully remove the back cover. The battery holder contains notches that help hold the case in place, so take care not to break those.
-
-
Deze stap is niet vertaald. Help het te vertalen
-
Remove the two 5mm screws on the fan assembly using a Phillips #0 screwdriver.
-
-
Deze stap is niet vertaald. Help het te vertalen
-
Unplug the fan's connection to the motherboard.
-
Lift the fan from the laptop.
-
Use a soft cloth to clean the dust away from where the fan was.
-
-
Deze stap is niet vertaald. Help het te vertalen
-
Remove the two screws in each speaker using the Phillips #0 Screwdriver.
-
Gently lift out the speakers out of the chassis.
-
-
Deze stap is niet vertaald. Help het te vertalen
-
Using the Phillips #0 screwdriver, remove the 3mm retention screw from the display connector.
-
Unplug and remove the display connector by pulling the connector free.
-
-
Deze stap is niet vertaald. Help het te vertalen
-
Remove the screen by removing two screws from both hinges using the #0 Phillips screwdriver.
-
Once the hinges have been unscrewed separate the screen from the body containing the motherboard.
-
-
Deze stap is niet vertaald. Help het te vertalen
-
The removed laptop screen should have the daughterboard and speakers attached to it via wires upon removal.
-


