Ga door naar hoofdinhoud

Toshiba Satellite L305D-S5900 Keyboard Replacement

Wat je nodig hebt

  1. Toshiba Satellite L305D-S5900 Keyboard Replacement, Keyboard: stap 1, afbeelding 1 van 1
    • Power off your laptop before beginning disassembly.

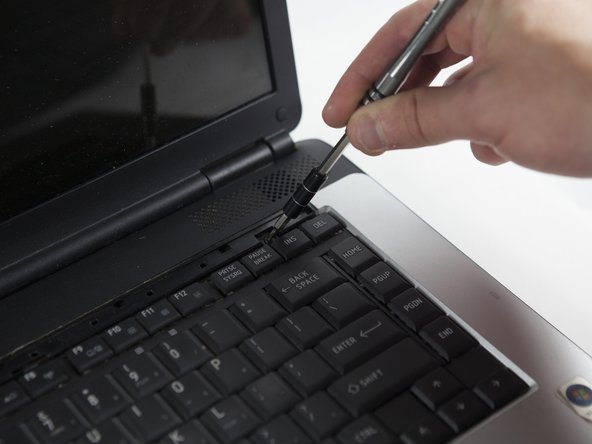
    • The plastic strip boxed in red is located above the keyboard of the computer.

  2. Toshiba Satellite L305D-S5900 Keyboard Replacement: stap 2, afbeelding 1 van 3 Toshiba Satellite L305D-S5900 Keyboard Replacement: stap 2, afbeelding 2 van 3 Toshiba Satellite L305D-S5900 Keyboard Replacement: stap 2, afbeelding 3 van 3
    • There are three points of contact boxed in red needed to release located at the far left, the far right and the middle of the plastic strip.

    • Remove the plastic strip from one far end progressively towards the other end using a metal spludger.

  3. Toshiba Satellite L305D-S5900 Keyboard Replacement: stap 3, afbeelding 1 van 2 Toshiba Satellite L305D-S5900 Keyboard Replacement: stap 3, afbeelding 2 van 2
    • Remove the two 5.3 mm Phillips #1 screws that are beneath the strip.

    • The screws located at the far left and far right when the plastic strip is removed.

  4. Toshiba Satellite L305D-S5900 Keyboard Replacement: stap 4, afbeelding 1 van 2 Toshiba Satellite L305D-S5900 Keyboard Replacement: stap 4, afbeelding 2 van 2
    • Use the metal spludger to push the keyboard in the direction of the track pad and then lift the keyboard up.

    • Be careful not to pull too fast as there is still another cable attaching the keyboard.

  5. Toshiba Satellite L305D-S5900 Keyboard Replacement: stap 5, afbeelding 1 van 3 Toshiba Satellite L305D-S5900 Keyboard Replacement: stap 5, afbeelding 2 van 3 Toshiba Satellite L305D-S5900 Keyboard Replacement: stap 5, afbeelding 3 van 3
    • There are two tab boxed in red is located at each side of the ZIF (zero insertion force) connector.

    • Use a metal spludger to push the tab upward in order to release the cable ribbon.

    • Carefully pull out the ribbon cable from the ZIF (zero insertion force) connector.

Conclusie

To reassemble your device, follow these instructions in reverse order.

Sing Yang Cheng

Lid sinds: 10/20/16

501 Reputatie

5 handleidingen geschreven

Team

UMass Dartmouth, Team 3-6, Isaacson Fall 2016 Lid van UMass Dartmouth, Team 3-6, Isaacson Fall 2016

UMASSD-ISAACSON-F16S3G6

2 Leden

10 handleidingen geschreven

0 opmerkingen

Voeg opmerking toe

Weergavestatistieken:

Afgelopen 24 uren: 0

Afgelopen 7 dagen: 0

Afgelopen 30 dagen: 2

Altijd: 324