Ga door naar hoofdinhoud

Toshiba Satellite C55-A5310 Fan Replacement

Wat je nodig hebt

  1. Toshiba Satellite C55-A5310 Fan Replacement, Battery: stap 1, afbeelding 1 van 3 Toshiba Satellite C55-A5310 Fan Replacement, Battery: stap 1, afbeelding 2 van 3 Toshiba Satellite C55-A5310 Fan Replacement, Battery: stap 1, afbeelding 3 van 3
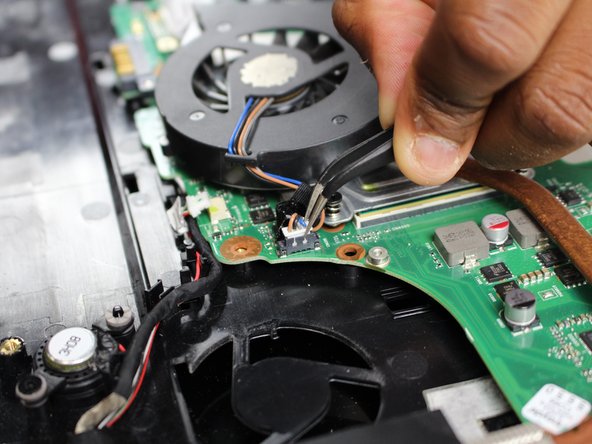
    • Push the left tab with your left hand.

    • Then push the right tab with your right hand.

    • While your right hand is still pushing, remove the battery with your left hand.

  2. Toshiba Satellite C55-A5310 Fan Replacement, Optical Drive: stap 2, afbeelding 1 van 2 Toshiba Satellite C55-A5310 Fan Replacement, Optical Drive: stap 2, afbeelding 2 van 2
    • Remove one screw with a JIS #000 screwdriver.

    • This screw does not come completely out, but you will still be able to get the panel off.

  3. Toshiba Satellite C55-A5310 Fan Replacement: stap 3, afbeelding 1 van 1
    • Use the plastic opening tool to pry open the back panel. Make sure to loosen all four sides then lift up.

  4. Toshiba Satellite C55-A5310 Fan Replacement: stap 4, afbeelding 1 van 2 Toshiba Satellite C55-A5310 Fan Replacement: stap 4, afbeelding 2 van 2
    • Remove a .5mm screw with a JIS #000 screwdriver.

  5. Toshiba Satellite C55-A5310 Fan Replacement: stap 5, afbeelding 1 van 2 Toshiba Satellite C55-A5310 Fan Replacement: stap 5, afbeelding 2 van 2
    • Using a plastic opening tool, pry open the disk drive. Once it has loosened it will pull out.

  6. Toshiba Satellite C55-A5310 Fan Replacement, Fan: stap 6, afbeelding 1 van 2 Toshiba Satellite C55-A5310 Fan Replacement, Fan: stap 6, afbeelding 2 van 2
    • Take a nylon spudger and push the prongs so that it releases the RAM.

  7. Toshiba Satellite C55-A5310 Fan Replacement: stap 7, afbeelding 1 van 1
    • Once the RAM has lifted, use tweezers or fingers to pull it out.

  8. Toshiba Satellite C55-A5310 Fan Replacement: stap 8, afbeelding 1 van 2 Toshiba Satellite C55-A5310 Fan Replacement: stap 8, afbeelding 2 van 2
    • Remove the single .5mm JIS #000 screw.

  9. Toshiba Satellite C55-A5310 Fan Replacement: stap 9, afbeelding 1 van 1
    • Use the plastic opening tool to remove the keyboard from the laptop.

  10. Toshiba Satellite C55-A5310 Fan Replacement: stap 10, afbeelding 1 van 2 Toshiba Satellite C55-A5310 Fan Replacement: stap 10, afbeelding 2 van 2
    • Once the keyboard is popped out, use a spudger to undo the ribbon or flap that attaches the back of the keyboard to the inside base of the laptop.

  11. Toshiba Satellite C55-A5310 Fan Replacement: stap 11, afbeelding 1 van 1
    • Remove thirteen JIS #000 11mm screws.

  12. Toshiba Satellite C55-A5310 Fan Replacement: stap 12, afbeelding 1 van 2 Toshiba Satellite C55-A5310 Fan Replacement: stap 12, afbeelding 2 van 2
    • Use a nylon spudger tool to lift up on all sides.

    • Once the panel has been loosened it will pop off.

  13. Toshiba Satellite C55-A5310 Fan Replacement: stap 13, afbeelding 1 van 1
    • Remove five 11mm JIS #000 screws.

  14. Toshiba Satellite C55-A5310 Fan Replacement: stap 14, afbeelding 1 van 3 Toshiba Satellite C55-A5310 Fan Replacement: stap 14, afbeelding 2 van 3 Toshiba Satellite C55-A5310 Fan Replacement: stap 14, afbeelding 3 van 3
    • Remove the four wires with tweezers.

    • Remove wires gently to avoid damaging them.

  15. Toshiba Satellite C55-A5310 Fan Replacement: stap 15, afbeelding 1 van 1
    • Lift from corresponding sides of the fan and it'll pop right out.

Conclusie

To reassemble your device, follow these instructions in reverse order.

Robin

Lid sinds: 02/08/18

181 Reputatie

1 Handleiding geschreven

Team

0 opmerkingen

Voeg opmerking toe

Weergavestatistieken:

Afgelopen 24 uren: 1

Afgelopen 7 dagen: 1

Afgelopen 30 dagen: 2

Altijd: 542