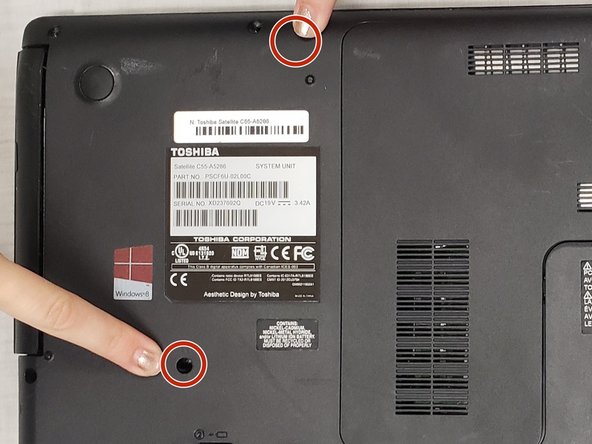
Ga door naar hoofdinhoud

Toshiba Satellite C55-A5286 Optical Drive Replacement

Wat je nodig hebt

  1. Toshiba Satellite C55-A5286 Optical Drive Replacement, Optical Drive: stap 1, afbeelding 1 van 1
    • Unplug the AC adapter and all other auxiliary components from the laptop

  2. Toshiba Satellite C55-A5286 Optical Drive Replacement: stap 2, afbeelding 1 van 2 Toshiba Satellite C55-A5286 Optical Drive Replacement: stap 2, afbeelding 2 van 2
    • Unscrew the only screw (5 mm) that is holding on the removable back panel and remove the back panel.

  3. Toshiba Satellite C55-A5286 Optical Drive Replacement: stap 3, afbeelding 1 van 1
    • Remove the two 5-mm screws near the disk drive on the back panel. These two screws are above and below the manufacturer’s sticker.

  4. Toshiba Satellite C55-A5286 Optical Drive Replacement: stap 4, afbeelding 1 van 1
    • Under the back panel, remove the 4-mm screw holding the disk drive in place.

  5. Toshiba Satellite C55-A5286 Optical Drive Replacement: stap 5, afbeelding 1 van 2 Toshiba Satellite C55-A5286 Optical Drive Replacement: stap 5, afbeelding 2 van 2
    • Carefully slide the optical drive out of its place in the laptop.

Conclusie

To reassemble your device, follow these instructions in reverse order.

2 andere personen hebben deze handleiding voltooid.

Nicole Zellers

Lid sinds: 11/06/18

265 Reputatie

2 handleidingen geschreven

Team

IUPUI, Team S1-G5, Hovde Fall 2018 Lid van IUPUI, Team S1-G5, Hovde Fall 2018

IUPUI-HOVDE-F18S1G5

2 Leden

9 handleidingen geschreven

Één opmerking

Not a medium effort at all - very easy.

…although, I did have to use an iFixt It needle-nose tweezer to pull the middle 5mm screw out after it was unscrewed - it would not fall out nor did it cling to the screwdriver.

William Totman - Antwoord

Voeg opmerking toe

Weergavestatistieken:

Afgelopen 24 uren: 0

Afgelopen 7 dagen: 0

Afgelopen 30 dagen: 5

Altijd: 283