Ga door naar hoofdinhoud

Toshiba Satellite A210 Motherboard Replacement

Wat je nodig hebt

  1. Toshiba Satellite A210 Motherboard Replacement, Battery: stap 1, afbeelding 1 van 2 Toshiba Satellite A210 Motherboard Replacement, Battery: stap 1, afbeelding 2 van 2
    • Unplug the AC adapter and all other auxiliary components from the laptop.

    • Slide the battery lock tab away from the center of the laptop to unlock the battery.

  2. Toshiba Satellite A210 Motherboard Replacement: stap 2, afbeelding 1 van 2 Toshiba Satellite A210 Motherboard Replacement: stap 2, afbeelding 2 van 2
    • Slide the battery release tab away from the center of the laptop and hold it.

    • Lifting from the small notch between the two tabs, pull the battery out of the laptop.

  3. Toshiba Satellite A210 Motherboard Replacement, RAM: stap 3, afbeelding 1 van 2 Toshiba Satellite A210 Motherboard Replacement, RAM: stap 3, afbeelding 2 van 2
    • Remove the screw holding the RAM cover with a PH1 screwdriver.

    • Remove the RAM cover.

  4. Toshiba Satellite A210 Motherboard Replacement: stap 4, afbeelding 1 van 3 Toshiba Satellite A210 Motherboard Replacement: stap 4, afbeelding 2 van 3 Toshiba Satellite A210 Motherboard Replacement: stap 4, afbeelding 3 van 3
    • Push outwards on the metal tabs to release the RAM.

    • Remove the RAM. Some force may be needed.

    • Be careful not to touch the gold pins on the RAM chips as there may be a build-up of static electricity. This can fry the parts of the chip that houses memory.

  5. Toshiba Satellite A210 Motherboard Replacement, Optical Disc Drive: stap 5, afbeelding 1 van 3 Toshiba Satellite A210 Motherboard Replacement, Optical Disc Drive: stap 5, afbeelding 2 van 3 Toshiba Satellite A210 Motherboard Replacement, Optical Disc Drive: stap 5, afbeelding 3 van 3
    • Use a PH0 screwdriver to remove the screw holding the optical drive in place.

    • Using your index finger, push the metal tab inside the RAM bay which is located directly underneath the screw-hole.

    • The optical drive will then slide out.

  6. Toshiba Satellite A210 Motherboard Replacement, Keyboard: stap 6, afbeelding 1 van 1
    • Unscrew the 4 highlighted screws with a PH1 screwdriver.

  7. Toshiba Satellite A210 Motherboard Replacement: stap 7, afbeelding 1 van 3 Toshiba Satellite A210 Motherboard Replacement: stap 7, afbeelding 2 van 3 Toshiba Satellite A210 Motherboard Replacement: stap 7, afbeelding 3 van 3
    • Orient the laptop so that the screen is open and facing you.

    • Slide the plastic opening tool underneath the top edge of the black plastic insert.

    • Pull it off and set aside.

  8. Toshiba Satellite A210 Motherboard Replacement: stap 8, afbeelding 1 van 2 Toshiba Satellite A210 Motherboard Replacement: stap 8, afbeelding 2 van 2
    • Remove the 2 PH1 screws.

    • Lift the keyboard from the top being carful not to remove it fully. There is still a ribbon cable that connects the keyboard to the laptop.

  9. Toshiba Satellite A210 Motherboard Replacement: stap 9, afbeelding 1 van 1
    • Disconnect the keyboard ribbon cable and remove the keyboard from the laptop.

  10. Toshiba Satellite A210 Motherboard Replacement, Fan: stap 10, afbeelding 1 van 1
    • Close the laptop and flip it over.

    • Unscrew the 11 yellow circled screws with a PH1 screwdriver. These screws are larger in size.

    • Unscrew the 2 red and yellow circled screws with a PH1 screwdriver. These screws are shorter and thicker than the previous.

    • Unscrew the 1 green and yellow circled screw with a PH1 screwdriver. This screw is longer and thinner than the previous.

  11. Toshiba Satellite A210 Motherboard Replacement: stap 11, afbeelding 1 van 3 Toshiba Satellite A210 Motherboard Replacement: stap 11, afbeelding 2 van 3 Toshiba Satellite A210 Motherboard Replacement: stap 11, afbeelding 3 van 3
    • Flip the laptop over and open it so that the screen is facing you.

    • Locate the hinges on either side of the screen, which secure the display to the body of the laptop.

    • Unscrew the 2 screws in each hinge with a PH1 screwdriver.

    • The display is no longer connected to the laptop and could fall. Be careful not to drop it during the next steps.

  12. Toshiba Satellite A210 Motherboard Replacement: stap 12, afbeelding 1 van 3 Toshiba Satellite A210 Motherboard Replacement: stap 12, afbeelding 2 van 3 Toshiba Satellite A210 Motherboard Replacement: stap 12, afbeelding 3 van 3
    • Unfasten the connectors from the highlighted locations.

    • Disconnect by gently pulling on the fasteners which connect the wires to the laptop.

    • Pulling directly on the wires could cause permanent damage to the connectors or the wires themselves.

    • Unscrew the screw indicated by the yellow circle.

  13. Toshiba Satellite A210 Motherboard Replacement: stap 13, afbeelding 1 van 2 Toshiba Satellite A210 Motherboard Replacement: stap 13, afbeelding 2 van 2
    • Slide the plastic opening tool underneath the edges of the upper casing, which is shown in the images.

  14. Toshiba Satellite A210 Motherboard Replacement: stap 14, afbeelding 1 van 1
    • The LCD screen can now be removed from the laptop.

    • Lift the upper plastic casing and remove it from the lower half of the laptop.

  15. Toshiba Satellite A210 Motherboard Replacement: stap 15, afbeelding 1 van 3 Toshiba Satellite A210 Motherboard Replacement: stap 15, afbeelding 2 van 3 Toshiba Satellite A210 Motherboard Replacement: stap 15, afbeelding 3 van 3
    • Unfasten the two connections shown.

    • Unscrew the two screws securing the fan to the laptop. Use a PH1 for the screw that is adjacent to the speaker and a PH0 for the other screw.

    • Lift up the fan and pull the black plastic tab away from the fan housing. Remove the fan.

    • Do not remove the metal fan housing. It is taped to a metal heat-sink and should not be removed.

  16. Toshiba Satellite A210 Motherboard Replacement, Motherboard: stap 16, afbeelding 1 van 1
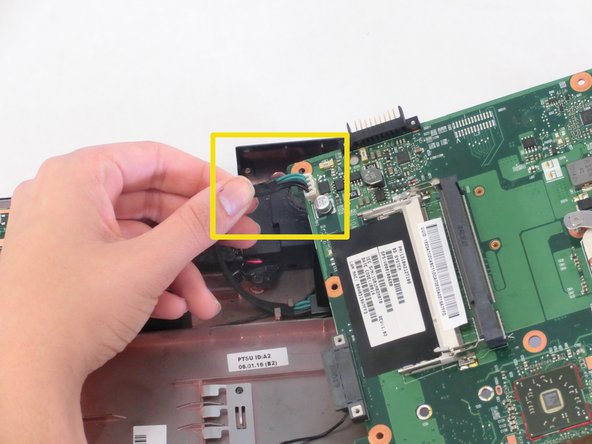
    • First, remove the one screw with a PH1 screwdriver.

    • Next, remove the black connector marked by the yellow box.

  17. Toshiba Satellite A210 Motherboard Replacement: stap 17, afbeelding 1 van 2 Toshiba Satellite A210 Motherboard Replacement: stap 17, afbeelding 2 van 2
    • Gently pull the the small white ribbon cable from its housing on the motherboard.

    • Locate and unfasten the small white clip from the motherboard near the bottom right.

  18. Toshiba Satellite A210 Motherboard Replacement: stap 18, afbeelding 1 van 3 Toshiba Satellite A210 Motherboard Replacement: stap 18, afbeelding 2 van 3 Toshiba Satellite A210 Motherboard Replacement: stap 18, afbeelding 3 van 3
    • Disconnect the two white fasteners that connect the speakers to the motherboard.

  19. Toshiba Satellite A210 Motherboard Replacement: stap 19, afbeelding 1 van 3 Toshiba Satellite A210 Motherboard Replacement: stap 19, afbeelding 2 van 3 Toshiba Satellite A210 Motherboard Replacement: stap 19, afbeelding 3 van 3
    • Gently slide the plastic opening tool underneath and around the motherboard.

    • Do not force the motherboard out. If the motherboard breaks, it is not repairable. You will have to buy a new one.

    • After the motherboard is free of the plastic casing, do not pull it all the way out. There is still a connector on the underside of it.

    • Remove the connector on the underside using your fingers.

Conclusie

To reassemble your device, follow these instructions in reverse order.

8 andere personen hebben deze handleiding voltooid.

Devin

Lid sinds: 04/11/13

57 Reputatie

3 handleidingen geschreven

Team

Cal Poly, Team 17-5, Regan Spring 2013 Lid van Cal Poly, Team 17-5, Regan Spring 2013

CPSU-REGAN-S13S17G5

4 Leden

18 handleidingen geschreven

0 opmerkingen

Voeg opmerking toe

Weergavestatistieken:

Afgelopen 24 uren: 0

Afgelopen 7 dagen: 3

Afgelopen 30 dagen: 23

Altijd: 7,837