Ga door naar hoofdinhoud

Toshiba Dynabook T552-58G Fan Replacement

Wat je nodig hebt

  1. Toshiba Dynabook T552-58G Fan Replacement, Back Panel: stap 1, afbeelding 1 van 1
    • Turn the Toshiba Dynabook T552-58G so that the back panel is facing you.

  2. Toshiba Dynabook T552-58G Fan Replacement: stap 2, afbeelding 1 van 2 Toshiba Dynabook T552-58G Fan Replacement: stap 2, afbeelding 2 van 2
    • Remove the 10 screws located on the back panel of the Toshiba Dynabook T552-58G using a PH 0 screwdriver.

    • Each screw will be 5.3 mm long.

  3. Toshiba Dynabook T552-58G Fan Replacement: stap 3, afbeelding 1 van 3 Toshiba Dynabook T552-58G Fan Replacement: stap 3, afbeelding 2 van 3 Toshiba Dynabook T552-58G Fan Replacement: stap 3, afbeelding 3 van 3
    • Remove the black screw using the J0 screwdriver. This is located by the top right foot of the device.

    • This will allow removal of the hard drive cover.

    • This screw will not come out of the hard drive cover.

  4. Toshiba Dynabook T552-58G Fan Replacement: stap 4, afbeelding 1 van 1
    • Remove the single screw located below the hard drive using the J0 screwdriver. This screw is 5.3 mm long.

  5. Toshiba Dynabook T552-58G Fan Replacement: stap 5, afbeelding 1 van 3 Toshiba Dynabook T552-58G Fan Replacement: stap 5, afbeelding 2 van 3 Toshiba Dynabook T552-58G Fan Replacement: stap 5, afbeelding 3 van 3
    • Remove two screws located diagonally from the bottom-left screw of the hard drive using a J0 screwdriver. The screw closest to the hard drive is 5.2 mm long and the screw farther away is 4.2 mm long.

    • Remove the screw located diagonally from the top right screw of the hard drive using a J0 screwdriver. This screw is 5.2 mm long.

  6. Toshiba Dynabook T552-58G Fan Replacement: stap 6, afbeelding 1 van 3 Toshiba Dynabook T552-58G Fan Replacement: stap 6, afbeelding 2 van 3 Toshiba Dynabook T552-58G Fan Replacement: stap 6, afbeelding 3 van 3
    • Slowly lift the back panel away from the computer.

    • There should be some resistance.

    • Once lifted, carefully remove the back panel.

  7. Toshiba Dynabook T552-58G Fan Replacement, Fan: stap 7, afbeelding 1 van 1
    • After removing the back panel, locate the fan in the bottom right corner.

    • Make sure computer is turned off and unplugged.

  8. Toshiba Dynabook T552-58G Fan Replacement: stap 8, afbeelding 1 van 1
    • Remove the two screws located on the top left and bottom right of the fan. You should use a PH 0 screwdriver.

    • Both screws are 2.7 mm long.

  9. Toshiba Dynabook T552-58G Fan Replacement: stap 9, afbeelding 1 van 2 Toshiba Dynabook T552-58G Fan Replacement: stap 9, afbeelding 2 van 2
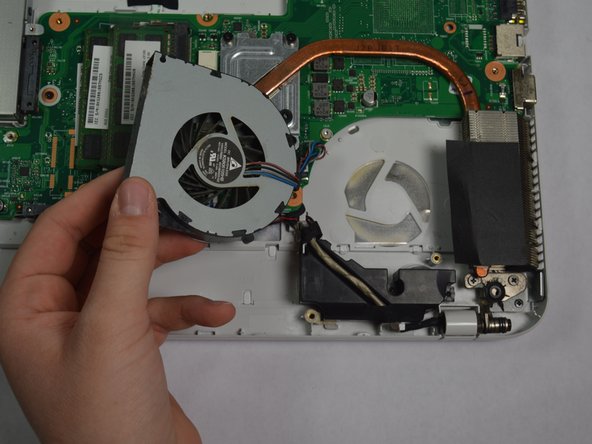
    • Gently lift the fan away from the base. There should be three wires that are connected to the base of the computer through a port.

  10. Toshiba Dynabook T552-58G Fan Replacement: stap 10, afbeelding 1 van 1
    • With your fingers, carefully pinch the white connector and pull up.

    • There will be some resistance.

  11. Toshiba Dynabook T552-58G Fan Replacement: stap 11, afbeelding 1 van 1
    • Remove the faulty fan.

Conclusie

To reassemble your device, follow these instructions in reverse order.

0 opmerkingen

Voeg opmerking toe

Weergavestatistieken:

Afgelopen 24 uren: 0

Afgelopen 7 dagen: 3

Afgelopen 30 dagen: 14

Altijd: 658