Inleiding
I couldn't find a guide to do this online, so I took notes while I figured it out myself. This guide probably also applies to other eReaders by Tolino, the Kobo Libra 2, and other Kobo eReaders. I only tested It with the Tolino Vision 6 on firmware version 16.1.0, so your mileage may vary (especially with the storage-increase part of the guide)
Wat je nodig hebt
-
-
Turn the eReader off by holding the power button on the back and selecting the appropriate option in the menu.
-
Lift the back panel upwards with a thin metal tool like the iFixit Jimmy or a flimsy butter knife.
-
Be careful around the area where the PCB resides so you don't damage it.
-
It's a bit tricky to start, but it becomes easier once you get it partly lifted.
-
-
-
Now that you have the device open comes the hardest part.
-
The SD Card is fixed in place inside the slot with double-sided tape on both sides.
-
You can approach this however you want, just make sure to take your time and not use excessive force.
-
I first wiggled it with my fingers a bit back and forth in the slot.
-
After that, I used a credit card to apply even pressure onto the raised section of the card away from the slot.
-
It also can be helpful to temporarily remove the screw on the bottom left of the card.
-
-
-
Now you need to create a Backup of the SD Card. You can use whatever software you like.
-
In the Screenshot, I'm using the built-in disk management of Linux Mint.
-
On Windows, you can use Programs like Win32DiskImager.
-
-
-
Now you do just the same thing "in reverse" with the new SD card.
-
Most programs that can create disk images also can write them. And the buttons are often right next to each other. You'll figure it out.
-
-
-
If all you wanted to do was to replace the internal storage, the story ends here. You wake up in your bed with a repaired device
and believe whatever you want to believe. -
If you continue, you stay in Wonderland, and I show you how
deep the rabbit hole goesto make the internal storage of your eReader bigger.
-
-
-
Increasing the internal storage of your eReader is the same as replacing it up to this point.
-
The rest of this guide is only relevant if you use an SD card with more capacity than the original one.
-
I also strongly recommend Linux for this. I used Linux Mint, but any modern distro will work.
-
You might be able to do this with some homebrew tools on macOS or WSL on Windows, but I haven't tested that.
-
-
-
-
The first step is to increase the size of the main data-partition to fill out the empty space at the end of the partition table.
-
Luckily the partition in question is at the end of the table.
-
If you haven't installed them on your system, install f2fs-tools version >= 1.15 and gdisk.
-
-
-
Open gdisk to edit the partition:
gdisk /dev/sdXwhere /dev/sdX is the USB device file. In my case, it's either sdb or sdc. -
Sort the Partitions by Typing
s -
List all Partitions by Typing
p
-
-
-
The partition you want to resize is called UDISK. Find its Partition number in the list from step two.
-
type
iand enter the Partition number for our partition when prompted. (15 in this case) -
Copy-paste the output of that somewhere save. You'll need it later.
-
As you can see, the entry Last sector has the value 31075328 (at 14.8 GiB) because that's where the old SD card ended.
-
-
-
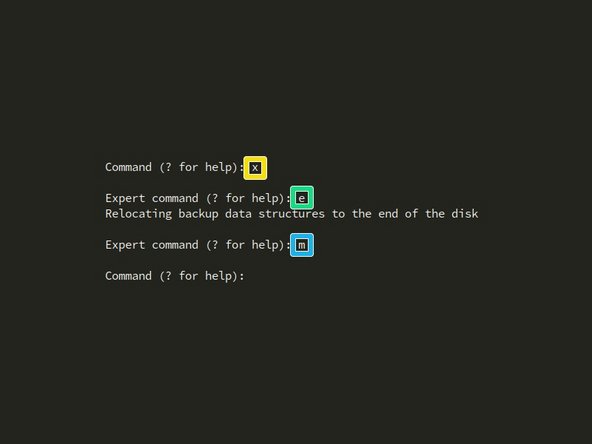
Now you have to fix an issue that is caused by copying the entirety of a small SD card onto a large one.
-
By pressing
vyou can verify the partition table on the SD card. It'll come up with one problem and one warning. -
We can safely ignore the warning but have to deal with the problem.
-
To do that you press
xto get into expert mode. -
In expert mode, you can press
eto apply the fix. -
Afterward, you press
mto get back to the main menu.
-
-
-
Now that this is over, you can finally resize the partition. For this, we'll delete the existing partition and create a bigger one at the same location.
-
Enter
dto delete the partition. In this screenshot, it's number 1, in a previous one it was number 15. It might be a different one for you, make sure you get the correct one. -
Enter
nto create a new partition. -
After entering
dyou'll be asked a bunch of questions. -
The Partition number, First sector, and Hex code or GUID have to be the same as in the output you copy-pasted previously. Normally the default value for the First sector should be correct, but it doesn't hurt to double-check.
-
The default value for the Last sector will extend the partition over the remaining disk space. That's what you want, so just press enter to accept the default.
-
-
-
Now we have to rename the new partition to the correct name.
-
Press
cto enter renaming mode. -
Enter the Partition number. Again: It might not be 1 for you.
-
Enter the name UDISK without any quotation marks.
-
Enter
iand the Partition number. In that output, everything except Partition unique GUID, Last sector, and Partition size should be the same as in the copy-pasted info now.
-
-
-
Before you can wrap up the partition size increase you have to set the old Partition unique GUID again.
-
To do that you press
xto get into expert mode. -
In expert mode, you can enter
cto change the GUID. It'll ask you again for the partition number. -
After that, you can copy-paste in the GUID from the text you copy-pasted at the beginning.
-
When you're done, leave expert mode by pressing
m.
-
-
-
Now you can check your work one last time before making it permanent.
-
Enter
iand the Partition number. In that output, everything except Last sector and Partition size should be the same as in the copy-pasted info now.
-
-
-
If everything is correct, you can now write the changes to the SD card.
-
enter
wto save the changes. -
The program will ask you if you're sure, enter
Yto proceed.
-
-
-
After you increase the partition size, you also have to increase the size of the file system on that partition. Don't worry, this is pretty quick in comparison to the other stuff I made you do.
-
Enter
resize.f2fs /dev/sdXYwhere /dev/sdXY is the Partition file. In my case it was /dev/sdb15 -
If everything goes correctly, the command finishes pretty quickly.
-
If you get
Mount unclean image to replay log firstthat means the partition wasn't unmounted correctly. Just mount and immediately unmount it in your OS and try again. -
If you get
Error: Device size is not sufficient for F2FS volume, more segment neededyou might be using an old version of f2fs-tools. There's a bug that has been fixed with version 1.15. That's what happened on my machine, and is also the reason why the console looks different in this screenshot.
-
-
-
Now's the time you'll find out if you did everything correctly.
-
Put the SD card into the eReader and press and hold the Power button on the back until the notification LED lights up or starts blinking.
-
Give it a few seconds to boot up.
-
After it's booted up, you can check out the newly acquired storage on the device.
-


To reassemble your device, plop the back panel back on and you're done.
To reassemble your device, plop the back panel back on and you're done.
Annuleren: ik heb deze handleiding niet afgemaakt.
Één andere persoon heeft deze handleiding voltooid.
