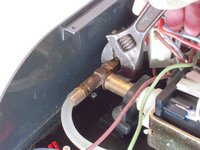
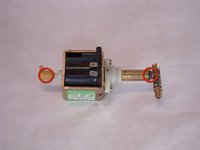
Ga door naar hoofdinhoud

Starbucks Barista Pump Replacement

Wat je nodig hebt

  1. Starbucks Barista Pump Replacement, Pump: stap 1, afbeelding 1 van 3 Starbucks Barista Pump Replacement, Pump: stap 1, afbeelding 2 van 3 Starbucks Barista Pump Replacement, Pump: stap 1, afbeelding 3 van 3
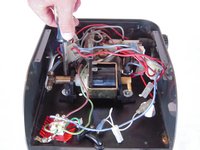
    • First remove all six screws on the back panel.

    • Remove the back panel, then set it aside.

    • Remove the two screws holding the bottom panel in place.

    • Remove the bottom panel, then set it aside.

  2. Starbucks Barista Pump Replacement: stap 2, afbeelding 1 van 3 Starbucks Barista Pump Replacement: stap 2, afbeelding 2 van 3 Starbucks Barista Pump Replacement: stap 2, afbeelding 3 van 3
    • Pull the drip tray out, then set it aside.

    • Turn the brew unit clockwise to unscrew.

    • Pull the tube that goes into water reservoir out.

    • Slide the water reservoir out through the front of the barista to remove it.

    • Remove the top tray from the backside.

  3. Starbucks Barista Pump Replacement: stap 3, afbeelding 1 van 3 Starbucks Barista Pump Replacement: stap 3, afbeelding 2 van 3 Starbucks Barista Pump Replacement: stap 3, afbeelding 3 van 3
    • Use an adjustable wrench to unscrew the connection tube between the pump and the boiler.

    • Pull off both tubes connecting on each side of the pump.

    • Remove the 3 electrical connectors from the pump.

  4. Starbucks Barista Pump Replacement: stap 4, afbeelding 1 van 3 Starbucks Barista Pump Replacement: stap 4, afbeelding 2 van 3 Starbucks Barista Pump Replacement: stap 4, afbeelding 3 van 3
    • Unscrew the two mounting bolts.

    • Remove the pump unit from the Barista.

    • Pull off the yellow end of the pump and unscrew T-shaped end.

    • See the links section of the device page for where to purchase a new pump.

Conclusie

To reassemble your device, follow these instructions in reverse order.

15 andere personen hebben deze handleiding voltooid.

Alex

Lid sinds: 01/28/11

491 Reputatie

1 Handleiding geschreven

Team

Cal Poly, Team 4-42, Regan Winter 2011 Lid van Cal Poly, Team 4-42, Regan Winter 2011

CPSU-REGAN-W11S4G42

4 Leden

5 handleidingen geschreven

16 opmerkingen

What is meant by "See the links section of the device page for where to purchase a new pump"? Which device page on which website? Are you not able to just post the link? Which type/model of pump is required?

nick - Antwoord

My son and I successfully replaced the pump, but it didn't go quite as easily as I'd thought. We could not get the hose that connects the boiler to the pump off. Thankfully, my clever son realized we could turn the portion of the pump that screws into the t-end to get the old pump off and new one on.....tricky, but doable. The new pump is a bit noisier than the last, but she pulls beautiful shots. Thanks so much for this guide!

Bananaslug - Antwoord

I put in a new pump and it still doesn’t work. I hear it him but can’t get it to pull water. I’ve tried the water in the line thing. How is the best way to prime it? Maybe that’s it?

wendy.tracy007 -

Does anyone know the purpose of the hose that goes toward the back? not the one to the boiler but the other one that goes backward and down from the t-connector? it doesn't seem to be moving any water but the unit seems to work fine.

Michael2020 - Antwoord

That's a return line I believe. So if there is water left it can drain back to the reservoir.

Chris Slater -

Voeg opmerking toe

Weergavestatistieken:

Afgelopen 24 uren: 3

Afgelopen 7 dagen: 15

Afgelopen 30 dagen: 77

Altijd: 36,427