Ga door naar hoofdinhoud

Stapler Spring Replacement

Wat je nodig hebt

  1. Stapler Spring Replacement, Spring: stap 1, afbeelding 1 van 2 Stapler Spring Replacement, Spring: stap 1, afbeelding 2 van 2
    • Open the stapler by gripping the handle to access the spring.

  2. Stapler Spring Replacement: stap 2, afbeelding 1 van 1
    Gereedschap gebruikt in deze stap:
    Tweezers
    $4.99
    Koop
    • Pry open the hook found on the pusher using the tweezers.

    • Hold the handle firmly to prevent the stapler from snapping back.

  3. Stapler Spring Replacement: stap 3, afbeelding 1 van 1
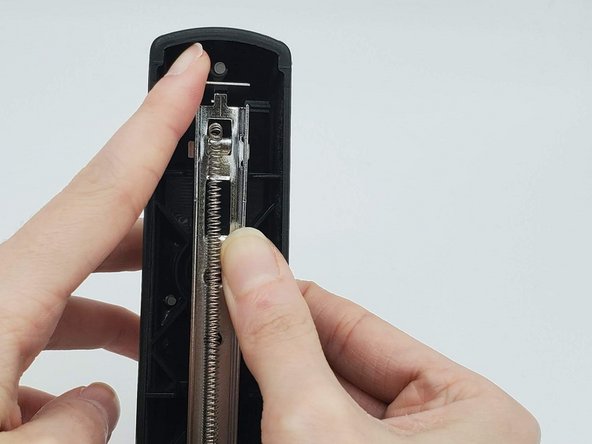
    • Unhook the end of the spring from the pusher.

    • Pinch the spring firmly between your fingers to keep it from snapping back.

  4. Stapler Spring Replacement: stap 4, afbeelding 1 van 2 Stapler Spring Replacement: stap 4, afbeelding 2 van 2
    • Unhook the other end of the spring from the inside of the handle.

    • The spring should be unthreaded from the holes on the handle's metal part.

  5. Stapler Spring Replacement: stap 5, afbeelding 1 van 2 Stapler Spring Replacement: stap 5, afbeelding 2 van 2
    • Press down on the metal part inside the handle with your thumbs until it will not go down anymore.

  6. Stapler Spring Replacement: stap 6, afbeelding 1 van 2 Stapler Spring Replacement: stap 6, afbeelding 2 van 2
    • Push the hammer, the rectangular piece, up and away from the metal part.

  7. Stapler Spring Replacement: stap 7, afbeelding 1 van 1
    • Release the metal part inside the handle so it comes away from the hammer.

    • Keep hold of the metal part to keep it from snapping closed.

  8. Stapler Spring Replacement: stap 8, afbeelding 1 van 1
    • Hook one end of the new spring onto the pusher's hook.

  9. Stapler Spring Replacement: stap 9, afbeelding 1 van 1
    • Clamp the pusher's hook closed using your thumb.

  10. Stapler Spring Replacement: stap 10, afbeelding 1 van 1
    • Thread the other end of the new spring through the top rectangular hole toward the back.

  11. Stapler Spring Replacement: stap 11, afbeelding 1 van 1
    • Thread the new spring through the bottom hole, bringing the end of spring toward you.

    • The spring should create a loop when done threading.

  12. Stapler Spring Replacement: stap 12, afbeelding 1 van 2 Stapler Spring Replacement: stap 12, afbeelding 2 van 2
    • Hook the new spring to the hook on the inside of the handle's metal part.

  13. Stapler Spring Replacement: stap 13, afbeelding 1 van 2 Stapler Spring Replacement: stap 13, afbeelding 2 van 2
    • Press the metal part down with your thumbs until it aligns with the hammer's hole.

  14. Stapler Spring Replacement: stap 14, afbeelding 1 van 2 Stapler Spring Replacement: stap 14, afbeelding 2 van 2
    • Reattach the hammer back onto the metal part.

  15. Stapler Spring Replacement: stap 15, afbeelding 1 van 2 Stapler Spring Replacement: stap 15, afbeelding 2 van 2
    • Close the handle until it clicks back into place.

    • Be careful not to staple your fingers when closing the stapler.

Conclusie

To reassemble your device, follow these instructions in reverse order.

11 andere personen hebben deze handleiding voltooid.

9 opmerkingen

Just what I needed. Thank you! Super clear

Daniela Labra - Antwoord

Can I replace the black rubber piece that goes on my swingling desk top stapler 70 sheet it came off and my dog chewed it up.

Edith Corkell - Antwoord

fron this sale ski o donde venden los repuestos de esta engrapadora en Venezuela gran caracas

Romulo -

Ihr Artikel war sehr leicht zu verstehen und ich habe es geschafft, vielen Dank gacha life!

Lily Collins - Antwoord

Voeg opmerking toe

Weergavestatistieken:

Afgelopen 24 uren: 149

Afgelopen 7 dagen: 1,367

Afgelopen 30 dagen: 5,941

Altijd: 161,901