Ga door naar hoofdinhoud

Sony Xperia Z1 Compact Motherboard Replacement

Wat je nodig hebt

  1. Sony Xperia Z1 Compact Motherboard Replacement, Back Cover: stap 1, afbeelding 1 van 1
    • Heat along the edges of the back cover using a heat gun to soften the glue.

  2. Sony Xperia Z1 Compact Motherboard Replacement: stap 2, afbeelding 1 van 1
    • Attach the small suction cup to the back cover near the bottom of the phone.

    • Pull up on the suction cup and insert the plastic opening tool in between the back cover and the rest of the phone.

  3. Sony Xperia Z1 Compact Motherboard Replacement: stap 3, afbeelding 1 van 2 Sony Xperia Z1 Compact Motherboard Replacement: stap 3, afbeelding 2 van 2
    • Move the spudger around the edge of the back cover to separate it from the black adhesive.

    • Separating the back cover from the rest of the phone ruins the adhesive which makes it no longer waterproof.

  4. Sony Xperia Z1 Compact Motherboard Replacement, Battery: stap 4, afbeelding 1 van 2 Sony Xperia Z1 Compact Motherboard Replacement, Battery: stap 4, afbeelding 2 van 2
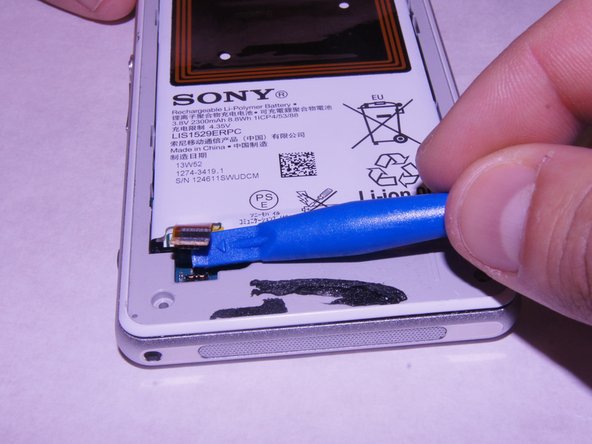
    • Carefully disconnect the battery from the logic board by using the plastic spudger as a lever.

  5. Sony Xperia Z1 Compact Motherboard Replacement: stap 5, afbeelding 1 van 2 Sony Xperia Z1 Compact Motherboard Replacement: stap 5, afbeelding 2 van 2
    • Remove the single 1 x 3.0 mm screw holding the battery in using the JIS #00 screwdriver.

    The replacement batteries probably come without the new NFC sticker, so you’ll have to transfer it from the original one to the replacement. This can be easily done with an iPlastix and a good amount of isopropyl alcohol. Do this carefully.

    Stefano Restuccia - Antwoord

  6. Sony Xperia Z1 Compact Motherboard Replacement: stap 6, afbeelding 1 van 1
    • Pry the battery up from the ends using the plastic spudger until the battery pops out of the enclosure.

  7. Sony Xperia Z1 Compact Motherboard Replacement: stap 7, afbeelding 1 van 1
    • Remove the battery from the device

  8. Sony Xperia Z1 Compact Motherboard Replacement, External Speaker: stap 8, afbeelding 1 van 2 Sony Xperia Z1 Compact Motherboard Replacement, External Speaker: stap 8, afbeelding 2 van 2
    • Unscrew the four screws on the corners of the back frame using the JIS #00 screwdriver.

  9. Sony Xperia Z1 Compact Motherboard Replacement: stap 9, afbeelding 1 van 3 Sony Xperia Z1 Compact Motherboard Replacement: stap 9, afbeelding 2 van 3 Sony Xperia Z1 Compact Motherboard Replacement: stap 9, afbeelding 3 van 3
    • Wedge the plastic opening tool under the back frame. Move the plastic opening tool around the entire frame to separate it from the adhesive.

  10. Sony Xperia Z1 Compact Motherboard Replacement: stap 10, afbeelding 1 van 1
    • Remove the back frame.

  11. Sony Xperia Z1 Compact Motherboard Replacement: stap 11, afbeelding 1 van 2 Sony Xperia Z1 Compact Motherboard Replacement: stap 11, afbeelding 2 van 2
    • Wedge the spudger underneath the external speaker. Pull up on the external speaker using the spudger.

  12. Sony Xperia Z1 Compact Motherboard Replacement: stap 12, afbeelding 1 van 2 Sony Xperia Z1 Compact Motherboard Replacement: stap 12, afbeelding 2 van 2
    • Remove the external speaker.

  13. Sony Xperia Z1 Compact Motherboard Replacement, Motherboard: stap 13, afbeelding 1 van 2 Sony Xperia Z1 Compact Motherboard Replacement, Motherboard: stap 13, afbeelding 2 van 2
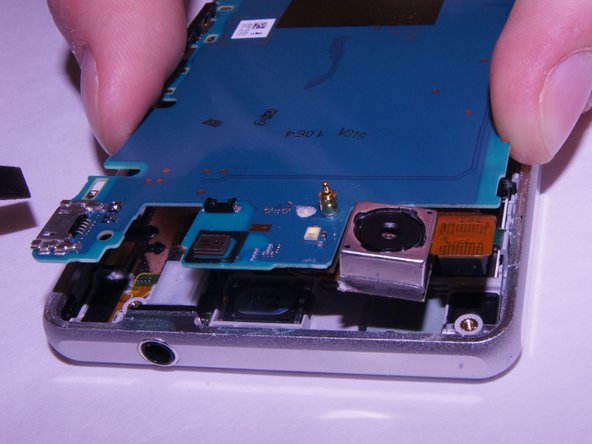
    • Remove the square rubber gasket from the camera using the plastic spudger.

  14. Sony Xperia Z1 Compact Motherboard Replacement: stap 14, afbeelding 1 van 2 Sony Xperia Z1 Compact Motherboard Replacement: stap 14, afbeelding 2 van 2
    • Remove the black plastic corner still holding in the motherboard.

  15. Sony Xperia Z1 Compact Motherboard Replacement: stap 15, afbeelding 1 van 3 Sony Xperia Z1 Compact Motherboard Replacement: stap 15, afbeelding 2 van 3 Sony Xperia Z1 Compact Motherboard Replacement: stap 15, afbeelding 3 van 3
    • Carefully pry up on the four sides of the motherboard using the plastic spudger til it separates from the base of the phone.

  16. Sony Xperia Z1 Compact Motherboard Replacement: stap 16, afbeelding 1 van 3 Sony Xperia Z1 Compact Motherboard Replacement: stap 16, afbeelding 2 van 3 Sony Xperia Z1 Compact Motherboard Replacement: stap 16, afbeelding 3 van 3
    • Remove the motherboard from the device.

    • There may be a small yellow adhesive underneath the motherboard still holding it in. Slide the tip of the spudger through it to sever it.

Conclusie

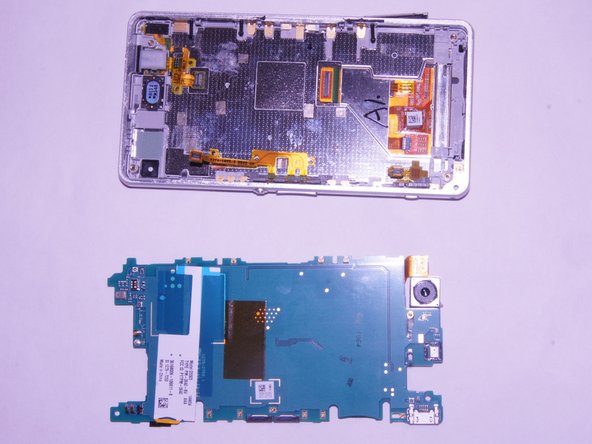
To reassemble your device, follow these instructions in reverse order.

2 andere personen hebben deze handleiding voltooid.

Daniel Benjamin

Lid sinds: 09/21/17

261 Reputatie

1 Handleiding geschreven

Team

Één opmerking

hi

Recently i brought Xperia Z1 now i am facing charging problem.

i already change new to battery but it is charging 75 % only.

after charging 75% my phone screen continually on and off

please let me know how can i fix this problem.

malinduariyasingha - Antwoord

Voeg opmerking toe

Weergavestatistieken:

Afgelopen 24 uren: 0

Afgelopen 7 dagen: 3

Afgelopen 30 dagen: 11

Altijd: 3,525