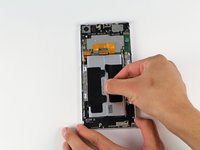
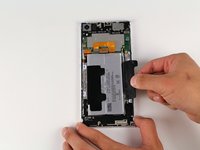
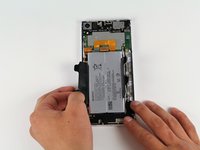
Ga door naar hoofdinhoud

Sony Xperia XA1 Ultra Battery Replacement

Wat je nodig hebt

  1. Sony Xperia XA1 Ultra Battery Replacement, Back Assembly: stap 1, afbeelding 1 van 2 Sony Xperia XA1 Ultra Battery Replacement, Back Assembly: stap 1, afbeelding 2 van 2
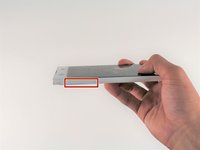
    • Wedge your finger under the bottom ridge of the SD card insert.

    • Pull outwards with your fingers to remove the SD card from the left side of device.

  2. Sony Xperia XA1 Ultra Battery Replacement: stap 2, afbeelding 1 van 1
    • Use a hair dryer to heat each corner of the phone.

    • Alternate heating each corner for a minute to loosen the adhesive binding the back cover to the phone.

    • Don't heat one area for too long; the phone may get damaged from overheating.

  3. Sony Xperia XA1 Ultra Battery Replacement: stap 3, afbeelding 1 van 1
    • Press a suction cup on a heated corner of the device.

    • Hold the phone down and gently lift the suction cup to create a small gap.

    • You may hear crunching or popping sounds when you lift up the back cover.

  4. Sony Xperia XA1 Ultra Battery Replacement: stap 4, afbeelding 1 van 1
    Gereedschap gebruikt in deze stap:
    Plastic Cards
    $2.99
    Koop
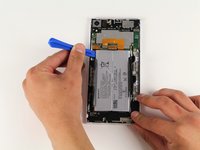
    • Insert your iFixit Opening Tool in the small gap between your phone and the back cover.

    • Lift up on the iFixit Opening Tool and insert your plastic card in the small gap between your phone and the back cover.

  5. Sony Xperia XA1 Ultra Battery Replacement: stap 5, afbeelding 1 van 1
    • Slide your plastic card along the side of your phone to loosen the adhesive.

    • Move the card along the sides of the phone to lift all of the corners.

  6. Sony Xperia XA1 Ultra Battery Replacement: stap 6, afbeelding 1 van 1
    • Lift up the back cover by lifting up the sides of the phone with your hand.

    • Apply a new strip of adhesive for reassembly.

  7. Sony Xperia XA1 Ultra Battery Replacement, Battery: stap 7, afbeelding 1 van 3 Sony Xperia XA1 Ultra Battery Replacement, Battery: stap 7, afbeelding 2 van 3 Sony Xperia XA1 Ultra Battery Replacement, Battery: stap 7, afbeelding 3 van 3
    • Peel off the two pieces of black tape covering the battery with your hands.

  8. Sony Xperia XA1 Ultra Battery Replacement: stap 8, afbeelding 1 van 2 Sony Xperia XA1 Ultra Battery Replacement: stap 8, afbeelding 2 van 2
    • Use the iFixit Opening Tool to remove the flexible orange strip which connects the battery to the motherboard.

  9. Sony Xperia XA1 Ultra Battery Replacement: stap 9, afbeelding 1 van 3 Sony Xperia XA1 Ultra Battery Replacement: stap 9, afbeelding 2 van 3 Sony Xperia XA1 Ultra Battery Replacement: stap 9, afbeelding 3 van 3
    • Wedge the iFixit Opening Tool underneath the battery.

    • Remove the battery by pulling up on the iFixit Opening Tool.

Conclusie

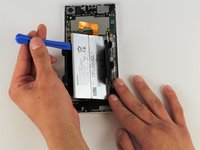
To reassemble your device, follow these instructions in reverse order.

12 andere personen hebben deze handleiding voltooid.

Jacob Jung

Lid sinds: 04/18/18

1.429 Reputatie

9 handleidingen geschreven

Team

Cal Poly, Team S16-G3, Livingston Spring 2018 Lid van Cal Poly, Team S16-G3, Livingston Spring 2018

CPSU-LIVINGSTON-S18S16G3

4 Leden

9 handleidingen geschreven

3 opmerkingen

magnificent…i successfully change a new battery for xperia xa1 ultra…its not the time yet for this xperia to retire from service to me…thank you very much

Wahyudi Hussaini - Antwoord

Wher did you get the batterry from? And is it good as the original?

very Green -

Where can I get the original battery

very Green - Antwoord

Voeg opmerking toe

Weergavestatistieken:

Afgelopen 24 uren: 3

Afgelopen 7 dagen: 8

Afgelopen 30 dagen: 26

Altijd: 10,103