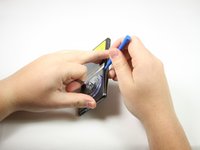
Ga door naar hoofdinhoud

Sony Xperia XA Battery Replacement

Wat je nodig hebt

  1. Sony Xperia XA Battery Replacement, Back Cover: stap 1, afbeelding 1 van 1
    • Apply heat on the back surface of the phone.

    • Continue to heat the device as needed throughout the replacement process.

    • The device can get very hot, so be careful when handling it.

  2. Sony Xperia XA Battery Replacement: stap 2, afbeelding 1 van 1
    • Stick the small suction cup on the bottom half of the back surface of the phone.

  3. Sony Xperia XA Battery Replacement: stap 3, afbeelding 1 van 3 Sony Xperia XA Battery Replacement: stap 3, afbeelding 2 van 3 Sony Xperia XA Battery Replacement: stap 3, afbeelding 3 van 3
    • With the bottom of the device facing you, lift up on the suction cup handle.

    • Use the plastic opening tool around all sides to pry off the back cover.

  4. Sony Xperia XA Battery Replacement: stap 4, afbeelding 1 van 3 Sony Xperia XA Battery Replacement: stap 4, afbeelding 2 van 3 Sony Xperia XA Battery Replacement: stap 4, afbeelding 3 van 3
    • Pull the back of the phone case away from the device.

    • You will hear popping sounds of glue being ripped from the phone.

    • You will hear the sound of the back unlatching from the device.

    • You will need to apply adhesive or glue along the device to have maximum seal in reassembly.

    • RAF antenna may be attached to the back cover upon removal.

  5. Sony Xperia XA Battery Replacement: stap 5, afbeelding 1 van 1
    • Apply heat to the copper RAF antenna.

    • This step and the following step only apply if the RAF antenna does not come off when taking the back cover off.

  6. Sony Xperia XA Battery Replacement: stap 6, afbeelding 1 van 1
    • Peel back the RAF antenna.

  7. Sony Xperia XA Battery Replacement, Battery: stap 7, afbeelding 1 van 3 Sony Xperia XA Battery Replacement, Battery: stap 7, afbeelding 2 van 3 Sony Xperia XA Battery Replacement, Battery: stap 7, afbeelding 3 van 3
    • Peel back the black tabs on the battery.

    • This may require some force as you are breaking the adhesive seal.

    • You will need to apply more adhesive for the reassembly.

  8. Sony Xperia XA Battery Replacement: stap 8, afbeelding 1 van 2 Sony Xperia XA Battery Replacement: stap 8, afbeelding 2 van 2
    • Use a plastic opening tool to pry up the orange battery connector that is directly above the battery in the center of the phone.

  9. Sony Xperia XA Battery Replacement: stap 9, afbeelding 1 van 1
    • Use a plastic opening tool to get under the battery and pry it up.

  10. Sony Xperia XA Battery Replacement: stap 10, afbeelding 1 van 1
    • Lift the battery out with your hands.

Conclusie

To reassemble your device, follow these instructions in reverse order.

11 andere personen hebben deze handleiding voltooid.

Cassidy Davis

Lid sinds: 04/18/18

621 Reputatie

1 Handleiding geschreven

Team

Cal Poly, Team S17-G2, Livingston Spring 2018 Lid van Cal Poly, Team S17-G2, Livingston Spring 2018

CPSU-LIVINGSTON-S18S17G2

4 Leden

8 handleidingen geschreven

Één opmerking

Thanks for such a clear set of instructions. I used a hair drier rather than heat gun!

Mike Jurkiewicz - Antwoord

Voeg opmerking toe

Weergavestatistieken:

Afgelopen 24 uren: 1

Afgelopen 7 dagen: 8

Afgelopen 30 dagen: 27

Altijd: 5,254