Ga door naar hoofdinhoud

Sony Xperia TL Camera Replacement

Wat je nodig hebt

  1. Sony Xperia TL Camera Replacement, Remove Top Plastic Section: stap 1, afbeelding 1 van 3 Sony Xperia TL Camera Replacement, Remove Top Plastic Section: stap 1, afbeelding 2 van 3 Sony Xperia TL Camera Replacement, Remove Top Plastic Section: stap 1, afbeelding 3 van 3
    • Use the plastic opening tool to pry the top plastic section off.

  2. Sony Xperia TL Camera Replacement, Remove Bottom Plastic Section: stap 2, afbeelding 1 van 2 Sony Xperia TL Camera Replacement, Remove Bottom Plastic Section: stap 2, afbeelding 2 van 2
    • Use the plastic opening tool to pry the bottom plastic section off.

  3. Sony Xperia TL Camera Replacement, Unscrewing the Back Off: stap 3, afbeelding 1 van 3 Sony Xperia TL Camera Replacement, Unscrewing the Back Off: stap 3, afbeelding 2 van 3 Sony Xperia TL Camera Replacement, Unscrewing the Back Off: stap 3, afbeelding 3 van 3
    • Remove the four 5mm screws.

    • Use the plastic opening tool to pry off the back.

  4. Sony Xperia TL Camera Replacement, Battery: stap 4, afbeelding 1 van 3 Sony Xperia TL Camera Replacement, Battery: stap 4, afbeelding 2 van 3 Sony Xperia TL Camera Replacement, Battery: stap 4, afbeelding 3 van 3
    • Use the plastic opening tool to detach the ribbon running across the battery.

    • Use the plastic opening tool to detach the ribbon connecting the battery to the motherboard.

  5. Sony Xperia TL Camera Replacement, Sony Xperia TL Auxiliary Cord Replacement: stap 5, afbeelding 1 van 2 Sony Xperia TL Camera Replacement, Sony Xperia TL Auxiliary Cord Replacement: stap 5, afbeelding 2 van 2
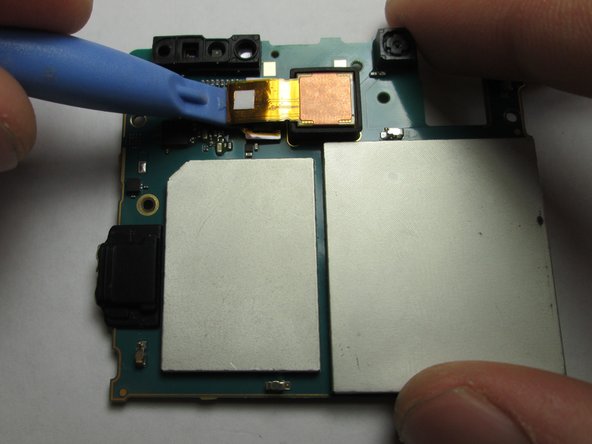
    • Use the plastic opening tool to unlatch the cord's ends off the motherboard and loud speaker module. The cord can be located on the right side of the phone.

  6. Sony Xperia TL Camera Replacement, Motherboard: stap 6, afbeelding 1 van 3 Sony Xperia TL Camera Replacement, Motherboard: stap 6, afbeelding 2 van 3 Sony Xperia TL Camera Replacement, Motherboard: stap 6, afbeelding 3 van 3
    • Use the Phillips #00 to remove the 3 5mm screws.

    • Lift the plastic cover off.

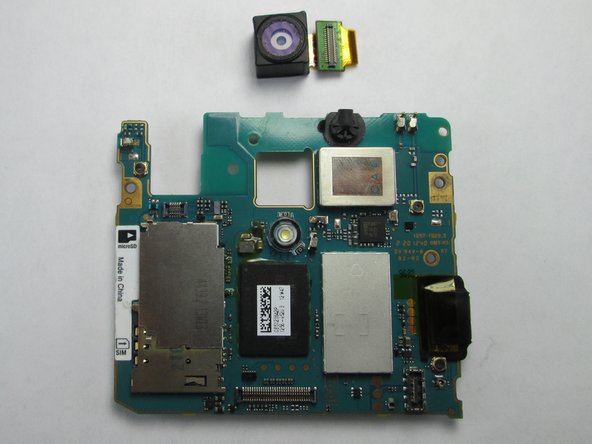
    • Use the plastic opening tool to pry the motherboard out of the phone shell.

  7. Sony Xperia TL Camera Replacement, Camera: stap 7, afbeelding 1 van 3 Sony Xperia TL Camera Replacement, Camera: stap 7, afbeelding 2 van 3 Sony Xperia TL Camera Replacement, Camera: stap 7, afbeelding 3 van 3
    • 'Use the plastic opening tool to detach the camera from the motherboard.'

    • The camera attachment is on the back of the motherboard.

Conclusie

To reassemble your device, follow these instructions in reverse order.

2 andere personen hebben deze handleiding voltooid.

Adam Giniger

Lid sinds: 09/22/14

1.303 Reputatie

8 handleidingen geschreven

Team

USF Tampa, Team 4-4, Brown Fall 2014 Lid van USF Tampa, Team 4-4, Brown Fall 2014

USFT-BROWN-F14S4G4

3 Leden

10 handleidingen geschreven

0 opmerkingen

Voeg opmerking toe

Weergavestatistieken:

Afgelopen 24 uren: 1

Afgelopen 7 dagen: 1

Afgelopen 30 dagen: 1

Altijd: 197