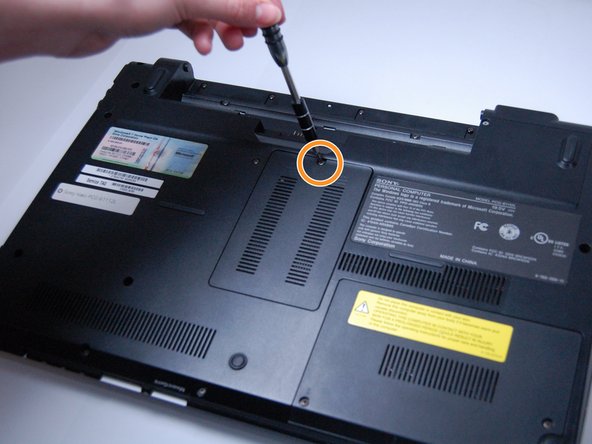
Ga door naar hoofdinhoud

Sony Vaio VPCCW17FX Speakers Replacement

Wat je nodig hebt

  1. Sony Vaio VPCCW17FX Speakers Replacement, Speakers: stap 1, afbeelding 1 van 1
    • Turn the laptop over and orient it as shown.

  2. Sony Vaio VPCCW17FX Speakers Replacement: stap 2, afbeelding 1 van 1
    • Slide the two latches towards the center of the laptop in order to release the battery.

  3. Sony Vaio VPCCW17FX Speakers Replacement: stap 3, afbeelding 1 van 2 Sony Vaio VPCCW17FX Speakers Replacement: stap 3, afbeelding 2 van 2
    • Use fingernail or plastic tool to lift the battery. Rotate the battery up and away to remove from the laptop.

  4. Sony Vaio VPCCW17FX Speakers Replacement: stap 4, afbeelding 1 van 2 Sony Vaio VPCCW17FX Speakers Replacement: stap 4, afbeelding 2 van 2
    • Using a Phillips #0 screwdriver to remove the two screws (Length: 7.7 mm) of the Hard Drive cover and place the cover to the side.

    • Using a Phillips #0 screwdriver, remove the one screw (Length: 7.7 mm) from the RAM cover and place it to the side.

  5. Sony Vaio VPCCW17FX Speakers Replacement: stap 5, afbeelding 1 van 1
    • Using a Phillips #0 screwdriver, remove all twelve screws (Length: 7.7 mm) that hold the bottom cover.

  6. Sony Vaio VPCCW17FX Speakers Replacement: stap 6, afbeelding 1 van 1
    • Lift and remove the back cover.

  7. Sony Vaio VPCCW17FX Speakers Replacement: stap 7, afbeelding 1 van 2 Sony Vaio VPCCW17FX Speakers Replacement: stap 7, afbeelding 2 van 2
    • Locate the fan and use a Phillips #0 screwdriver, remove the two screws (Length: 7.7 mm) that hold it in place.

    • Lift the fan and move it out of the way.

  8. Sony Vaio VPCCW17FX Speakers Replacement: stap 8, afbeelding 1 van 2 Sony Vaio VPCCW17FX Speakers Replacement: stap 8, afbeelding 2 van 2
    • Begin removing the four screws with a Phillips #0 screwdriver (Length: 7.7 mm) from the back cover.

    • Place the cover out of the way.

    • Be careful to not pull any wires out while moving the cover.

  9. Sony Vaio VPCCW17FX Speakers Replacement: stap 9, afbeelding 1 van 3 Sony Vaio VPCCW17FX Speakers Replacement: stap 9, afbeelding 2 van 3 Sony Vaio VPCCW17FX Speakers Replacement: stap 9, afbeelding 3 van 3
    • Using a Phillips #0 screwdriver, remove the two screws (Length: 7.7 mm) that hold the speaker in place.

    • Follow the wire until you find the ribbon cable that holds the wires and pull straight out of the connect to remove it.

    • You are now free to replace the speakers.

    • There are two speakers so be sure to repeat the same steps for the second speaker.

Conclusie

To reassemble your device, follow these instructions in reverse order.

Brianna Rukes

Lid sinds: 03/21/17

101 Reputatie

1 Handleiding geschreven

Team

Texas Tech, Team S8-G5, Bennett Spring 2017 Lid van Texas Tech, Team S8-G5, Bennett Spring 2017

TTU-BENNETT-S17S8G5

4 Leden

10 handleidingen geschreven

0 opmerkingen

Voeg opmerking toe

Weergavestatistieken:

Afgelopen 24 uren: 1

Afgelopen 7 dagen: 8

Afgelopen 30 dagen: 14

Altijd: 486