Ga door naar hoofdinhoud

Sony Vaio Fit SVF14A190X Ram Replacement

Wat je nodig hebt

  1. Sony Vaio Fit SVF14A190X Ram Replacement, Battery Replacement: stap 1, afbeelding 1 van 1
    • Make sure the battery is drained or the computer is turned off.

    • Use the Phillips head screw driver to remove the eleven 6 mm screws.

    • Use the Phillips head screw driver to remove the one 4 mm screw securing the CD drive.

  2. Sony Vaio Fit SVF14A190X Ram Replacement: stap 2, afbeelding 1 van 3 Sony Vaio Fit SVF14A190X Ram Replacement: stap 2, afbeelding 2 van 3 Sony Vaio Fit SVF14A190X Ram Replacement: stap 2, afbeelding 3 van 3
    • Insert the plastic opening tool into the slit of the CD drive.

    • Then pull it outwards.

    • Grab the CD drive with your hand.

    • Take the CD drive all the way out.

  3. Sony Vaio Fit SVF14A190X Ram Replacement: stap 3, afbeelding 1 van 3 Sony Vaio Fit SVF14A190X Ram Replacement: stap 3, afbeelding 2 van 3 Sony Vaio Fit SVF14A190X Ram Replacement: stap 3, afbeelding 3 van 3
    • Insert the plastic opening tool into the slit between the back cover and the rest of the computer.

    • Move the plastic opening tool around all sides of the device.

    • Peel off the back cover.

  4. Sony Vaio Fit SVF14A190X Ram Replacement: stap 4, afbeelding 1 van 2 Sony Vaio Fit SVF14A190X Ram Replacement: stap 4, afbeelding 2 van 2
    • Use the Phillips head screw driver to remove the four 7 mm screws.

    • Lift the battery out with your hand.

  5. Sony Vaio Fit SVF14A190X Ram Replacement, RAM Replacement: stap 5, afbeelding 1 van 1
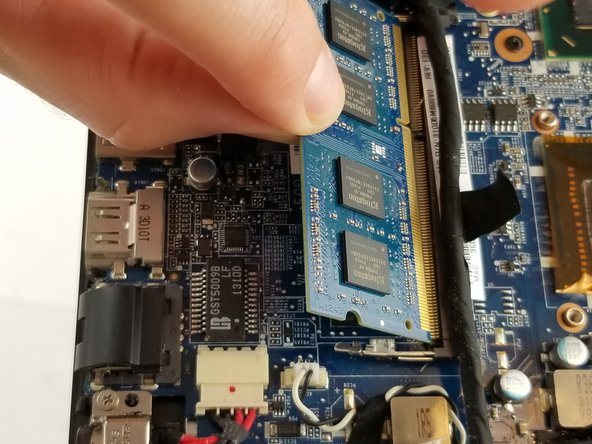
    • The RAM is a small rectangular component located on the opposite side of the lab top from where you pulled out the CD disc drive.

  6. Sony Vaio Fit SVF14A190X Ram Replacement: stap 6, afbeelding 1 van 3 Sony Vaio Fit SVF14A190X Ram Replacement: stap 6, afbeelding 2 van 3 Sony Vaio Fit SVF14A190X Ram Replacement: stap 6, afbeelding 3 van 3
    • Push down on the metal prongs encircled to allow the RAM component to spring up diagonally from the lab top.

    • When the RAM is sprung up, pull it out in the same direction it is currently at, to remove it from the lab top.

Conclusie

To reassemble your device, follow these instructions in reverse order.

Één andere persoon heeft deze handleiding voltooid.

Bryan J. Hartman

Lid sinds: 02/13/18

255 Reputatie

2 handleidingen geschreven

Team

USF Tampa, Team S11-G3, Cheng Spring 2018 Lid van USF Tampa, Team S11-G3, Cheng Spring 2018

USFT-CHENG-S18S11G3

4 Leden

11 handleidingen geschreven

0 opmerkingen

Voeg opmerking toe

Weergavestatistieken:

Afgelopen 24 uren: 0

Afgelopen 7 dagen: 7

Afgelopen 30 dagen: 11

Altijd: 343