Ga door naar hoofdinhoud

Sony SS-CCP1 Speaker Replacement

Wat je nodig hebt

  1. Sony SS-CCP1 Speaker Replacement, Screen: stap 1, afbeelding 1 van 3 Sony SS-CCP1 Speaker Replacement, Screen: stap 1, afbeelding 2 van 3 Sony SS-CCP1 Speaker Replacement, Screen: stap 1, afbeelding 3 van 3
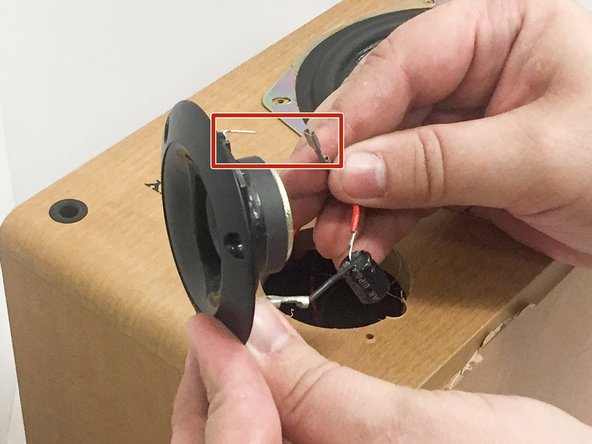
    • Pull screen cover from the edges for removal. This will not require much effort.

  2. Sony SS-CCP1 Speaker Replacement, Speaker: stap 2, afbeelding 1 van 2 Sony SS-CCP1 Speaker Replacement, Speaker: stap 2, afbeelding 2 van 2
    • Remove the seven 18.06mm PH1 screws.

  3. Sony SS-CCP1 Speaker Replacement: stap 3, afbeelding 1 van 3 Sony SS-CCP1 Speaker Replacement: stap 3, afbeelding 2 van 3 Sony SS-CCP1 Speaker Replacement: stap 3, afbeelding 3 van 3
    • Remove the crimps from the tweeter speaker.

    • If its not connected too tightly the crimps can be removed by hand pressure only.

    • If its too tight to be removed by hand, then you can use a pair of pliers to removed the crimps.

    • Never remove by pulling on the cables. Always pull by the metal crimps.

  4. Sony SS-CCP1 Speaker Replacement: stap 4, afbeelding 1 van 3 Sony SS-CCP1 Speaker Replacement: stap 4, afbeelding 2 van 3 Sony SS-CCP1 Speaker Replacement: stap 4, afbeelding 3 van 3
    • Remove the crimps from the 12cm loudspeaker.

    • If its not connected too tightly the crimps can be removed by hand pressure only.

    • If its too tight to be removed by hand, then you can use a pair of pliers to removed the crimps.

    • Never remove by pulling on the cables. Always pull by the metal crimps.

  5. Sony SS-CCP1 Speaker Replacement: stap 5, afbeelding 1 van 2 Sony SS-CCP1 Speaker Replacement: stap 5, afbeelding 2 van 2
    • Remove the grommet using an object with a flat edge.

    • The grommet is not made of rubber, it is made of plastic. Be careful when removing it, as it can break easily.

  6. Sony SS-CCP1 Speaker Replacement: stap 6, afbeelding 1 van 2 Sony SS-CCP1 Speaker Replacement: stap 6, afbeelding 2 van 2
    • Feed the speaker cable through the front of the box.

Conclusie

To reassemble your device, follow these instructions in reverse order.

4 andere personen hebben deze handleiding voltooid.

Dallas

Lid sinds: 10/10/16

892 Reputatie

3 handleidingen geschreven

Team

IUPUI, Team 3-2, Baechle Fall 2016 Lid van IUPUI, Team 3-2, Baechle Fall 2016

IUPUI-BAECHLE-F16S3G2

4 Leden

10 handleidingen geschreven

0 opmerkingen

Voeg opmerking toe

Weergavestatistieken:

Afgelopen 24 uren: 3

Afgelopen 7 dagen: 12

Afgelopen 30 dagen: 40

Altijd: 3,836