Ga door naar hoofdinhoud

Deze handleiding heeft recentere wijzigingen. Schakel over naar de nieuwste niet-geverifieerde versie.

Sony Ericsson W350a Speaker Replacement

Wat je nodig hebt

  1. Sony Ericsson W350a Speaker Replacement, Battery: stap 1, afbeelding 1 van 2 Sony Ericsson W350a Speaker Replacement, Battery: stap 1, afbeelding 2 van 2
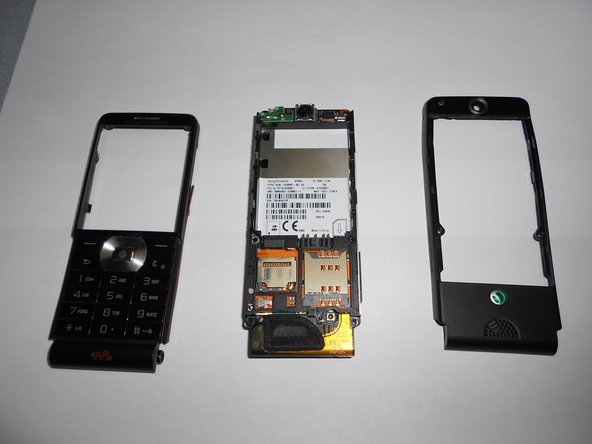
    • Place the phone face down on a flat smooth surface so that the camera, logos, and speaker face up.

    • Using the provided notch on the bottom of the back cover, insert a plastic opening tool and lift upwards to remove the back cover of the phone.

  2. Sony Ericsson W350a Speaker Replacement: stap 2, afbeelding 1 van 3 Sony Ericsson W350a Speaker Replacement: stap 2, afbeelding 2 van 3 Sony Ericsson W350a Speaker Replacement: stap 2, afbeelding 3 van 3
    • Set the cover to the side upon removal.

    • Insert the plastic opening tool into the crevice between the camera and the battery of the phone. Using a gentle prying motion, lift the end of the battery and remove.

    • After removal, recycle the defective battery appropriately.

  3. Sony Ericsson W350a Speaker Replacement, Speaker: stap 3, afbeelding 1 van 2 Sony Ericsson W350a Speaker Replacement, Speaker: stap 3, afbeelding 2 van 2
    • Flip the phone over and remove the Sony Ericsson sticker that is over the phone's ear speaker.

    • Using a T5 screwdriver, loosen and remove the two screws under the Sony Ericsson sticker by turning them counterclockwise.

  4. Sony Ericsson W350a Speaker Replacement: stap 4, afbeelding 1 van 1
    • Using a mini phillips head screwdriver, loosen and remove these screws by turning them counterclockwise.

    • Be careful to remember and organize screws to their unique positions in this step as well as future steps.

  5. Sony Ericsson W350a Speaker Replacement: stap 5, afbeelding 1 van 1
    • Insert a prybar in bottom crack between the front and back plates (see picture) and use a gentle upward pull to separate the back case from the front case.

    • Side buttons/controls may fall from their place in between the back and front casings.

  6. Sony Ericsson W350a Speaker Replacement: stap 6, afbeelding 1 van 1
    • Using a T5 screwdriver, loosen and remove the two screws by turning them counterclockwise.

  7. Sony Ericsson W350a Speaker Replacement: stap 7, afbeelding 1 van 2 Sony Ericsson W350a Speaker Replacement: stap 7, afbeelding 2 van 2
    • Using a prybar and a gentle outward motion, separate the front plate from the inner phone workings.

    • After removing the back plate and the front plate, the phone should look like the remaining pictures.

  8. Sony Ericsson W350a Speaker Replacement: stap 8, afbeelding 1 van 2 Sony Ericsson W350a Speaker Replacement: stap 8, afbeelding 2 van 2
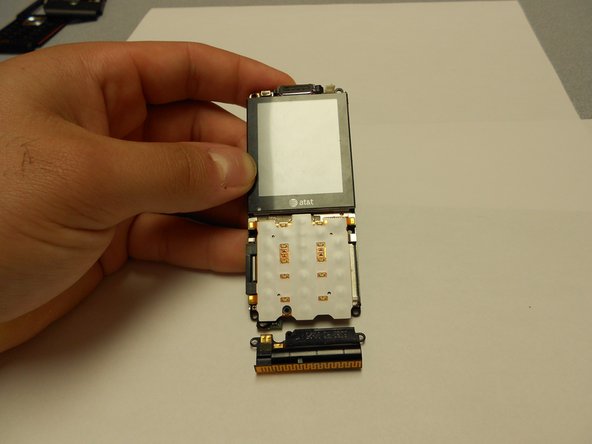
    • Using a mini phillips head screwdriver, loosen and remove the screw located on the front number pad by turning it counterclockwise.

    • After removing this screw, the speaker will be free to move and the phone will look like this remaining picture.

    • To reassemble the phone, follow these steps in reverse order.

Conclusie

To reassemble your device, follow these instructions in reverse order.

Één andere persoon heeft deze handleiding voltooid.

Ldellos

Lid sinds: 03/12/12

112 Reputatie

3 handleidingen geschreven

Team

Clemson, Team 1-4, Benson Spring 2012 Lid van Clemson, Team 1-4, Benson Spring 2012

CLEM-BENSON-S12S1G4

4 Leden

14 handleidingen geschreven

0 opmerkingen

Voeg opmerking toe

Weergavestatistieken:

Afgelopen 24 uren: 0

Afgelopen 7 dagen: 0

Afgelopen 30 dagen: 2

Altijd: 1,021