Ga door naar hoofdinhoud

Sony Cyber-shot DSC-HX300 Motherboard Replacement

Wat je nodig hebt

  1. Sony Cyber-shot DSC-HX300 Motherboard Replacement, Battery: stap 1, afbeelding 1 van 1
    • Make sure the camera is powered off

    • Turn the camera upside down. This is a view of the bottom of the camera.

  2. Sony Cyber-shot DSC-HX300 Motherboard Replacement: stap 2, afbeelding 1 van 1
    • Push battery cover away from the camera.

  3. Sony Cyber-shot DSC-HX300 Motherboard Replacement: stap 3, afbeelding 1 van 1
    • Push the blue tab that secures the battery. The battery will then spring out.

  4. Sony Cyber-shot DSC-HX300 Motherboard Replacement: stap 4, afbeelding 1 van 2 Sony Cyber-shot DSC-HX300 Motherboard Replacement: stap 4, afbeelding 2 van 2
    • Remove the battery.

  5. Sony Cyber-shot DSC-HX300 Motherboard Replacement, Motherboard: stap 5, afbeelding 1 van 3 Sony Cyber-shot DSC-HX300 Motherboard Replacement, Motherboard: stap 5, afbeelding 2 van 3 Sony Cyber-shot DSC-HX300 Motherboard Replacement, Motherboard: stap 5, afbeelding 3 van 3
    • Make sure to remove the battery before disassembly to prevent electrocution.

    • Remove the 3 (4 cm) Phillips head screws located on the back of the camera.

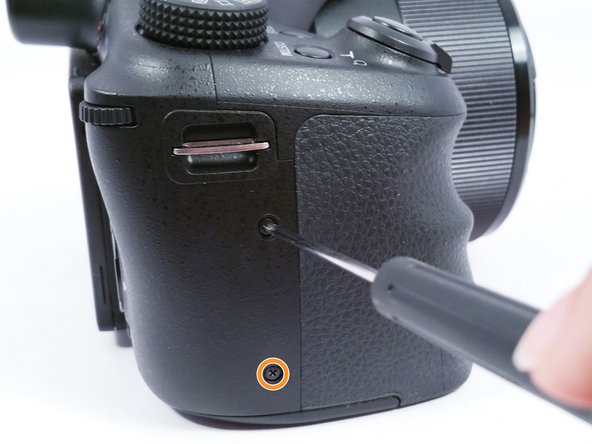
    • Remove the 2 (4 cm) Phillips head screws on the right side of the camera.

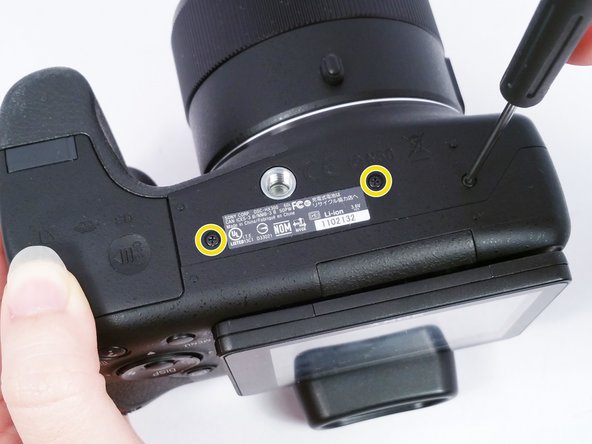
    • Turn the camera upside down to remove the remaining the 3 (4 cm) Phillips head screws holding the plastic camera housing together.

  6. Sony Cyber-shot DSC-HX300 Motherboard Replacement: stap 6, afbeelding 1 van 2 Sony Cyber-shot DSC-HX300 Motherboard Replacement: stap 6, afbeelding 2 van 2
    • Using a plastic opening tool, separate the plastic camera housing.

  7. Sony Cyber-shot DSC-HX300 Motherboard Replacement: stap 7, afbeelding 1 van 1
    • Disconnect the ribbon wire attaching the screen to the camera.

  8. Sony Cyber-shot DSC-HX300 Motherboard Replacement: stap 8, afbeelding 1 van 3 Sony Cyber-shot DSC-HX300 Motherboard Replacement: stap 8, afbeelding 2 van 3 Sony Cyber-shot DSC-HX300 Motherboard Replacement: stap 8, afbeelding 3 van 3
    • Carefully remove the 7 ribbon wires connected to the mother board.

    • Remove the 2 (5 cm) Phillips head screws on the speaker mounting bracket.

    • Remove the 3 (4 cm) Phillips head screws that secure the motherboard to the camera.

    • Lift up on the speaker mounting bracket to remove it.

  9. Sony Cyber-shot DSC-HX300 Motherboard Replacement: stap 9, afbeelding 1 van 2 Sony Cyber-shot DSC-HX300 Motherboard Replacement: stap 9, afbeelding 2 van 2
    • Carefully disconnect the ribbon wire connecting the HDMI port to the Motherboard.

    • Once the Motherboard is removed the replacement can be installed.

Conclusie

To reassemble your device, follow these instructions in reverse order.

Elizabeth Surface

Lid sinds: 08/26/15

1.465 Reputatie

9 handleidingen geschreven

Team

USF Tampa, Team 4-6, Meier Fall 2015 Lid van USF Tampa, Team 4-6, Meier Fall 2015

USFT-MEIER-F15S4G6

4 Leden

18 handleidingen geschreven

3 opmerkingen

During my vacation two capicators on the motherboard failed and 'exploded'.

I've ordered the motherboard and replaced it exactly as described here. Thanks for the explanation!

But since I've replaced it, I have autofocus problems, the camera isn't capable to focus, especially in wide zoom.

Is this something that needs to be calibrated or something?

Erik Mourik - Antwoord

Where can you order a motherboard?

Astrid - Antwoord

That ist what i need to know too. Where can i order a Motherboard?

Jürgen Frömmert - Antwoord

Voeg opmerking toe

Weergavestatistieken:

Afgelopen 24 uren: 0

Afgelopen 7 dagen: 1

Afgelopen 30 dagen: 5

Altijd: 2,727