Ga door naar hoofdinhoud

Sony Bloggie 3D Player USB Drive Replacement

Wat je nodig hebt

  1. Sony Bloggie 3D Player USB Drive Replacement, Front Cover: stap 1, afbeelding 1 van 1
    • Remove the two 2.5mm Phillips #00 screws using the Philips #00 screwdriver.

  2. Sony Bloggie 3D Player USB Drive Replacement: stap 2, afbeelding 1 van 2 Sony Bloggie 3D Player USB Drive Replacement: stap 2, afbeelding 2 van 2
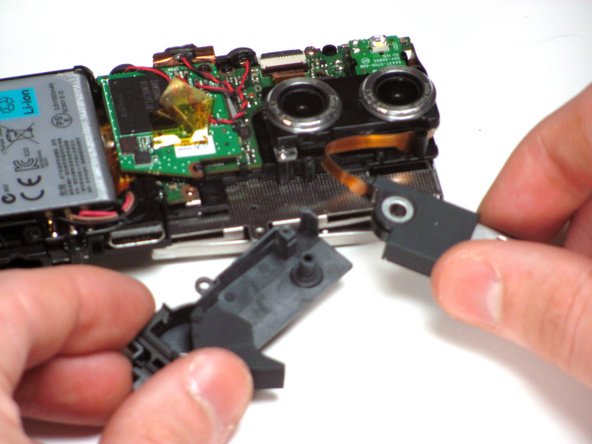
    • Use a plastic opening tool to pry the cover open.

    • After the the cover is partly open as shown, remove the cover with your hands.

  3. Sony Bloggie 3D Player USB Drive Replacement, Back Cover: stap 3, afbeelding 1 van 2 Sony Bloggie 3D Player USB Drive Replacement, Back Cover: stap 3, afbeelding 2 van 2
    • Using your hand, or a pair of tweezers, remove the ZIF connector by gently pulling it out of the dock on the circuit board.

  4. Sony Bloggie 3D Player USB Drive Replacement: stap 4, afbeelding 1 van 2 Sony Bloggie 3D Player USB Drive Replacement: stap 4, afbeelding 2 van 2
    • Use a plastic opening tool to loosen the back cover off the device.

    • Once the back cover is loose, remove it gently by hand.

  5. Sony Bloggie 3D Player USB Drive Replacement, USB Drive: stap 5, afbeelding 1 van 2 Sony Bloggie 3D Player USB Drive Replacement, USB Drive: stap 5, afbeelding 2 van 2
    • Once the back cover is removed, by using the opening tool, remove the following screws using a Phillips #00 screwdriver.

    • Two 4.0mm Phillips #00 screws

    • One 8.0mm Phillips #00 screw

    • One 9.5mm Phillips #00 screw

  6. Sony Bloggie 3D Player USB Drive Replacement: stap 6, afbeelding 1 van 2 Sony Bloggie 3D Player USB Drive Replacement: stap 6, afbeelding 2 van 2
    • Using a spudger, remove the clips of the metal casing from each end of the USB drive.

  7. Sony Bloggie 3D Player USB Drive Replacement: stap 7, afbeelding 1 van 2 Sony Bloggie 3D Player USB Drive Replacement: stap 7, afbeelding 2 van 2
    • Carefully lift the USB drive off of the peg that it is attached to.

  8. Sony Bloggie 3D Player USB Drive Replacement: stap 8, afbeelding 1 van 1
    • Now that the USB component is on its own, untangle the ribbon from inside the device.

  9. Sony Bloggie 3D Player USB Drive Replacement: stap 9, afbeelding 1 van 1
    • Now remove the ZIF connector from the device using a pair of tweezers.

Conclusie

To reassemble your device, follow these instructions in reverse order.

Craig Sweet

Lid sinds: 01/11/13

1 Reputatie

1 Handleiding geschreven

Team

Cal Poly, Team 7-12, Maness Winter 2013 Lid van Cal Poly, Team 7-12, Maness Winter 2013

CPSU-MANESS-W13S7G12

5 Leden

12 handleidingen geschreven

0 opmerkingen

Voeg opmerking toe

Weergavestatistieken:

Afgelopen 24 uren: 0

Afgelopen 7 dagen: 0

Afgelopen 30 dagen: 0

Altijd: 486