Ga door naar hoofdinhoud

Sony Alpha NEX-6 Control Wheel Replacement

Wat je nodig hebt

  1. Sony Alpha NEX-6 Control Wheel Replacement, Battery: stap 1, afbeelding 1 van 1
    • Prior to operating on this device, be sure the camera is turned OFF. With power, the camera can be a dangerous device to work with.

    • Turn the camera off by switching the power knob "OFF" text to the white selector dot.

  2. Sony Alpha NEX-6 Control Wheel Replacement: stap 2, afbeelding 1 van 1
    • Flip the camera upside-down and carefully place it on a flat surface.

    • With the lens facing outward, locate the battery compartment - indicated by a grooved latch.

    • Push the latch to the right to unlock the battery compartment. The door should flip upward.

  3. Sony Alpha NEX-6 Control Wheel Replacement: stap 3, afbeelding 1 van 1
    • With the compartment open, locate a blue tab shown with spudger

    • Press the tab to the side (to the left, or toward the camera wall). This will eject the camera battery.

  4. Sony Alpha NEX-6 Control Wheel Replacement, Battery compartment screws: stap 4, afbeelding 1 van 1
    • Remove the two 3.5mm Phillips #00 screws that hold the back case - located inside the battery compartment.

  5. Sony Alpha NEX-6 Control Wheel Replacement, Bottom screws: stap 5, afbeelding 1 van 1
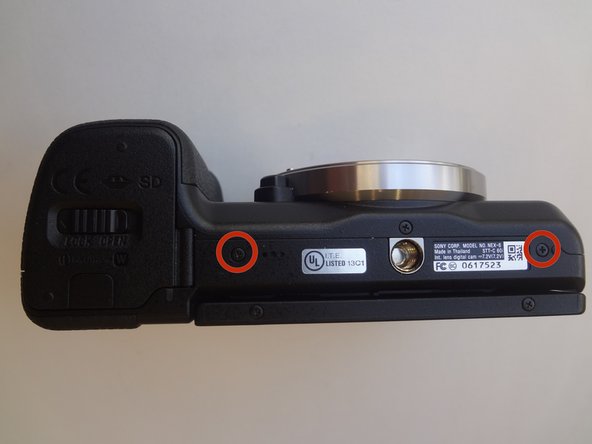
    • Remove the two 3.5mm Phillips #00 screws that hold the back case - located on the bottom of the camera.

  6. Sony Alpha NEX-6 Control Wheel Replacement, Side screws: stap 6, afbeelding 1 van 1
    • Remove the 3.5 mm Phillips #00 screw on the side of camera - located between the charging and HDMI ports.

    • Remove the 4.0 mm Phillips #00 screw on the side of the camera - located next to the WiFi sign.

  7. Sony Alpha NEX-6 Control Wheel Replacement, Dis-attaching procedure: stap 7, afbeelding 1 van 2 Sony Alpha NEX-6 Control Wheel Replacement, Dis-attaching procedure: stap 7, afbeelding 2 van 2
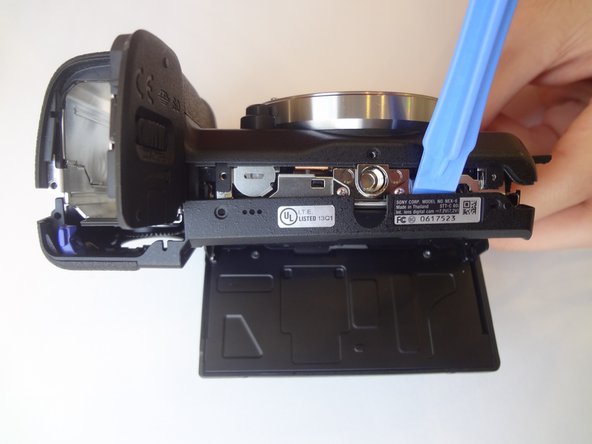
    • Starting with the battery compartment gently begin to separate the back case front the camera.

    • Using a plastic opening tool, separate the bottom of the back case from the camera. Then proceed by separating the sides.

    • Gently lift the back case away from the camera an slide it down to completely remove the back case.

  8. Sony Alpha NEX-6 Control Wheel Replacement, Control Wheel: stap 8, afbeelding 1 van 2 Sony Alpha NEX-6 Control Wheel Replacement, Control Wheel: stap 8, afbeelding 2 van 2
    • Pry out the ribbon cable by carefully pushing on its side tabs with a spudger.

  9. Sony Alpha NEX-6 Control Wheel Replacement, Control wheel romoval: stap 9, afbeelding 1 van 2 Sony Alpha NEX-6 Control Wheel Replacement, Control wheel romoval: stap 9, afbeelding 2 van 2
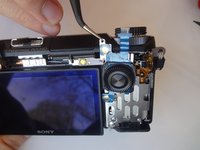
    • Using a spudger, lift the metal locking tab located at the top right corner of control wheel assembly.

    • Using tweezers, carefully slide the assembly up to release it.

Conclusie

To reassemble your device, follow these instructions in reverse order.

5 andere personen hebben deze handleiding voltooid.

Clayton Dale

Lid sinds: 01/20/15

1.067 Reputatie

7 handleidingen geschreven

Team

USF Tampa, Team 11-2, Blackwell Winter 2015 Lid van USF Tampa, Team 11-2, Blackwell Winter 2015

USFT-BLACKWELL-W15S11G2

4 Leden

14 handleidingen geschreven

0 opmerkingen

Voeg opmerking toe

Weergavestatistieken:

Afgelopen 24 uren: 1

Afgelopen 7 dagen: 3

Afgelopen 30 dagen: 39

Altijd: 4,669