Ga door naar hoofdinhoud

Sonos Connect WIFI Card Replacement

Wat je nodig hebt

  1. Sonos Connect WIFI Card Replacement, WIFI Card: stap 1, afbeelding 1 van 3 Sonos Connect WIFI Card Replacement, WIFI Card: stap 1, afbeelding 2 van 3 Sonos Connect WIFI Card Replacement, WIFI Card: stap 1, afbeelding 3 van 3
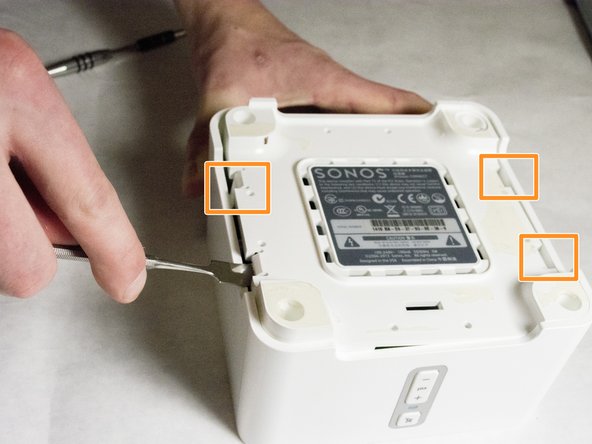
    • Start by using a spudger or plastic opening tool to remove the bottom cover.

    • When working with electronics, it's important to choose a tool that's ESD-safe to avoid accidental damage to the device. The regular black nylon spudger or a plastic opening tool should be used whenever possible.

    • Once enough of the glue is removed, peel the cover off by hand,

  2. Sonos Connect WIFI Card Replacement: stap 2, afbeelding 1 van 3 Sonos Connect WIFI Card Replacement: stap 2, afbeelding 2 van 3 Sonos Connect WIFI Card Replacement: stap 2, afbeelding 3 van 3
    • Remove the four 7.5mm length Philips head screws under the rubber cover.

  3. Sonos Connect WIFI Card Replacement: stap 3, afbeelding 1 van 3 Sonos Connect WIFI Card Replacement: stap 3, afbeelding 2 van 3 Sonos Connect WIFI Card Replacement: stap 3, afbeelding 3 van 3
    • Use a nylon spudger to unsnap the bottom from the sides.

    • Pry until the remaining three points are unsnapped.

    • Once unsnapped, lift the cover.

  4. Sonos Connect WIFI Card Replacement: stap 4, afbeelding 1 van 2 Sonos Connect WIFI Card Replacement: stap 4, afbeelding 2 van 2
    • Remove the connection for the front buttons to fully remove the cover.

  5. Sonos Connect WIFI Card Replacement: stap 5, afbeelding 1 van 2 Sonos Connect WIFI Card Replacement: stap 5, afbeelding 2 van 2
    • Use a plastic opening tool or spudger to remove the adhesive covering the the WIFI connectors.

    • Gently pull the wires at the connection point to disconnect them from the motherboard.

  6. Sonos Connect WIFI Card Replacement: stap 6, afbeelding 1 van 2 Sonos Connect WIFI Card Replacement: stap 6, afbeelding 2 van 2
    • Remove the two pieces of glue holding the WIFI card in place.

  7. Sonos Connect WIFI Card Replacement: stap 7, afbeelding 1 van 3 Sonos Connect WIFI Card Replacement: stap 7, afbeelding 2 van 3 Sonos Connect WIFI Card Replacement: stap 7, afbeelding 3 van 3
    • Scrape the glued pad underneath the WIFI card to seperate the card from the board.

    • Push apart the two clips holding the WIFI card in the connection.

    • Pull the WIFI card out of the connection.

    • When putting the new WIFI card in, put the card in the connector first, then push downward until it clicks.

Conclusie

To reassemble your device, follow these instructions in reverse order.

Clark Snyder

Lid sinds: 01/21/16

483 Reputatie

4 handleidingen geschreven

Team

IUPUI, Team 3-2, Baechle Spring 2016 Lid van IUPUI, Team 3-2, Baechle Spring 2016

IUPUI-BAECHLE-S16S3G2

4 Leden

4 handleidingen geschreven

3 opmerkingen

Where do you source the replacement wifi card?

cterrell9 - Antwoord

great piece of advice. After some searching I found this on ebay.

https://www.ebay.co.uk/itm/Atheros-AR500...

or type in search bar Atheros AR5008 AR5416 Mini PCI N 802.11N 300M WIFI Wireless Card Dell ASUS SONY.

It cost me around £10.00 and seems to be working fine now after installation

Garry Briggs - Antwoord

Do you know the wireless card for the sonos connect s15?

Craig Wojay - Antwoord

Voeg opmerking toe

Weergavestatistieken:

Afgelopen 24 uren: 1

Afgelopen 7 dagen: 10

Afgelopen 30 dagen: 35

Altijd: 5,939