Ga door naar hoofdinhoud

Sonos Connect Internal Power Supply Replacement

Wat je nodig hebt

  1. Sonos Connect Internal Power Supply Replacement, WIFI Card: stap 1, afbeelding 1 van 3 Sonos Connect Internal Power Supply Replacement, WIFI Card: stap 1, afbeelding 2 van 3 Sonos Connect Internal Power Supply Replacement, WIFI Card: stap 1, afbeelding 3 van 3
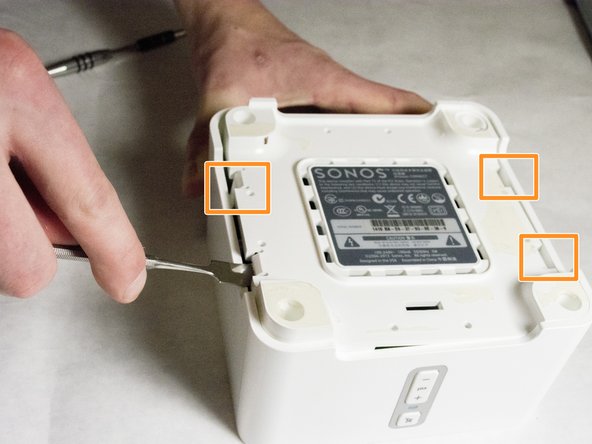
    • Start by using a spudger or plastic opening tool to remove the bottom cover.

    • When working with electronics, it's important to choose a tool that's ESD-safe to avoid accidental damage to the device. The regular black nylon spudger or a plastic opening tool should be used whenever possible.

    • Once enough of the glue is removed, peel the cover off by hand,

    Careful as the rubber bottom rips extremely easily. Be very patient.

    marcos_peixoto1 - Antwoord

  2. Sonos Connect Internal Power Supply Replacement: stap 2, afbeelding 1 van 3 Sonos Connect Internal Power Supply Replacement: stap 2, afbeelding 2 van 3 Sonos Connect Internal Power Supply Replacement: stap 2, afbeelding 3 van 3
    • Remove the four 7.5mm length Philips head screws under the rubber cover.

  3. Sonos Connect Internal Power Supply Replacement: stap 3, afbeelding 1 van 3 Sonos Connect Internal Power Supply Replacement: stap 3, afbeelding 2 van 3 Sonos Connect Internal Power Supply Replacement: stap 3, afbeelding 3 van 3
    • Use a nylon spudger to unsnap the bottom from the sides.

    • Pry until the remaining three points are unsnapped.

    • Once unsnapped, lift the cover.

  4. Sonos Connect Internal Power Supply Replacement: stap 4, afbeelding 1 van 2 Sonos Connect Internal Power Supply Replacement: stap 4, afbeelding 2 van 2
    • Remove the connection for the front buttons to fully remove the cover.

  5. Sonos Connect Internal Power Supply Replacement: stap 5, afbeelding 1 van 2 Sonos Connect Internal Power Supply Replacement: stap 5, afbeelding 2 van 2
    • Use a plastic opening tool or spudger to remove the adhesive covering the the WIFI connectors.

    • Gently pull the wires at the connection point to disconnect them from the motherboard.

  6. Sonos Connect Internal Power Supply Replacement: stap 6, afbeelding 1 van 2 Sonos Connect Internal Power Supply Replacement: stap 6, afbeelding 2 van 2
    • Remove the two pieces of glue holding the WIFI card in place.

  7. Sonos Connect Internal Power Supply Replacement: stap 7, afbeelding 1 van 3 Sonos Connect Internal Power Supply Replacement: stap 7, afbeelding 2 van 3 Sonos Connect Internal Power Supply Replacement: stap 7, afbeelding 3 van 3
    • Scrape the glued pad underneath the WIFI card to seperate the card from the board.

    • Push apart the two clips holding the WIFI card in the connection.

    • Pull the WIFI card out of the connection.

    • When putting the new WIFI card in, put the card in the connector first, then push downward until it clicks.

  8. Sonos Connect Internal Power Supply Replacement, Top Motherboard: stap 8, afbeelding 1 van 1
    • Remove the 7mm length Phillips screw holding the board in place.

  9. Sonos Connect Internal Power Supply Replacement: stap 9, afbeelding 1 van 2 Sonos Connect Internal Power Supply Replacement: stap 9, afbeelding 2 van 2
    • Flip the board over to access the Molex Cable.

  10. Sonos Connect Internal Power Supply Replacement: stap 10, afbeelding 1 van 1
    • Disconnect the Molex Cable from the top motherboard.

  11. Sonos Connect Internal Power Supply Replacement, Internal Power Supply: stap 11, afbeelding 1 van 2 Sonos Connect Internal Power Supply Replacement, Internal Power Supply: stap 11, afbeelding 2 van 2
    • Remove foam protective insulator from the bottom board.

  12. Sonos Connect Internal Power Supply Replacement: stap 12, afbeelding 1 van 2 Sonos Connect Internal Power Supply Replacement: stap 12, afbeelding 2 van 2
    • Picture shows the side of the device.

    • Remove the 7mm length Phillips screw from the power supply motherboard.

  13. Sonos Connect Internal Power Supply Replacement: stap 13, afbeelding 1 van 3 Sonos Connect Internal Power Supply Replacement: stap 13, afbeelding 2 van 3 Sonos Connect Internal Power Supply Replacement: stap 13, afbeelding 3 van 3
    • Remove the adhesive backed rear label by using a spudger.

    • Remove the two 8mm length screws as shown.

  14. Sonos Connect Internal Power Supply Replacement: stap 14, afbeelding 1 van 2 Sonos Connect Internal Power Supply Replacement: stap 14, afbeelding 2 van 2
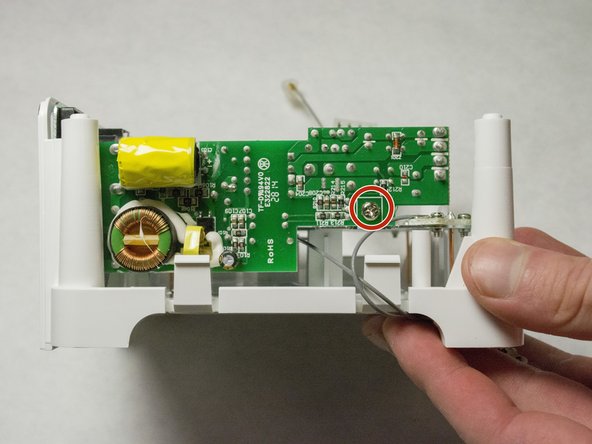
    • Pull the power supply out of the back of the device.

    Were to order a power suply from the Sonos connect??

    rickjonkman @ Hotmail.com

    thnx!!

    Rick Jonkman - Antwoord

    Does anyone please know what the 4 coloured power wires in the Molex are, in terms of 12v, A rating and + or - ? Many thanks.

    dhroser - Antwoord

    values are printed on the PCB: -

    Red: 3.3v+

    Black 3.3v GND

    Yellow 14.8v+

    Brown 14.8v GND

    Andy -

Conclusie

To reassemble your device, follow these instructions in reverse order.

3 andere personen hebben deze handleiding voltooid.

Clark Snyder

Lid sinds: 01/21/16

483 Reputatie

4 handleidingen geschreven

Team

IUPUI, Team 3-2, Baechle Spring 2016 Lid van IUPUI, Team 3-2, Baechle Spring 2016

IUPUI-BAECHLE-S16S3G2

4 Leden

4 handleidingen geschreven

22 opmerkingen

And where do you find a spare power supply ?

meh - Antwoord

You'd probably just replace the 1800µƒ cap, which you can do without removing the board. Leave the wireless card attached to the top board when you carefully lift it out of the way. 99 times out of 100 if a PSU goes down it's one or more capacitors.

Steve Long - Antwoord

My Sonos was fried by a thunderstrike recently.

More precisely: 3 parts on the power supply PCB: the fuse, that 1800 uF cap mentioned above and some other part that I'm having a hard time to identify:

It's located pretty close to the fuse on the PCB, there labeled whith "TH1" and according to the symbol it's some kind of varistor or thermistor. With the "TH1" label I'm inclined to bet my money on thermistor, some NTC probably.

From what little is left of its housing (green, round with a diameter of about 8mm) its caption once read "SCK 102"... or something similar. But that's all I could find out.

Could anybody tell me more about this part and its dimensions?

When feeding the 3.3V and 14.V that the power supply PCB normaly provides from some lab power supply to the mainboard of the Sonos it works fine. So wether I'll be able t resurect my Sonos depends on identifying and replacing this one little bugger...

Thanks a lot

Ber

Tomarang - Antwoord

In my case, the 2A fuse and the MB8S Bridge rectifier were broken. Also my 14V output delivers 17.5V. The zener was not broken so I guess there are different versions.

Dirk de Vries - Antwoord

Can you lick up +5 volts from power supply black/red?

Robert Bruce - Antwoord

Hi guys! My connect stoped working so I took it apart and the 1800uF cap was leaky and screwed! So I replaced it.... now all I'm getting is the white LED flashing!! Before a replaced the cap I got nothing at all! Any ideas??

Matt - Antwoord

Hi guys, hope someone can help - I'm trying to fix a failed Connect but someone already tampered with it (and abandoned the notion). Since the PSU board is incomplete I can't make out what needs to exist where the U3 pinout is (the chip is missing - has 8 contact points). any thoughts? or maybe photos? Thanks so much upfront!

Mike - Antwoord

Hy Mike B.

I can send you some pictures with my PSU that was blown due to a surge and can't fix it...there is a short...when I plug it in the fuse will blow and i couldn't find the therminator to replace it the one that Tomarang refers in his comment. So if you need pictures of it ...let me know

George -

Mine has the same 5M0165R chip clearly blown, missing two legs with soot on the PCB indicating a transient spike took it out! Can buy and replace chip but have to suspect other components might be damaged. Sure would love to know where to buy a replacement Powersupply PCB!

sailingmagnus -

@ Matt - sound like you just need to reset the connect. Plug it in with mute and volume up button pressed

nhendley - Antwoord

I abandoned the connect for a bit as I was having no joy but really want to get it working and sonos won't touch it now as I've already started, originally I was getting a white light but now no light at all, where is this internal fuse I'm hearing about.... and how can I test to see if the power supply is screwed??

Thank you

Matt -

I need to replace the cap as well. What voltage should it be? Thank you!

Scott Hechinger - Antwoord

My Connect just stopped working about 2 months ago. These instructions are great and probably a little beyond me. Sonos have offered to replace it but at a high price. So would anyone here be willing to have a crack at it for me? Could be a simple fix? Happy to pay? thanks

JamieDOTmacdATmeDOTcom

JamieMac - Antwoord

really helpful demo thanks and I have managed to remove the power supply. I have 3 questions:

1. I think I have found the 1800uF cap- can I tell from the outside if it is blown?

2. To replace it will I need to solder?

3. If so is it tricky/any tips?

arnoldcb6 - Antwoord

Following this guide I completed replacement of 1800 uF capacitator but still no power- any other suggestions please?

arnoldcb6 - Antwoord

Try replacing 5M0165R. It was found blown on the unit I have here, waiting on parts.

kylegp -

Found this video https://www.youtube.com/watch?v=shxvyfY1... that might be helpful to some here. I think the video is in Romanian language, but gives you some clues what to test and replace. Would be great if someone contributed an english closed captioning translation on it.

ByCarl - Antwoord

Hola buenos dias, podria decirme donde puedo encontrar las fuentes de alimentacion para ese modelo de SONOS

Ben Thompson - Antwoord

Hello please any place to buy a power supply SONOS Connect sorry my english is not good

Ben Thompson - Antwoord

No need to take off the wifi card for this guide...only disconnect the antennas.

kylegp - Antwoord

How do you test the 5M0165R?

Oberpriller - Antwoord

Voeg opmerking toe

Weergavestatistieken:

Afgelopen 24 uren: 6

Afgelopen 7 dagen: 17

Afgelopen 30 dagen: 95

Altijd: 17,628