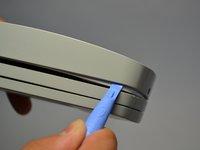
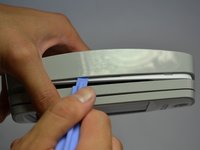
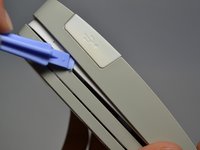
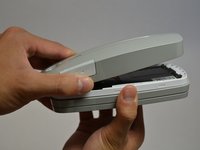
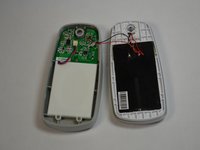
Ga door naar hoofdinhoud

Solio CLASSIC2 Disconnecting the Battery

Alleen vereisten
Deze handleiding is alleen bedoeld als vereiste voor andere handleidingen. Het staat niet op zichzelf.

Wat je nodig hebt

  1. Solio CLASSIC2 Disconnecting the Battery, Disconnecting the Battery: stap 1, afbeelding 1 van 1
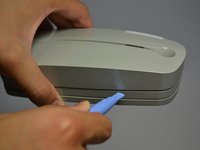
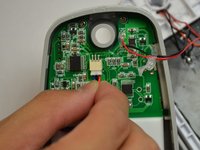
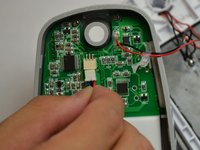
    • Turn off the device by pressing on the clear power button behind the device.
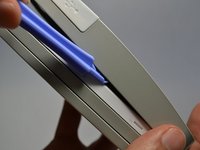
    • To make sure that it is off, make sure the button is not flashing green.

  2. Solio CLASSIC2 Disconnecting the Battery: stap 2, afbeelding 1 van 1
    • Using the Phillips #1 screwdriver, remove the 2mm screw located on the bottom of the device, near the hinge.

  3. Solio CLASSIC2 Disconnecting the Battery: stap 3, afbeelding 1 van 3 Solio CLASSIC2 Disconnecting the Battery: stap 3, afbeelding 2 van 3 Solio CLASSIC2 Disconnecting the Battery: stap 3, afbeelding 3 van 3
    • Using the plastic opening tools, gently pry open the side of the large panel.

    • Keeping the tool in, slowly slide the tool along the side of the panel.

  4. Solio CLASSIC2 Disconnecting the Battery: stap 4, afbeelding 1 van 2 Solio CLASSIC2 Disconnecting the Battery: stap 4, afbeelding 2 van 2
    • Rotate the device 180 degrees.

    • Make sure the opening on other side of the device does not snap closed.

    • Gently slide the plastic opening tool along the side of the panel.

  5. Solio CLASSIC2 Disconnecting the Battery: stap 5, afbeelding 1 van 2 Solio CLASSIC2 Disconnecting the Battery: stap 5, afbeelding 2 van 2
    • Do not fully pull apart the back panel from the device. Doing so can rip the two red and blue wires attached to the panel.

    • Using both hands, slowly pull apart the back panel from the rest of the device.

    • Gently flip the back panel open so the circuit board faces up and the two panels are side by side.

  6. Solio CLASSIC2 Disconnecting the Battery: stap 6, afbeelding 1 van 2 Solio CLASSIC2 Disconnecting the Battery: stap 6, afbeelding 2 van 2
    • Softly pinch the red and blue wires close to the white connector.

    • To pull the wires out, wiggle them back and forth until the connector is fully out.

Conclusie

To reassemble your device, follow these instructions in reverse order.

Johnny Tran

Lid sinds: 10/21/13

311 Reputatie

3 handleidingen geschreven

Team

Cal Poly, Team 4-28, Amido Fall 2013 Lid van Cal Poly, Team 4-28, Amido Fall 2013

CPSU-AMIDO-F13S4G28

4 Leden

7 handleidingen geschreven

0 opmerkingen

Voeg opmerking toe

Weergavestatistieken:

Afgelopen 24 uren: 0

Afgelopen 7 dagen: 0

Afgelopen 30 dagen: 0

Altijd: 88