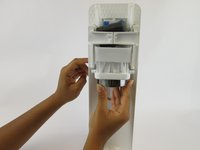
Ga door naar hoofdinhoud

SodaStream Source Internal Disassembly

Alleen vereisten
Deze gids is alleen bedoeld voor beginners! Deze gids maakt deel uit van een andere procedure en is niet bedoeld om alleen te worden gebruikt.

Wat je nodig hebt

  1. SodaStream Source  Internal Disassembly, SodaStream Source  Internal Disassembly: stap 1, afbeelding 1 van 3 SodaStream Source  Internal Disassembly, SodaStream Source  Internal Disassembly: stap 1, afbeelding 2 van 3 SodaStream Source  Internal Disassembly, SodaStream Source  Internal Disassembly: stap 1, afbeelding 3 van 3
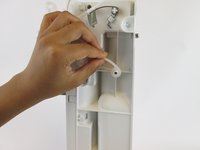
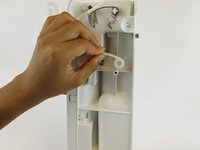
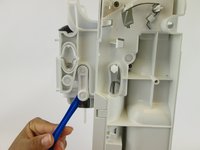
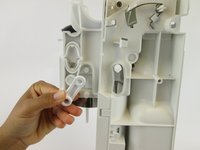
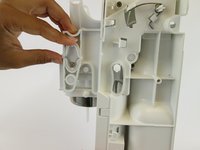
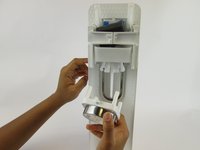
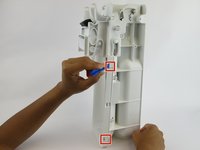
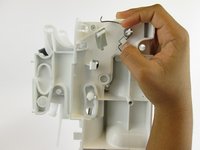
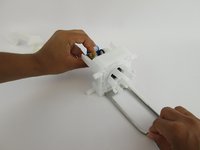
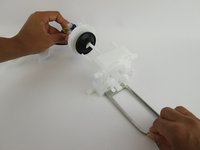
    • Push the brass bar, located in the top of the device, out of the carbonating block.

    • You can use the end of your screwdriver to push this piece out.

  2. SodaStream Source  Internal Disassembly: stap 2, afbeelding 1 van 3 SodaStream Source  Internal Disassembly: stap 2, afbeelding 2 van 3 SodaStream Source  Internal Disassembly: stap 2, afbeelding 3 van 3
    • Slide the yellow battery cover up and away to remove it from the device.

  3. SodaStream Source  Internal Disassembly: stap 3, afbeelding 1 van 2 SodaStream Source  Internal Disassembly: stap 3, afbeelding 2 van 2
    • Unhook the bottom piece of the plastic arm on each side of the device.

  4. SodaStream Source  Internal Disassembly: stap 4, afbeelding 1 van 2 SodaStream Source  Internal Disassembly: stap 4, afbeelding 2 van 2
    • Lift the top of the plastic arm with the spudger and remove it on both sides.

  5. SodaStream Source  Internal Disassembly: stap 5, afbeelding 1 van 2 SodaStream Source  Internal Disassembly: stap 5, afbeelding 2 van 2
    • Remove the plastic piece, located near the front of the carbonating block, from both sides of the device using a plastic opening tool or nylon spudger.

  6. SodaStream Source  Internal Disassembly: stap 6, afbeelding 1 van 2 SodaStream Source  Internal Disassembly: stap 6, afbeelding 2 van 2
    • Remove the plastic oval and the spring within it.

  7. SodaStream Source  Internal Disassembly: stap 7, afbeelding 1 van 2 SodaStream Source  Internal Disassembly: stap 7, afbeelding 2 van 2
    • Pull the loader tab cover down and away from the rest of the carbonating block.

  8. SodaStream Source  Internal Disassembly: stap 8, afbeelding 1 van 1
    • Remove the three 17.9 mm screws located on the right side.

    • These screws may be difficult to access.

  9. SodaStream Source  Internal Disassembly: stap 9, afbeelding 1 van 2 SodaStream Source  Internal Disassembly: stap 9, afbeelding 2 van 2
    • Unhook the four clips on the top of the carbonating block and remove the plastic cover.

  10. SodaStream Source  Internal Disassembly: stap 10, afbeelding 1 van 3 SodaStream Source  Internal Disassembly: stap 10, afbeelding 2 van 3 SodaStream Source  Internal Disassembly: stap 10, afbeelding 3 van 3
    • Lift the clips located on both sides with the plastic spudger. Slide the front cover off.

  11. SodaStream Source  Internal Disassembly: stap 11, afbeelding 1 van 2 SodaStream Source  Internal Disassembly: stap 11, afbeelding 2 van 2
    • Unhook the silver spring arms on both sides of the device by pushing down.

  12. SodaStream Source  Internal Disassembly: stap 12, afbeelding 1 van 1
    • Grip the right and left sides of the device and pull it into two identical halves.

    • Once these two pieces are apart, all remaining internal components will fall out of the device.

  13. SodaStream Source  Internal Disassembly: stap 13, afbeelding 1 van 3 SodaStream Source  Internal Disassembly: stap 13, afbeelding 2 van 3 SodaStream Source  Internal Disassembly: stap 13, afbeelding 3 van 3
    • Pull the foam pad up and remove it from the front side of the carbonation component.

  14. SodaStream Source  Internal Disassembly: stap 14, afbeelding 1 van 1
    • Remove the six 17.7 mm screws from the underside of the loader tab piece.

  15. SodaStream Source  Internal Disassembly: stap 15, afbeelding 1 van 3 SodaStream Source  Internal Disassembly: stap 15, afbeelding 2 van 3 SodaStream Source  Internal Disassembly: stap 15, afbeelding 3 van 3
    • Pull the loader tab out of the nozzle.

Conclusie

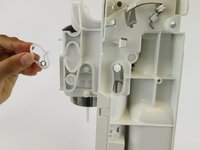
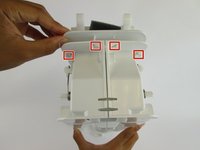
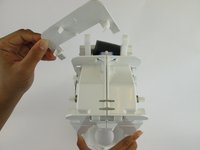
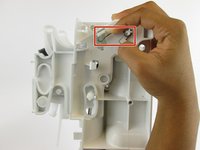
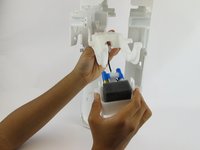
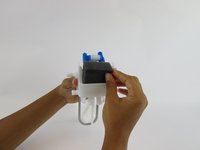
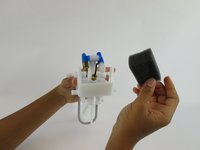
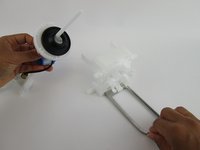
To reassemble your device, follow these instructions in reverse order.

2 andere personen hebben deze handleiding voltooid.

Angela Mossgrove

Lid sinds: 02/20/17

1.138 Reputatie

3 handleidingen geschreven

Team

USF Tampa, Team S1-G4, Leahy Spring 2017 Lid van USF Tampa, Team S1-G4, Leahy Spring 2017

USFT-LEAHY-S17S1G4

3 Leden

41 handleidingen geschreven

2Gids Commentaar

Bonjour j'ai une pièce à l'intérieur dont je ne retrouve pas du tout la position au remontage.

Pouvez vous m'aider ?

Delphine Renard - Antwoord

De quelle partie s'agit-il, peux-tu prendre une photo ?

Toon Konings - Antwoord

Voeg opmerking toe

Weergavestatistieken:

Afgelopen 24 uren: 0

Afgelopen 7 dagen: 5

Afgelopen 30 dagen: 46

Altijd: 712