Ga door naar hoofdinhoud

Skullcandy Mix Master DJ Mylar Driver Replacement

Wat je nodig hebt

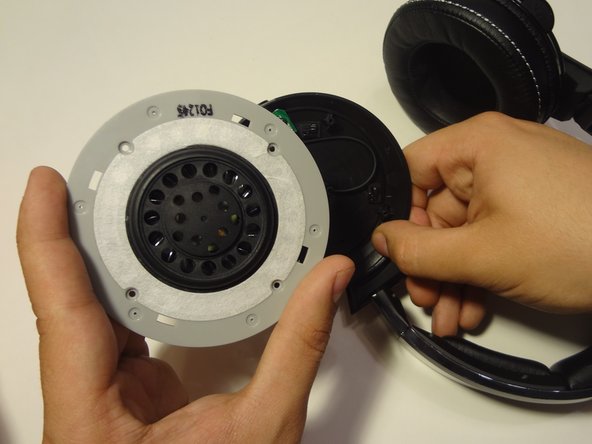
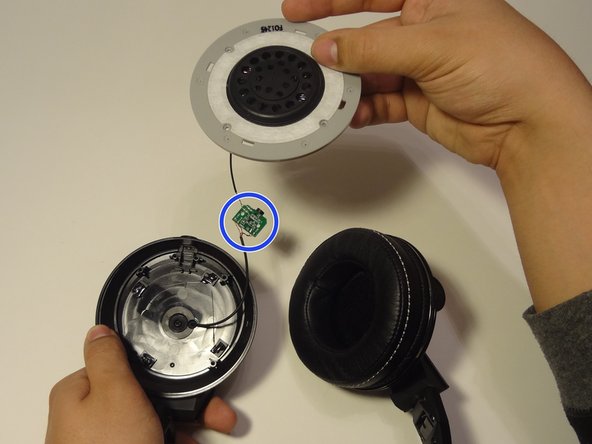
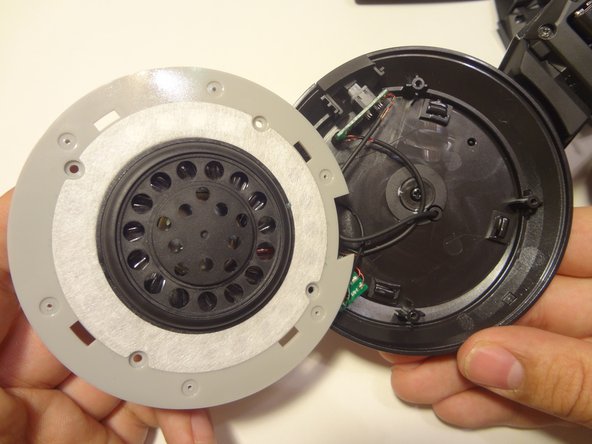
  1. Skullcandy Mix Master DJ Mylar Driver Replacement, Mylar Driver: stap 1, afbeelding 1 van 3 Skullcandy Mix Master DJ Mylar Driver Replacement, Mylar Driver: stap 1, afbeelding 2 van 3 Skullcandy Mix Master DJ Mylar Driver Replacement, Mylar Driver: stap 1, afbeelding 3 van 3
    • With the plastic opening tool, separate the padded ear cup from the main speaker component.

    • Make sure to fold the ear cup inward to avoid getting in the way of the opposite side.

  2. Skullcandy Mix Master DJ Mylar Driver Replacement: stap 2, afbeelding 1 van 1
    • Using your screw driver, remove the six Philips 2mm screws located on the chrome ring.

  3. Skullcandy Mix Master DJ Mylar Driver Replacement: stap 3, afbeelding 1 van 2 Skullcandy Mix Master DJ Mylar Driver Replacement: stap 3, afbeelding 2 van 2
    • Using your screw driver, remove the four 3mm Phillips screws located on the grey speaker.

    • Remove the driver from the gray speaker assembly.

    • Carefully remove the driver assembly since there are wires connected to the headphone jack, headband, and mute button.

  4. Skullcandy Mix Master DJ Mylar Driver Replacement: stap 4, afbeelding 1 van 2 Skullcandy Mix Master DJ Mylar Driver Replacement: stap 4, afbeelding 2 van 2
    • Using your screw driver, remove the two 2mm Phillips screws located on the circuit panel of the audio jack.

    • Carefully separate the jack from the ear cup casing.

    • If you are working on the right ear cup, the mute button circuit board may be difficult to remove.

  5. Skullcandy Mix Master DJ Mylar Driver Replacement: stap 5, afbeelding 1 van 2 Skullcandy Mix Master DJ Mylar Driver Replacement: stap 5, afbeelding 2 van 2
    • The Mylar driver is connected to several small circuit boards by soldered wires. It can only be removed by cutting the connecting wires.

    • Do not pull the driver away too fast since there are wires connecting the driver to the ear cup.

    • Soldering Guide: https://www.youtube.com/watch?v=urGB_IUX...

Conclusie

To reassemble your device, follow these instructions in reverse order.

Één andere persoon heeft deze handleiding voltooid.

Sean Herlihy

Lid sinds: 03/30/15

117 Reputatie

1 Handleiding geschreven

Team

UMass Dartmouth, Team 1-3, Shastany Spring 2015 Lid van UMass Dartmouth, Team 1-3, Shastany Spring 2015

UMASSD-SHASTANY-S15S1G3

3 Leden

3 handleidingen geschreven

0 opmerkingen

Voeg opmerking toe

Weergavestatistieken:

Afgelopen 24 uren: 0

Afgelopen 7 dagen: 0

Afgelopen 30 dagen: 5

Altijd: 1,484