Ga door naar hoofdinhoud

Skullcandy Air Raid USB Board Replacement

Wat je nodig hebt

  1. Skullcandy Air Raid USB Board Replacement, Rubber Cover: stap 1, afbeelding 1 van 1
    • Starting with the corners, gently pull the rubber cover off of the device.

  2. Skullcandy Air Raid USB Board Replacement, Handle: stap 2, afbeelding 1 van 1
    • Using the T-6 hexagonal screwdriver, unscrew the four 10mm #6 hex screws on the right side of the device.

    • Remove the handle from the device.

  3. Skullcandy Air Raid USB Board Replacement, Front Plate: stap 3, afbeelding 1 van 1
    • Unscrew the two screws on the left side of the device using the phillips #00 screwdriver.

    • One 5mm Phillips screw.

    • One 8mm Phillips screw.

  4. Skullcandy Air Raid USB Board Replacement: stap 4, afbeelding 1 van 1
    • Gently pull the sides of the front plate outwards from the device.

    • Pull up on the front plate to remove it from the device.

  5. Skullcandy Air Raid USB Board Replacement, Speakers: stap 5, afbeelding 1 van 1
    • Using a #000 Philips Screwdriver, unscrew the four 8 mm Philips screws from each corner of both speakers (eight 8 mm Philips screws total).

  6. Skullcandy Air Raid USB Board Replacement: stap 6, afbeelding 1 van 1
    • Using the plastic opening tool, pry around edges of the speaker to loosen glue contact with front plate.

    • If you are unable to loosen glue contact using the plastic opening tool, use a heat gun to assist in removal.

  7. Skullcandy Air Raid USB Board Replacement: stap 7, afbeelding 1 van 1
    • Lift the speaker out of the device.

    • Be aware of the connection with the ribbon cable.

    • For reassembly, ensure proper orientation of the cable plug.

  8. Skullcandy Air Raid USB Board Replacement: stap 8, afbeelding 1 van 1
    • Firmly pull on the end of ribbon cable to disconnect the speaker from the motherboard.

  9. Skullcandy Air Raid USB Board Replacement, Control Buttons: stap 9, afbeelding 1 van 1
    • Using a Phillips #00 Precision Screwdriver, unscrew two 6 mm screws from the middle of the panel, above and below volume buttons.

  10. Skullcandy Air Raid USB Board Replacement: stap 10, afbeelding 1 van 1
    • Lift the button panel.

  11. Skullcandy Air Raid USB Board Replacement, Button Motherboard: stap 11, afbeelding 1 van 1
    • Using a Phillips #00 Precision Screwdriver, unscrew two 6 mm screws from the button motherboard.

  12. Skullcandy Air Raid USB Board Replacement: stap 12, afbeelding 1 van 1
    • Using a plastic opening tool, pry the button motherboard to detach it from the device.

    • The button motherboard is connected to a ribbon cable inside the device.

  13. Skullcandy Air Raid USB Board Replacement, Ribbon Cable: stap 13, afbeelding 1 van 1
    • Pull the black ribbon cord attachment away from the motherboard.

    • Pull on the cable until it releases from the back of the motherboard.

    • The black attachment is part of the connector, not the blue ribbon cable, so it will not disconnect from the motherboard.

  14. Skullcandy Air Raid USB Board Replacement, Back panel: stap 14, afbeelding 1 van 2 Skullcandy Air Raid USB Board Replacement, Back panel: stap 14, afbeelding 2 van 2
    • Using a Phillips #00 Precision Screwdriver, unscrew two 8 mm screws.

    • Lift off the back panel.

  15. Skullcandy Air Raid USB Board Replacement, Ribbon Cables: stap 15, afbeelding 1 van 1
    • Where the blue and white ribbon cable meets the motherboard, pull up on the black piece of the ribbon cable connector.

    • Pull the ribbon cable away from the motherboard.

  16. Skullcandy Air Raid USB Board Replacement: stap 16, afbeelding 1 van 1
    • Pull on grey and white ribbon cable until it disconnects from the motherboard.

  17. Skullcandy Air Raid USB Board Replacement, Left Divider: stap 17, afbeelding 1 van 3 Skullcandy Air Raid USB Board Replacement, Left Divider: stap 17, afbeelding 2 van 3 Skullcandy Air Raid USB Board Replacement, Left Divider: stap 17, afbeelding 3 van 3
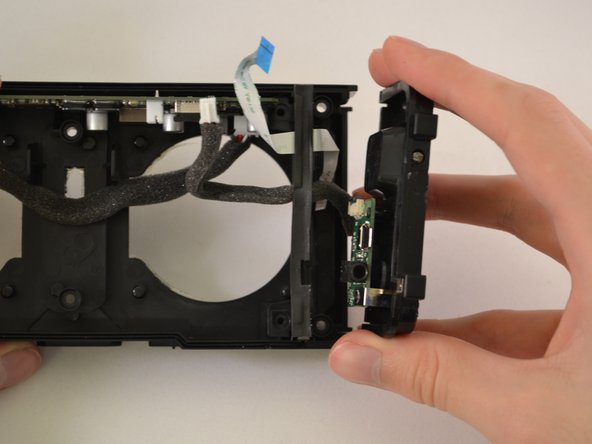
    • Using a Phillips #00 Precision Screwdriver, unscrew two 6 mm screws from the left divider between the main cavity and the USB motherboard.

    • Pull out the USB/On Switch panel.

    • Pull out the Left Divider.

    • For reassembly, lift up on right side of motherboard to slide left divider back in place.

  18. Skullcandy Air Raid USB Board Replacement, USB Motherboard: stap 18, afbeelding 1 van 2 Skullcandy Air Raid USB Board Replacement, USB Motherboard: stap 18, afbeelding 2 van 2
    • Using a Phillips #00 Precision Screwdriver, unscrew two 5 mm Phillips-head screws from the USB motherboard.

    • Remove the metal clip.

Conclusie

To reassemble your device, follow these instructions in reverse order.

2 andere personen hebben deze handleiding voltooid.

Cyrene

Lid sinds: 01/13/15

200 Reputatie

1 Handleiding geschreven

2 opmerkingen

Where can you purchase the replacement?

Mikail Lane - Antwoord

As far as I know,You can't!

Luke Thomas - Antwoord

Voeg opmerking toe

Weergavestatistieken:

Afgelopen 24 uren: 0

Afgelopen 7 dagen: 1

Afgelopen 30 dagen: 2

Altijd: 1,430