Ga door naar hoofdinhoud

Sharp LC-42D62U T-Con Board Replacement

Wat je nodig hebt

  1. Sharp LC-42D62U  T-Con Board Replacement, Remove the SD card cover: stap 1, afbeelding 1 van 1
    • To replace the T-Con board it is not necessary to remove the base.

    • Lay the the TV flat on a padded surface.

  2. Sharp LC-42D62U  T-Con Board Replacement, Detach the rear cover: stap 2, afbeelding 1 van 1
    • Remove 17 screws.

  3. Sharp LC-42D62U  T-Con Board Replacement, Remove the stand fixing angle: stap 3, afbeelding 1 van 1
    • To reassemble all the parts easily, mark with a permanent marker the location of the screws you are removing.

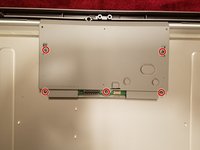
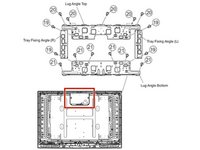
    • 4 screws hold the nd fixing angle.

  4. Sharp LC-42D62U  T-Con Board Replacement, Remove left and right center angles: stap 4, afbeelding 1 van 1
    • 2 screws hold each center angles.

  5. Sharp LC-42D62U  T-Con Board Replacement, Remove the main shield: stap 5, afbeelding 1 van 1
    • 9 screws.

  6. Sharp LC-42D62U  T-Con Board Replacement, Disconnect connectors: stap 6, afbeelding 1 van 1
    • Insert wisdom here.

  7. Sharp LC-42D62U  T-Con Board Replacement, Remove the tray chassis: stap 7, afbeelding 1 van 1
    • 7 screws.

  8. Sharp LC-42D62U  T-Con Board Replacement, Remove the tray fixing angles and the lug angle top: stap 8, afbeelding 1 van 1
    • Remove the 7 screws holding the lug angle top.

    • Then remove only the bottom screws from the tray fixing angles, leaving the top screws attached to the lug angle top.

  9. Sharp LC-42D62U  T-Con Board Replacement, Remove the T-Con board shield: stap 9, afbeelding 1 van 2 Sharp LC-42D62U  T-Con Board Replacement, Remove the T-Con board shield: stap 9, afbeelding 2 van 2
    • 5 screws.

  10. Sharp LC-42D62U  T-Con Board Replacement, Remove the last screw and disconnect the 4 ribbon cables: stap 10, afbeelding 1 van 1
    • To disconnect the ribbon cables, lift the brown tab on the connector.

    • Make sure the ribbons are positioned correctly in the connector when reassembling the new board.

  11. Sharp LC-42D62U  T-Con Board Replacement, Remove the T-Con board: stap 11, afbeelding 1 van 2 Sharp LC-42D62U  T-Con Board Replacement, Remove the T-Con board: stap 11, afbeelding 2 van 2
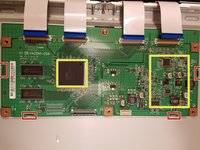
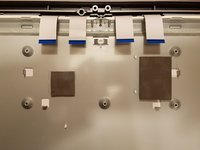
    • There are two pads glued under the board (see yellow marks in the picture): use a heat gun to soften them and then gently pry them to detach the board from the frame.

    • There are also 4 tabs holding the board: gently pull the board to release it, after the pads are disconnected.

    • Reposition the pads on the chassis before installing the new board.

Conclusie

To reassemble your device, follow these instructions in reverse order.

Één andere persoon heeft deze handleiding voltooid.

Emme

Lid sinds: 06/15/17

903 Reputatie

4 handleidingen geschreven

0Gids Commentaar

Voeg opmerking toe

Weergavestatistieken:

Afgelopen 24 uren: 4

Afgelopen 7 dagen: 7

Afgelopen 30 dagen: 50

Altijd: 1,416