Ga door naar hoofdinhoud

Shark Rotator Powered Lift-Away Speed Roller Brush Replacement

Wat je nodig hebt

  1. Shark Rotator Powered Lift-Away Speed Roller Brush Replacement, Belt: stap 1, afbeelding 1 van 3 Shark Rotator Powered Lift-Away Speed Roller Brush Replacement, Belt: stap 1, afbeelding 2 van 3 Shark Rotator Powered Lift-Away Speed Roller Brush Replacement, Belt: stap 1, afbeelding 3 van 3
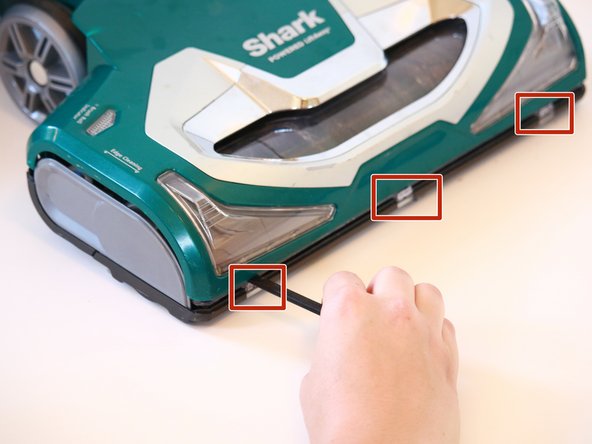
    • Turn the vacuum on its side.

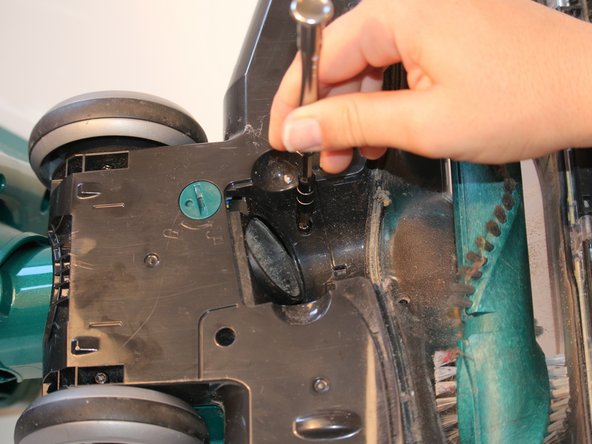
    • Using a quarter, twist the three green locks to the unlock position.

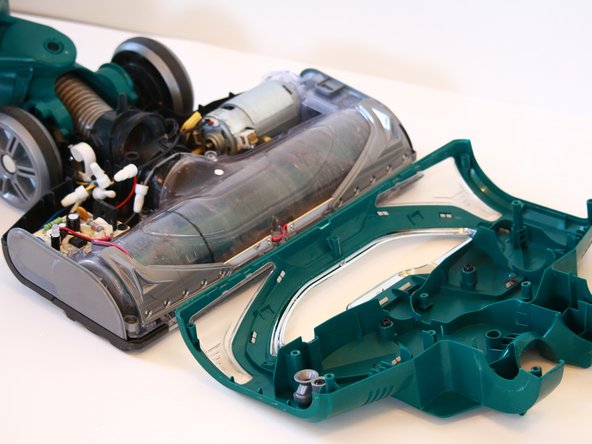
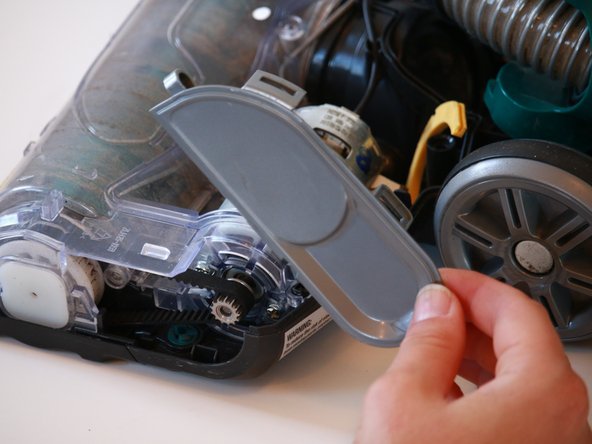
    • Pull the bottom roller brush cover to open the vacuum.

  2. Shark Rotator Powered Lift-Away Speed Roller Brush Replacement: stap 2, afbeelding 1 van 1
    • Using a T20 screwdriver, remove the five 15.9 mm screws on the outside cover.

  3. Shark Rotator Powered Lift-Away Speed Roller Brush Replacement: stap 3, afbeelding 1 van 2 Shark Rotator Powered Lift-Away Speed Roller Brush Replacement: stap 3, afbeelding 2 van 2
    • Remove the three 14.3 mm screws with a T20 screwdriver.

  4. Shark Rotator Powered Lift-Away Speed Roller Brush Replacement: stap 4, afbeelding 1 van 1
    • Remove the two 14.3 mm screws under the wheels with a T20 screwdriver bit.

  5. Shark Rotator Powered Lift-Away Speed Roller Brush Replacement: stap 5, afbeelding 1 van 1
    • Remove the two 15.9 mm screws from behind the wheels with a T20 bit screwdriver.

  6. Shark Rotator Powered Lift-Away Speed Roller Brush Replacement: stap 6, afbeelding 1 van 1
    • Remove the single 13.4 mm small screw behind the roller brush with a PH0 screwdriver bit.

  7. Shark Rotator Powered Lift-Away Speed Roller Brush Replacement: stap 7, afbeelding 1 van 1
    • Remove the single 13.4 mm screw from behind the belted end of the roller brush with a T20 screwdriver bit.

  8. Shark Rotator Powered Lift-Away Speed Roller Brush Replacement: stap 8, afbeelding 1 van 3 Shark Rotator Powered Lift-Away Speed Roller Brush Replacement: stap 8, afbeelding 2 van 3 Shark Rotator Powered Lift-Away Speed Roller Brush Replacement: stap 8, afbeelding 3 van 3
    • Turn the vacuum around.

    • Using a spudger, pry the top of the vacuum cover off. There are three tabs behind each of the clear rectangles below the headlights.

  9. Shark Rotator Powered Lift-Away Speed Roller Brush Replacement: stap 9, afbeelding 1 van 2 Shark Rotator Powered Lift-Away Speed Roller Brush Replacement: stap 9, afbeelding 2 van 2
    • Remove both of the headlight covers with the spudger.

  10. Shark Rotator Powered Lift-Away Speed Roller Brush Replacement: stap 10, afbeelding 1 van 3 Shark Rotator Powered Lift-Away Speed Roller Brush Replacement: stap 10, afbeelding 2 van 3 Shark Rotator Powered Lift-Away Speed Roller Brush Replacement: stap 10, afbeelding 3 van 3
    • Remove the grey side panel on the motor side of the vaccum with a spudger. Pry under each tab to release the side panel.

  11. Shark Rotator Powered Lift-Away Speed Roller Brush Replacement: stap 11, afbeelding 1 van 1
    • Remove the two 13.4 mm screws with a T20 bit screwdriver.

  12. Shark Rotator Powered Lift-Away Speed Roller Brush Replacement: stap 12, afbeelding 1 van 1
    • Remove the single 13.4 mm screw located next to where the belt was detached, securing the motor in place, with a PH1 screwdriver.

  13. Shark Rotator Powered Lift-Away Speed Roller Brush Replacement: stap 13, afbeelding 1 van 3 Shark Rotator Powered Lift-Away Speed Roller Brush Replacement: stap 13, afbeelding 2 van 3 Shark Rotator Powered Lift-Away Speed Roller Brush Replacement: stap 13, afbeelding 3 van 3
    • Remove the visible side of the belt from the gear with a spudger.

  14. Shark Rotator Powered Lift-Away Speed Roller Brush Replacement: stap 14, afbeelding 1 van 1
    • Remove the grey panel from the opposite side, by uncrewing the single 13.4 mm screw with a PH1 screwdriver. This will release the container for the roller brush and belt motor.

  15. Shark Rotator Powered Lift-Away Speed Roller Brush Replacement: stap 15, afbeelding 1 van 2 Shark Rotator Powered Lift-Away Speed Roller Brush Replacement: stap 15, afbeelding 2 van 2
    • Using the spudger, push the white end cap out of the clear plastic by placing the spudger on the roller brush side and pushing the cap outward.

  16. Shark Rotator Powered Lift-Away Speed Roller Brush Replacement: stap 16, afbeelding 1 van 2 Shark Rotator Powered Lift-Away Speed Roller Brush Replacement: stap 16, afbeelding 2 van 2
    • Remove the belt from the gear.

  17. Shark Rotator Powered Lift-Away Speed Roller Brush Replacement, Roller Brush: stap 17, afbeelding 1 van 1
    • Pull roller brush away from the vacuum.

Conclusie

To reassemble your device, follow these instructions in reverse order.

9 andere personen hebben deze handleiding voltooid.

Sujey Ruano

Lid sinds: 10/08/18

706 Reputatie

3 handleidingen geschreven

Team

Cal Poly, Team S4-G6, White Fall 2018 Lid van Cal Poly, Team S4-G6, White Fall 2018

CPSU-WHITE-F18S4G6

4 Leden

12 handleidingen geschreven

12 opmerkingen

By God, what an ordeal: the excruciatingly hard to find screw behind the roller brush was a phillips on my machine. Thanks a google, nw.

Nicholas - Antwoord

Exactly, I struggled for sometime trying to find that 1 little screw that was a Phillips head.

Autumn Lamoon Creech - Antwoord

I figured out how to get it apart… Where do I find a new roller?

Scott D Selk - Antwoord

where can i get a new roller also...

STEVE BOSCH -

We will never, ever buy a Shark vacuum again. What a nightmare

HOG Rider - Antwoord

Voeg opmerking toe

Weergavestatistieken:

Afgelopen 24 uren: 44

Afgelopen 7 dagen: 318

Afgelopen 30 dagen: 1,644

Altijd: 36,213