Ga door naar hoofdinhoud

Shark Professional Steam Pocket Mop Water Tank Replacement

Wat je nodig hebt

  1. Shark Professional Steam Pocket Mop Water Tank Replacement, Shark Professional Steam Pocket Mop Front Panel Disassembly: stap 1, afbeelding 1 van 2 Shark Professional Steam Pocket Mop Water Tank Replacement, Shark Professional Steam Pocket Mop Front Panel Disassembly: stap 1, afbeelding 2 van 2
    • Unwrap the power cord from the handle.

    • Remove the 56.0 mm Phillips head #2 screw located above the water tank cap.

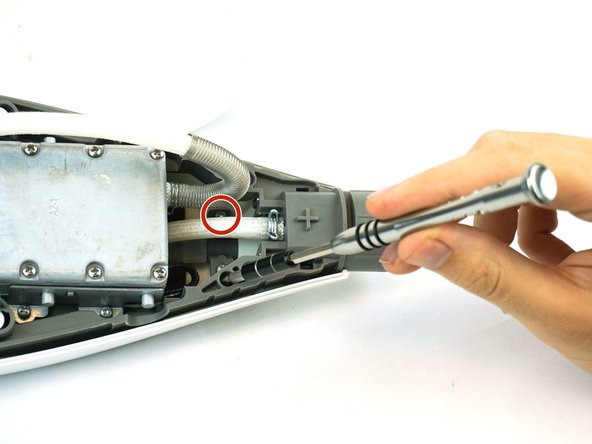
    • Pull the handle to separate it from the body.

  2. Shark Professional Steam Pocket Mop Water Tank Replacement: stap 2, afbeelding 1 van 3 Shark Professional Steam Pocket Mop Water Tank Replacement: stap 2, afbeelding 2 van 3 Shark Professional Steam Pocket Mop Water Tank Replacement: stap 2, afbeelding 3 van 3
    • Remove the three 12.0 mm Phillips head #2 screws where the handle connects to the body.

    • Remove the plastic cap.

  3. Shark Professional Steam Pocket Mop Water Tank Replacement: stap 3, afbeelding 1 van 2 Shark Professional Steam Pocket Mop Water Tank Replacement: stap 3, afbeelding 2 van 2
    • Remove the three 16.0 mm T10 Torx screws near the top of the body and remove the water tank cap.

    • The third screw is directly on other side of the bottom screw in the photo.

  4. Shark Professional Steam Pocket Mop Water Tank Replacement: stap 4, afbeelding 1 van 3 Shark Professional Steam Pocket Mop Water Tank Replacement: stap 4, afbeelding 2 van 3 Shark Professional Steam Pocket Mop Water Tank Replacement: stap 4, afbeelding 3 van 3
    • Remove steam control button cover with a metal spudger.

    • Remove the two 12.0 mm Phillips head #2 screws underneath.

    • Remove the plastic rim with clear plastic cover.

  5. Shark Professional Steam Pocket Mop Water Tank Replacement: stap 5, afbeelding 1 van 3 Shark Professional Steam Pocket Mop Water Tank Replacement: stap 5, afbeelding 2 van 3 Shark Professional Steam Pocket Mop Water Tank Replacement: stap 5, afbeelding 3 van 3
    • Remove the Shark logo decal on the front of body using a metal spudger.

    • Remove the two 12.0 mm Phillips head #2 screws underneath.

    • Pull out the plastic cover to remove.

  6. Shark Professional Steam Pocket Mop Water Tank Replacement: stap 6, afbeelding 1 van 1
    • Pop off the grey front plate to expose the control panel and screws necessary to open mop body.

  7. Shark Professional Steam Pocket Mop Water Tank Replacement, Shark Professional Steam Pocket Mop Open Mop Body: stap 7, afbeelding 1 van 1
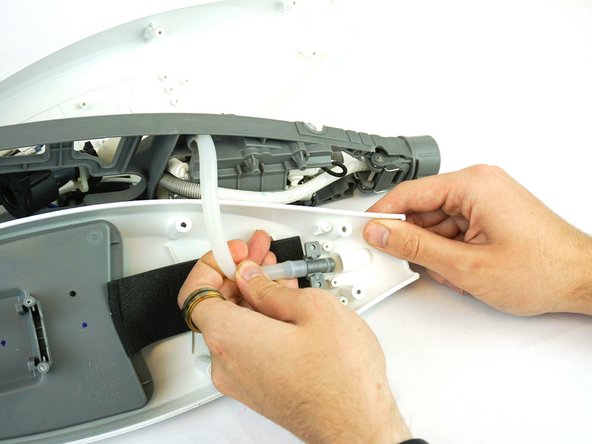
    • Remove the three 12.0 mm Philips head #2 screws connected to the dark grey plastic trim.

  8. Shark Professional Steam Pocket Mop Water Tank Replacement: stap 8, afbeelding 1 van 1
    • Remove the four 16.0 mm T10 Torx screws located on the back of the mop.

  9. Shark Professional Steam Pocket Mop Water Tank Replacement: stap 9, afbeelding 1 van 1
    • Remove the two 12.0 mm Phillips head #2 screws that hold the power cord to the device.

  10. Shark Professional Steam Pocket Mop Water Tank Replacement: stap 10, afbeelding 1 van 1
    • Pop off the dark grey plastic trim cover.

  11. Shark Professional Steam Pocket Mop Water Tank Replacement: stap 11, afbeelding 1 van 1
    • Pop open the white plastic mop body by pulling apart from the front and back side.

  12. Shark Professional Steam Pocket Mop Water Tank Replacement, Water Tank: stap 12, afbeelding 1 van 2 Shark Professional Steam Pocket Mop Water Tank Replacement, Water Tank: stap 12, afbeelding 2 van 2
    • Remove the top left 12.0 mm Phillips head #2 screw from inside body.

  13. Shark Professional Steam Pocket Mop Water Tank Replacement: stap 13, afbeelding 1 van 2 Shark Professional Steam Pocket Mop Water Tank Replacement: stap 13, afbeelding 2 van 2
    • Remove four 12.0 mm Phillips head #2 screws from the inside of the mop body.

  14. Shark Professional Steam Pocket Mop Water Tank Replacement: stap 14, afbeelding 1 van 2 Shark Professional Steam Pocket Mop Water Tank Replacement: stap 14, afbeelding 2 van 2
    • Pull apart the bottom of the mop body from the dark grey connector.

    • Disconnect the tube from the bottom

  15. Shark Professional Steam Pocket Mop Water Tank Replacement: stap 15, afbeelding 1 van 2 Shark Professional Steam Pocket Mop Water Tank Replacement: stap 15, afbeelding 2 van 2
    • Remove two 12.0 mm Phillips head #2 screws on the top and then pull back the black foam to reveal and remove the third 12.0 mm Phillips head #2 screw.

  16. Shark Professional Steam Pocket Mop Water Tank Replacement: stap 16, afbeelding 1 van 1
    • Pull apart the mop body from the water tank to separate.

Conclusie

To reassemble your device, follow these instructions in reverse order.

Één andere persoon heeft deze handleiding voltooid.

Brett Wilson

Lid sinds: 02/12/18

992 Reputatie

6 handleidingen geschreven

Team

USF Tampa, Team S15-G1, Boczar Spring 2018 Lid van USF Tampa, Team S15-G1, Boczar Spring 2018

USFT-BOCZAR-S18S15G1

4 Leden

14 handleidingen geschreven

0 opmerkingen

Voeg opmerking toe

Weergavestatistieken:

Afgelopen 24 uren: 3

Afgelopen 7 dagen: 12

Afgelopen 30 dagen: 59

Altijd: 5,316