Ga door naar hoofdinhoud

Screwless Light Switch Wall Plate Replacement

Wat je nodig hebt

  1. Screwless Light Switch Wall Plate Replacement, Light Switch Wall Plate: stap 1, afbeelding 1 van 3 Screwless Light Switch Wall Plate Replacement, Light Switch Wall Plate: stap 1, afbeelding 2 van 3 Screwless Light Switch Wall Plate Replacement, Light Switch Wall Plate: stap 1, afbeelding 3 van 3
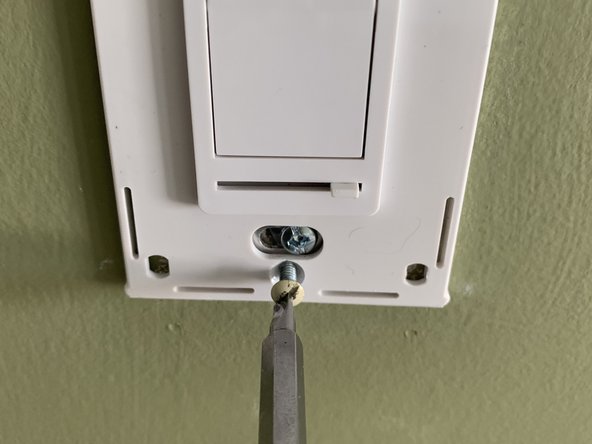
    • Caution: Before beginning this guide, turn the light switch off and turn off power to the switch at the circuit breaker.

    • They are usually labeled by the area of the house to which they belong.

  2. Screwless Light Switch Wall Plate Replacement: stap 2, afbeelding 1 van 3 Screwless Light Switch Wall Plate Replacement: stap 2, afbeelding 2 van 3 Screwless Light Switch Wall Plate Replacement: stap 2, afbeelding 3 van 3
    • Insert a prying tool into the two catches on the top of the light switch.

    • Slowly turn the prying tool or use it as a lever to push the outer plate away from the wall.

  3. Screwless Light Switch Wall Plate Replacement: stap 3, afbeelding 1 van 1
    • Remove the outer layer of the faceplate.

  4. Screwless Light Switch Wall Plate Replacement: stap 4, afbeelding 1 van 2 Screwless Light Switch Wall Plate Replacement: stap 4, afbeelding 2 van 2
    • Remove the inner part of the faceplate by unscrewing the two screws on the top and the bottom.

    • Different faceplates use different screws. Use the screwdriver that works with your screws.

  5. Screwless Light Switch Wall Plate Replacement: stap 5, afbeelding 1 van 3 Screwless Light Switch Wall Plate Replacement: stap 5, afbeelding 2 van 3 Screwless Light Switch Wall Plate Replacement: stap 5, afbeelding 3 van 3
    • Unbox the new faceplate.

    • Just like Step 2, remove the outer layer of the new faceplate by inserting a prying tool in the catches on its top and bottom, pushing the two layers away from each other.

  6. Screwless Light Switch Wall Plate Replacement: stap 6, afbeelding 1 van 3 Screwless Light Switch Wall Plate Replacement: stap 6, afbeelding 2 van 3 Screwless Light Switch Wall Plate Replacement: stap 6, afbeelding 3 van 3
    • Hold the inner layer of the faceplate against the wall.

    • Align the holes in the plate with the existing holes on the light switch or power outlet.

    • Tighten the two screws on the top and bottom.

  7. Screwless Light Switch Wall Plate Replacement: stap 7, afbeelding 1 van 3 Screwless Light Switch Wall Plate Replacement: stap 7, afbeelding 2 van 3 Screwless Light Switch Wall Plate Replacement: stap 7, afbeelding 3 van 3
    • Attach the outer layer of the faceplate by putting it on top of the inner layer and slightly pushing it until you hear a click sound.

Conclusie

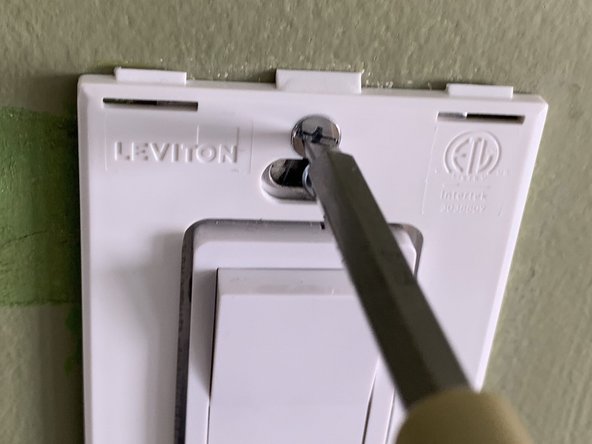
You can follow this guide to replace a power outlet faceplate as the procedure is essentially the same.

2 andere personen hebben deze handleiding voltooid.

Davood Dehghani Firoozabadi

Lid sinds: 09/20/20

428 Reputatie

2 handleidingen geschreven

Team

0 opmerkingen

Voeg opmerking toe

Weergavestatistieken:

Afgelopen 24 uren: 10

Afgelopen 7 dagen: 64

Afgelopen 30 dagen: 244

Altijd: 9,474