Ga door naar hoofdinhoud

Samsung SCH-U340 Logic Board Assembly Replacement

Wat je nodig hebt

  1. Samsung SCH-U340 Logic Board Assembly Replacement, Battery: stap 1, afbeelding 1 van 1
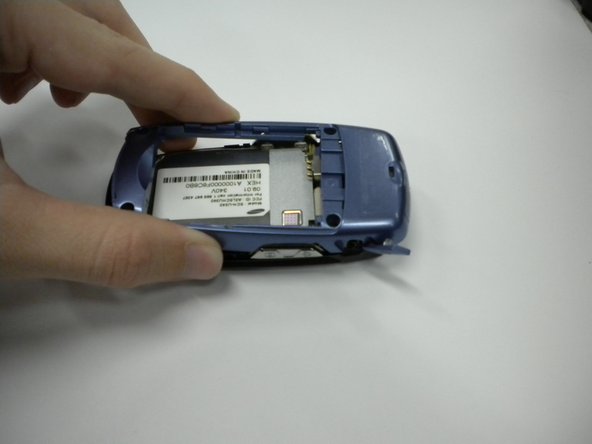
    • Turn the cell phone so that the back side is facing you.

    • Press the upper indent and slide the back cover down.

  2. Samsung SCH-U340 Logic Board Assembly Replacement: stap 2, afbeelding 1 van 1
    • Pull the battery up from indent at the bottom and slide it out.

  3. Samsung SCH-U340 Logic Board Assembly Replacement: stap 3, afbeelding 1 van 1
    • Set the battery aside.

  4. Samsung SCH-U340 Logic Board Assembly Replacement, Top Casing: stap 4, afbeelding 1 van 1
    • The outer casing consists of two separate parts on the upper and lower halves of the device. The upper outer casing is held on through a combination of screws and tabs.

    • First, remove the plastic plugs covering the screws with a spudger.

  5. Samsung SCH-U340 Logic Board Assembly Replacement: stap 5, afbeelding 1 van 1
    • Underneath the plugs are two small screws that can be removed with a small Phillips screwdriver.

    • The screws will need to be pried out after unscrewing them due to their size.

    • Take care not to lose the screws as they are small and have a tendency to roll.

  6. Samsung SCH-U340 Logic Board Assembly Replacement: stap 6, afbeelding 1 van 1
    • The outer cover is now secured with seven tabs: one large tab (marked in red) and seven smaller tabs (marked in orange).

    • To begin removing the outer cover, start by prying the large tab up with a flat object.

    • See next slide for details for smaller tabs.

  7. Samsung SCH-U340 Logic Board Assembly Replacement: stap 7, afbeelding 1 van 1
    • Continue to pry each smaller tab up, taking care not to break the tabs.

    • If disaster strikes and a tab is broken, the outer casing can still be put back on assuming the majority of the tabs are still intact.

  8. Samsung SCH-U340 Logic Board Assembly Replacement: stap 8, afbeelding 1 van 1
    • After the last tab is removed, tug gently on the outer casing to remove it.

    • Don't pull too hard, or you may damage the wires connected to the speaker.

  9. Samsung SCH-U340 Logic Board Assembly Replacement, Lower Casing: stap 9, afbeelding 1 van 1
    • The lower casing is held on by four screws in the corner of the battery enclosure. Remove these screws.

  10. Samsung SCH-U340 Logic Board Assembly Replacement: stap 10, afbeelding 1 van 2 Samsung SCH-U340 Logic Board Assembly Replacement: stap 10, afbeelding 2 van 2
    • Use a spudger to pry the back assembly off of the device.

  11. Samsung SCH-U340 Logic Board Assembly Replacement, Logic Board Assembly: stap 11, afbeelding 1 van 1
    • Use spudger to pry logic board from the casing.

  12. Samsung SCH-U340 Logic Board Assembly Replacement: stap 12, afbeelding 1 van 1
    • Rotate the logic board assembly out of the casing, being careful not to break VGA cable.

  13. Samsung SCH-U340 Logic Board Assembly Replacement: stap 13, afbeelding 1 van 1
    • Lift the number pad straight up from the casing.

  14. Samsung SCH-U340 Logic Board Assembly Replacement: stap 14, afbeelding 1 van 1
    • Set the number pad to the side.

Eindstreep

Mitchell Walker

Lid sinds: 01/20/10

25 Reputatie

2 handleidingen geschreven

Team

Cal Poly, Team 3-21, Maness Winter 2010 Lid van Cal Poly, Team 3-21, Maness Winter 2010

CPSU-MANESS-W10S3G21

4 Leden

10 handleidingen geschreven

0 opmerkingen

Voeg opmerking toe

Weergavestatistieken:

Afgelopen 24 uren: 0

Afgelopen 7 dagen: 0

Afgelopen 30 dagen: 2

Altijd: 3,477