Ga door naar hoofdinhoud

Samsung SCH-A670 Camera Replacement

Wat je nodig hebt

  1. Samsung SCH-A670 Camera Replacement, Battery Cover: stap 1, afbeelding 1 van 1
    • Slide the latch on the back of the phone up.

  2. Samsung SCH-A670 Camera Replacement, Battery: stap 2, afbeelding 1 van 1
    • Remove the battery.

  3. Samsung SCH-A670 Camera Replacement, Logic Board: stap 3, afbeelding 1 van 1
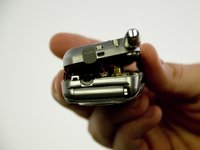
    • After removing the battery, remove the four small Phillips-head screws with a #0 Phillips screwdriver.

  4. Samsung SCH-A670 Camera Replacement: stap 4, afbeelding 1 van 1
    • Using a thumbtack, pry the small plastic cover from the case near the base of the antenna.

  5. Samsung SCH-A670 Camera Replacement: stap 5, afbeelding 1 van 1
    • With a #0 Phillips screwdriver remove the screw which you just uncovered.

  6. Samsung SCH-A670 Camera Replacement: stap 6, afbeelding 1 van 2 Samsung SCH-A670 Camera Replacement: stap 6, afbeelding 2 van 2
    • Using the spudger, carefully pry the case apart starting near the charging port. Ease the case open.

    • Then disconnect the small power connector near the top of the phone.

  7. Samsung SCH-A670 Camera Replacement: stap 7, afbeelding 1 van 1
    • Gently pry up the ribbon-type connector with the spudger.

  8. Samsung SCH-A670 Camera Replacement: stap 8, afbeelding 1 van 1
    • Carefully pry the logic board from the case with the spudger.

  9. Samsung SCH-A670 Camera Replacement, Keypad: stap 9, afbeelding 1 van 1
    • Once the logic board has been removed, peel the keypad up.

  10. Samsung SCH-A670 Camera Replacement, Keypad Housing: stap 10, afbeelding 1 van 2 Samsung SCH-A670 Camera Replacement, Keypad Housing: stap 10, afbeelding 2 van 2
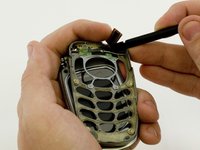
    • When using a spudger the keypad housing comes off quite easily, although it may be necessary to guide the ribbon cable through the slot in the housing.

  11. Samsung SCH-A670 Camera Replacement, Screen Casing: stap 11, afbeelding 1 van 1
    • Remove screws with #0 Phillips screwdriver.

  12. Samsung SCH-A670 Camera Replacement: stap 12, afbeelding 1 van 1
    • Carefully pry apart the casing with the spudger tool.

  13. Samsung SCH-A670 Camera Replacement, Screen: stap 13, afbeelding 1 van 1
    • Use the spudger to carefully pry off the speaker.

  14. Samsung SCH-A670 Camera Replacement: stap 14, afbeelding 1 van 1
    • Carefully pry off the ringer with the spudger.

  15. Samsung SCH-A670 Camera Replacement: stap 15, afbeelding 1 van 1
    • Carefully pry off the screen with the spudger.

  16. Samsung SCH-A670 Camera Replacement, Camera: stap 16, afbeelding 1 van 1
    • Gently pry off the camera with the spudger.

Conclusie

To reassemble your device, follow these instructions in reverse order.

Nathan Brink

Lid sinds: 04/11/10

19 Reputatie

7 handleidingen geschreven

Team

Cal Poly, Team 34-59, Forte Spring 2010 Lid van Cal Poly, Team 34-59, Forte Spring 2010

CPSU-FORTE-S10S34G59

4 Leden

14 handleidingen geschreven

0 opmerkingen

Voeg opmerking toe

Weergavestatistieken:

Afgelopen 24 uren: 0

Afgelopen 7 dagen: 0

Afgelopen 30 dagen: 1

Altijd: 4,138