Ga door naar hoofdinhoud

Samsung Radiant 360 R1 Touch Control Panel Replacement

Wat je nodig hebt

  1. Samsung Radiant 360 R1 Touch Control Panel Replacement, Micro USB / Power Port Panel: stap 1, afbeelding 1 van 1
    • Working on your device while it is turned on may result in electric shock. Make sure to shut down and unplug your device before you begin.

    • Use the plastic opening tool to lift and remove the rubber grommet plugs.

  2. Samsung Radiant 360 R1 Touch Control Panel Replacement: stap 2, afbeelding 1 van 1
    • Using a PH1 Philips screwdriver, remove four (9.5mm x 1.6mm) screws from the base plate.

    • Remove base plate by stabilizing speaker and using plastic prying tool to pry the base plate from the speaker.

  3. Samsung Radiant 360 R1 Touch Control Panel Replacement: stap 3, afbeelding 1 van 1
    • Place the speaker on the table with the Touch Pad facing down. This will leave you with the Port Panel exposed.

    • Remove speaker grill by stabilizing speaker on a table and applying pressure to the bottom of the speaker. Slide the speaker grill up and away from the remaining endcap.

  4. Samsung Radiant 360 R1 Touch Control Panel Replacement: stap 4, afbeelding 1 van 1
    • Remove the two exposed (9.5mm x 1.6mm) PH1 Phillips screws on the Port Panel.

    • Remove the Port Panel from the speaker body, exposing the ribbon cables.

  5. Samsung Radiant 360 R1 Touch Control Panel Replacement: stap 5, afbeelding 1 van 1
    • While stabilizing the Port Panel remove the two ribbon cables one at a time by pressing the locking clip down on the ribbon cable connectors and pulling the connector away from the Port Panel.

  6. Samsung Radiant 360 R1 Touch Control Panel Replacement, 1" Tweeter Speaker: stap 6, afbeelding 1 van 3 Samsung Radiant 360 R1 Touch Control Panel Replacement, 1" Tweeter Speaker: stap 6, afbeelding 2 van 3 Samsung Radiant 360 R1 Touch Control Panel Replacement, 1" Tweeter Speaker: stap 6, afbeelding 3 van 3
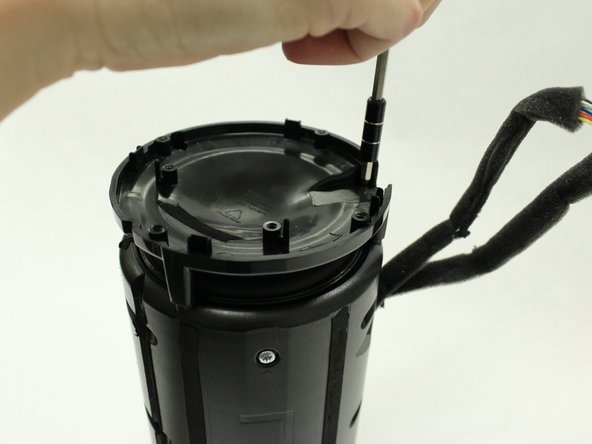
    • Remove the four (9.5mm x 1.6mm) PH1 Phillips screws on the port speaker body.

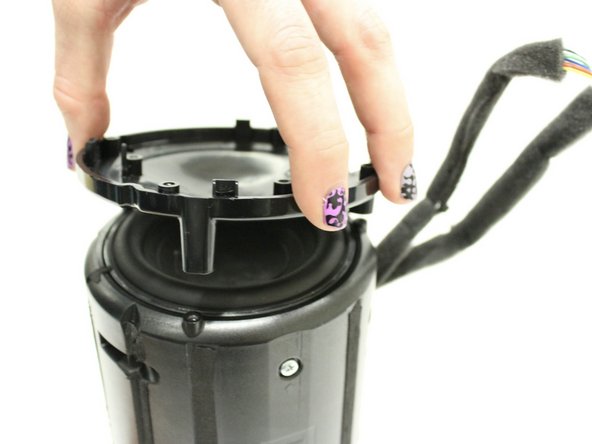
    • Remove the Port Panel exposing the subwoofer.

  7. Samsung Radiant 360 R1 Touch Control Panel Replacement: stap 7, afbeelding 1 van 3 Samsung Radiant 360 R1 Touch Control Panel Replacement: stap 7, afbeelding 2 van 3 Samsung Radiant 360 R1 Touch Control Panel Replacement: stap 7, afbeelding 3 van 3
    • Remove the eight (9.5mm x 1.6mm) PH1 Phillips screws on the right side of the speaker body.

    • Remove the one (9.5mm x 1.6mm) PH1 Phillips screw on the left side of the speaker body.

    • The body sides are denoted with a "R" and an "L" for right and left sides.

  8. Samsung Radiant 360 R1 Touch Control Panel Replacement: stap 8, afbeelding 1 van 1
    • Open up the body to expose the inner panel and motherboard.

  9. Samsung Radiant 360 R1 Touch Control Panel Replacement: stap 9, afbeelding 1 van 3 Samsung Radiant 360 R1 Touch Control Panel Replacement: stap 9, afbeelding 2 van 3 Samsung Radiant 360 R1 Touch Control Panel Replacement: stap 9, afbeelding 3 van 3
    • Remove the ribbon cable from the tweeter which is attached to the main motherboard.

    • Slide the tweeter out of the enclosure.

  10. Samsung Radiant 360 R1 Touch Control Panel Replacement, Touch Panel: stap 10, afbeelding 1 van 1
    • Separate the control panel from the base.

  11. Samsung Radiant 360 R1 Touch Control Panel Replacement: stap 11, afbeelding 1 van 1
    • Control panel is now removed.

Conclusie

To reassemble your device, follow these instructions in reverse order.

Één andere persoon heeft deze handleiding voltooid.

Kim

Lid sinds: 01/24/17

128 Reputatie

1 Handleiding geschreven

Team

UW Tacoma, Team 2-5, Rose Winter 2017 Lid van UW Tacoma, Team 2-5, Rose Winter 2017

UWT-ROSE-W17S2G5

4 Leden

4 handleidingen geschreven

0 opmerkingen

Voeg opmerking toe

Weergavestatistieken:

Afgelopen 24 uren: 0

Afgelopen 7 dagen: 2

Afgelopen 30 dagen: 8

Altijd: 655