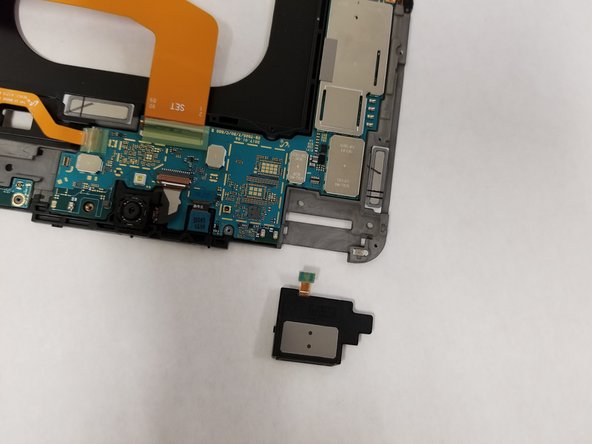
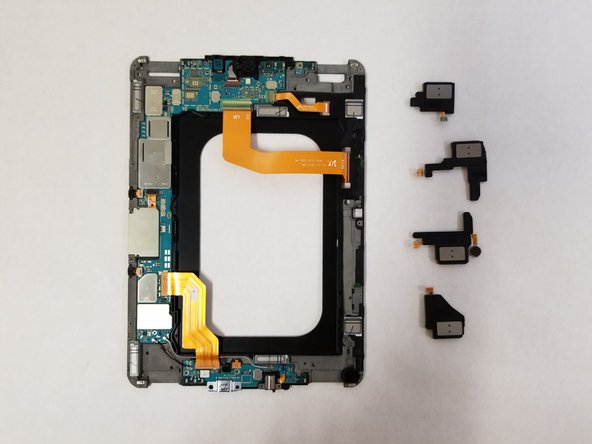
Ga door naar hoofdinhoud

Samsung Galaxy Tab S3 Speaker Replacement

Wat je nodig hebt

  1. Samsung Galaxy Tab S3 Speaker Replacement, Display: stap 1, afbeelding 1 van 1
    • To soften the adhesive holding the tablet together, heat up the edges of the glass panel using a heated iOpener on the edge of the device. Alternatively you can use a heat gun to loosen the adhesive.

    • Leave the iOpener on edge for two minutes.

    • Be careful not to burn yourself while handling the hot iOpener. For more information on the iOpener, use the iOpener Instructions Guide.

  2. Samsung Galaxy Tab S3 Speaker Replacement: stap 2, afbeelding 1 van 1
    • Place a suction cup near edge that you heated up with the iOpener.

    • Press down on the suction cup to create a seal, and pull up with force to create a separation between the display and the midframe.

    • Use an opening tool to split apart the glass panel from the midframe.

    • Be careful to not break the glass when prying from the frame.

  3. Samsung Galaxy Tab S3 Speaker Replacement: stap 3, afbeelding 1 van 1
    Gereedschap gebruikt in deze stap:
    Plastic Cards
    $2.99
    Koop
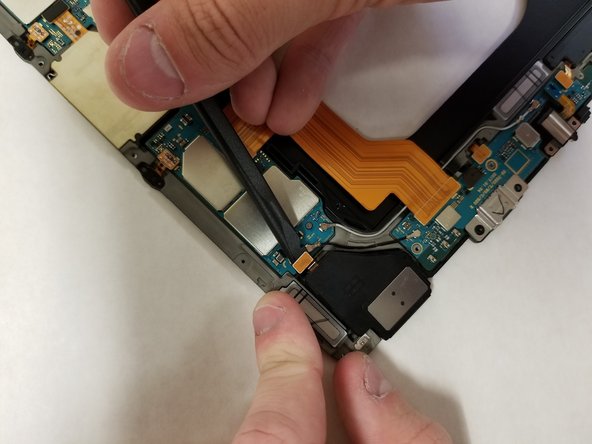
    • As you continue along the edge using the opening tool, use a plastic card to keep the glass separate from the midframe.

    • You can also use multiple opening picks instead of a plastic card.

  4. Samsung Galaxy Tab S3 Speaker Replacement: stap 4, afbeelding 1 van 3 Samsung Galaxy Tab S3 Speaker Replacement: stap 4, afbeelding 2 van 3 Samsung Galaxy Tab S3 Speaker Replacement: stap 4, afbeelding 3 van 3
    • Pull off the glass panel using the suction cup.

    • As you remove the glass panel, be careful not to tear the ribbon connecting the motherboard to the display.

    • Carefully disconnect the ribbon cable connecting the display assembly to the motherboard. You can disconnect this ribbon from either end.

  5. Samsung Galaxy Tab S3 Speaker Replacement, Rear glass panel: stap 5, afbeelding 1 van 2 Samsung Galaxy Tab S3 Speaker Replacement, Rear glass panel: stap 5, afbeelding 2 van 2
    • Repeat steps 3 through 7 to remove the rear glass panel on the opposite side of the device.

  6. Samsung Galaxy Tab S3 Speaker Replacement, Battery: stap 6, afbeelding 1 van 2 Samsung Galaxy Tab S3 Speaker Replacement, Battery: stap 6, afbeelding 2 van 2
    • Use a Phillips #000 screwdriver to unscrew the five screws securing the battery, and the twenty-two screws surrounding the midframe.

  7. Samsung Galaxy Tab S3 Speaker Replacement: stap 7, afbeelding 1 van 1
    • The midframe should snap off from the device’s motherboard.

  8. Samsung Galaxy Tab S3 Speaker Replacement: stap 8, afbeelding 1 van 3 Samsung Galaxy Tab S3 Speaker Replacement: stap 8, afbeelding 2 van 3 Samsung Galaxy Tab S3 Speaker Replacement: stap 8, afbeelding 3 van 3
    • Locate the ribbon running from the midframe and disconnect it from the motherboard with the flat end of a spudger.

  9. Samsung Galaxy Tab S3 Speaker Replacement: stap 9, afbeelding 1 van 2 Samsung Galaxy Tab S3 Speaker Replacement: stap 9, afbeelding 2 van 2
    • Use the flat end of the spudger to pop off the connector between the battery and the motherboard.

  10. Samsung Galaxy Tab S3 Speaker Replacement: stap 10, afbeelding 1 van 2 Samsung Galaxy Tab S3 Speaker Replacement: stap 10, afbeelding 2 van 2
    • Flip the midframe over and pop the battery out, making sure to slide it out from underneath the ribbon cables.

  11. Samsung Galaxy Tab S3 Speaker Replacement: stap 11, afbeelding 1 van 1
    • The battery should now be removed and detached from the device.

  12. Samsung Galaxy Tab S3 Speaker Replacement, Speakers: stap 12, afbeelding 1 van 1
    • The Tab S3 has four speakers, one located on each corner.

    • Each of the speakers is a different shape and size.

  13. Samsung Galaxy Tab S3 Speaker Replacement: stap 13, afbeelding 1 van 3 Samsung Galaxy Tab S3 Speaker Replacement: stap 13, afbeelding 2 van 3 Samsung Galaxy Tab S3 Speaker Replacement: stap 13, afbeelding 3 van 3
    • Use your finger to snap one side of the speaker module off of the motherboard. Use the flat end of a spudger to snap off the other side.

  14. Samsung Galaxy Tab S3 Speaker Replacement: stap 14, afbeelding 1 van 3 Samsung Galaxy Tab S3 Speaker Replacement: stap 14, afbeelding 2 van 3 Samsung Galaxy Tab S3 Speaker Replacement: stap 14, afbeelding 3 van 3
    • Use the flat end of the spudger to disconnect the ribbon connector from the motherboard.

    • Remove the speaker from the device.

  15. Samsung Galaxy Tab S3 Speaker Replacement: stap 15, afbeelding 1 van 2 Samsung Galaxy Tab S3 Speaker Replacement: stap 15, afbeelding 2 van 2
    • The second speaker module is located on the bottom right of the device. This speaker module is attached to the vibration motor, which is what provides haptic feedback for the tablet.

    • Use the flat end of the spudger to snap the speaker module off of the motherboard.

  16. Samsung Galaxy Tab S3 Speaker Replacement: stap 16, afbeelding 1 van 2 Samsung Galaxy Tab S3 Speaker Replacement: stap 16, afbeelding 2 van 2
    • Use the flat end of the spudger to snap the ribbon connector off of the motherboard.

    • Be careful not to tear the cable connecting the vibration motor to the speaker module. You will not be able to remove the speaker completely until you unstick the vibration motor.

  17. Samsung Galaxy Tab S3 Speaker Replacement: stap 17, afbeelding 1 van 3 Samsung Galaxy Tab S3 Speaker Replacement: stap 17, afbeelding 2 van 3 Samsung Galaxy Tab S3 Speaker Replacement: stap 17, afbeelding 3 van 3
    • Use the pointy end of the spudger to remove the vibration motor from the motherboard.

    • Much like the display assembly, the vibration motor is attached to the device with a good amount of adhesive, and may require some force to remove.

    • Remove the speaker and the vibration motor from the device.

  18. Samsung Galaxy Tab S3 Speaker Replacement: stap 18, afbeelding 1 van 3 Samsung Galaxy Tab S3 Speaker Replacement: stap 18, afbeelding 2 van 3 Samsung Galaxy Tab S3 Speaker Replacement: stap 18, afbeelding 3 van 3
    • The third speaker module on the top right corner comes off a bit easier than the rest.

    • Use the flat end of the spudger to snap the ribbon connector off of the motherboard and remove the speaker from the device.

  19. Samsung Galaxy Tab S3 Speaker Replacement: stap 19, afbeelding 1 van 3 Samsung Galaxy Tab S3 Speaker Replacement: stap 19, afbeelding 2 van 3 Samsung Galaxy Tab S3 Speaker Replacement: stap 19, afbeelding 3 van 3
    • Only one more speaker module to go. This one is located on the top left corner.

    • Use the flat end of the spudger to snap the ribbon connector off of the motherboard.

  20. Samsung Galaxy Tab S3 Speaker Replacement: stap 20, afbeelding 1 van 3 Samsung Galaxy Tab S3 Speaker Replacement: stap 20, afbeelding 2 van 3 Samsung Galaxy Tab S3 Speaker Replacement: stap 20, afbeelding 3 van 3
    • Use the pointy end of the spudger to snap the speaker module off of the motherboard.

Conclusie

To reassemble your device, follow these instructions in reverse order. If you have removed too much adhesive, you may need to apply more during the reassembly process.

Één andere persoon heeft deze handleiding voltooid.

Mimi Fucini

Lid sinds: 04/18/18

684 Reputatie

4 handleidingen geschreven

Team

Cal Poly, Team S22-G4, Maness Spring 2018 Lid van Cal Poly, Team S22-G4, Maness Spring 2018

CPSU-MANESS-S18S22G4

5 Leden

15 handleidingen geschreven

2 opmerkingen

This repair can be done without removing the screen!

hansderaedt - Antwoord

Is removal of the screen and battery really necessary for this repair? You show how to remove them, but in subsequent pictures, the battery remains in.

Steets - Antwoord

Voeg opmerking toe

Weergavestatistieken:

Afgelopen 24 uren: 0

Afgelopen 7 dagen: 6

Afgelopen 30 dagen: 7

Altijd: 1,104