Ga door naar hoofdinhoud

Samsung Galaxy Tab 2 10.1 Front Camera Replacement

Wat je nodig hebt

  1. Samsung Galaxy Tab 2 10.1 Front Camera Replacement, Back Cover: stap 1, afbeelding 1 van 2 Samsung Galaxy Tab 2 10.1 Front Camera Replacement, Back Cover: stap 1, afbeelding 2 van 2
    • The plastic opening tool may break during this step. You may need to use the heavy duty spudger instead.

    • Insert the plastic opening tool between the glass screen and the back cover so the curved end of the plastic opening tool is under the glass. Gently pry the back cover away from the glass screen.

    • Be sure to lift the entire display from the body and that you are not are lifting the glass from the display. You will need to reach down a little further for the correct removal.

    • Continue inserting the plastic opening tool around the whole device screen to completely separate the back cover from the glass screen.

  2. Samsung Galaxy Tab 2 10.1 Front Camera Replacement: stap 2, afbeelding 1 van 2 Samsung Galaxy Tab 2 10.1 Front Camera Replacement: stap 2, afbeelding 2 van 2
    • Gently lift the screen up with your finger.

    • If the screen will not separate from the back cover, try repeating step 1.

  3. Samsung Galaxy Tab 2 10.1 Front Camera Replacement, Battery Disconnect: stap 3, afbeelding 1 van 1
    • Using your fingers, remove the green tape covering the battery connector.

  4. Samsung Galaxy Tab 2 10.1 Front Camera Replacement: stap 4, afbeelding 1 van 3 Samsung Galaxy Tab 2 10.1 Front Camera Replacement: stap 4, afbeelding 2 van 3 Samsung Galaxy Tab 2 10.1 Front Camera Replacement: stap 4, afbeelding 3 van 3
    • Insert the flat end of the heavy-duty spudger between the wires and underneath the battery connector. Carefully lift the black battery connector up to disconnect it from the motherboard.

    • The metal spudger shown in the photo is not recommended due to the possibility of an electrical short. Use an ESD-safe tool, such as a heavy-duty (nylon) spudger.

  5. Samsung Galaxy Tab 2 10.1 Front Camera Replacement, Front Camera: stap 5, afbeelding 1 van 2 Samsung Galaxy Tab 2 10.1 Front Camera Replacement, Front Camera: stap 5, afbeelding 2 van 2
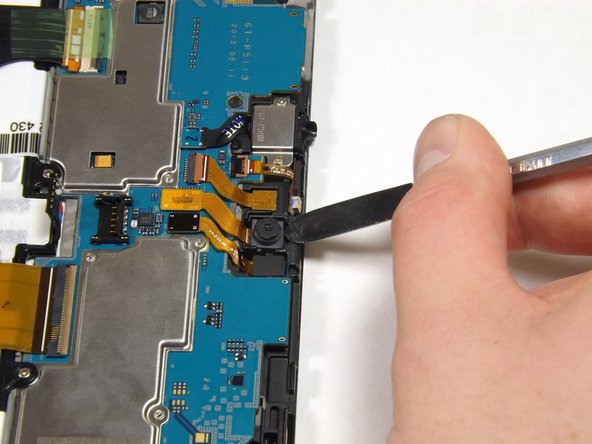
    • Gently lift the camera from its socket with the flat end of the heavy-duty spudger.

  6. Samsung Galaxy Tab 2 10.1 Front Camera Replacement: stap 6, afbeelding 1 van 1
    • Gently lift the gold cable connector with the flat end of the heavy-duty spudger to disconnect it from the device.

Conclusie

To reassemble your device, follow these instructions in reverse order.

8 andere personen hebben deze handleiding voltooid.

Amy Tsai

Lid sinds: 01/30/15

1.977 Reputatie

2 handleidingen geschreven

Team

Cal Poly, Team 6-26, Amido Winter 2015 Lid van Cal Poly, Team 6-26, Amido Winter 2015

CPSU-AMIDO-W15S6G26

5 Leden

14 handleidingen geschreven

2 opmerkingen

You choose the narrative.

krunker

Leon Watts - Antwoord

Voeg opmerking toe

Weergavestatistieken:

Afgelopen 24 uren: 0

Afgelopen 7 dagen: 1

Afgelopen 30 dagen: 1

Altijd: 1,709