Deze vertaling geeft mogelijk niet de meest recente updates van de bronhandleiding weer. Help ons met het updaten van de vertaling of bekijk de bronhandleiding.
Inleiding
Gebruik deze handleiding om een gebarsten of kapot scherm in je Samsung Galaxy S9 te vervangen.
Ontlaad de batterij, voordat je begint met het uit elkaar halen van je telefoon, tot onder de 25%. Je batterij kan in brand vliegen en/of exploderen als het per ongeluk wordt doorboord, maar de kans dat dat gebeurt is veel kleiner als de batterij ontladen is.
Note: deze handleiding toont hoe je het scherm vervangt terwijl je het originele frame, het moederbord en de batterij laat zitten. Sommige vervangende schermen komen echter in een vooraf geïnstalleerd frame (a.k.a. chassis), wat een andere procedure vereist - namelijk het transplanteren van interne onderdelen en het installeren van een nieuwe batterij. Zorg ervoor dat je het goede vervangende onderdeel hebt voordat je aan deze handleiding begint.
Deze handleiding bevat ook instructies voor het verwijderen van de glazen achterkant; hiervoor zul je ook vervangende lijm of kleefstrips nodig hebben om de achterkant weer terug aan de telefoon te bevestigen. Als je vervangende scherm niet met kleefstrips komt, kun je ook sterke dubbelzijdige tape gebruiken, zoals Tesa 61395 om deze te bevestigen.
Het openen van de Samsung Galaxy S9 zal de waterdichte sluiting van de telefoon aantasten. Als je deze niet vervangt, zal je telefoon gewoon functioneren, maar zal deze niet meer waterdicht zijn.
Als het frame beschadigd of gebogen is, is het belangrijk dat je het ook vervangt. Anders kan het zijn dat het scherm niet correct past en dus kapot gaat vanwege de ongelijke druk die erop komt te staan.
Her proces waarbij je het scherm van het frame los haalt, sloopt normaal gezien het scherm, dus volg deze handleiding niet als je niet van plan bent het scherm te vervangen.
Wat je nodig hebt
-
-
Zet, voordat je begint, je telefoon uit.
-
Gebruik een opgewarmde iOpener aan de lange zijde van de telefoon om zo de lijm onder de glazen achterkant te verzachten. Laat de iOpener op z'n minst twee minuten z'n werk doen.
-
-
-
In de komende stappen ga je de kleefstrips doorsnijden die de achterkant aan de telefoon bevestigen.
-
Je gaat de strips doorsnijden op de plaatsen die je op de foto kunt zien:
-
Dikke laag aan kleefmiddel
-
Dunne laag aan kleefmiddel
-
Voorkom dat je snijdt of wrikt in dit gebied om zo de flexbkabel van de vingerafdruksensor te beschermen.
I ran into a chunk of adhesive that was in the red zone right next to where the connector was. Be careful, cut slow, I managed to make it through my working my way through things that felt like foam.
-
-
-
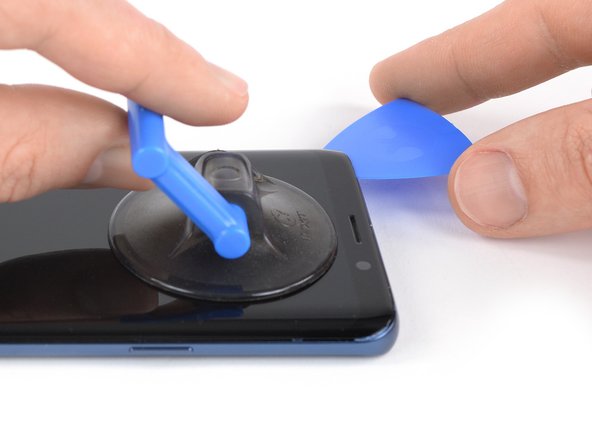
Druk een zuignap op de glazen achterkant.
-
Til de onderkant van de glazen achterkant omhoog met behulp van de zuignap, zodat er een kleine ruimte vrijkomt tussen de achterkant en het frame van de telefoon.
-
Schuif een openingsplectrum in de opening die je zojuist hebt gecreëerd en schuif deze in de richting van de onderste rechterhoek.
-
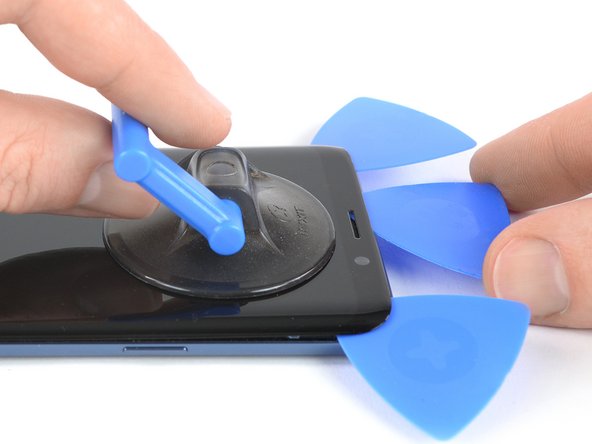
Schuif een tweede openingsplectrum in de opening en schuif deze in de richting van de onderste linkerhoek.
-
Schuif nu een derde openingsplectrum in de ruimte om te voorkomen dat het kleefmiddel zich weer aan de telefoon hecht tijdens de rest van het proces.
The manufacturer obviously doesn't want owners to replace the battery, or they would have a simple method like they did in the past !!! They would rather have you throw it away and replace the phone !!!!
Well. I guess so!
I was so looking forward to doing this.
What a shame this type of manufacturing occurs!
😭
From a do it yourself person.
-
-
-
-
Verwijder de acht 4 mm Phillips #00 schroeven.
I think the #000 fits better!
The second and fourth screws on the bottom row are a little shorter at 2mm ( I measure the others as 3mm). Worth some care to put the screws back in the same holes as they came from. (SM-G960U)
Hi Will,
thank you for mentioning! On our model the “SM-G960XU” all screws have the same length (4 mm). However this might differ between different models and is definitely something to keep an eye on during repairs.
-
-
-
Gebruik het platte einde van een spudger om de flexkabel van de batterij omhoog te duwen en los te maken.
-
-
-
Verwijder de twee 4 mm Phillips #00 schroeven die het plasticen paneeltje op z'n plek houden.
-
-
-
Prepareer een iOpener en gebruik deze op het scherm voor minstens twee minuten om de lijm eronder te verzachten.
-
Plak meerdere lagen tape over het scherm totdat deze volledig is beplakt.
-
Dit zorgt ervoor dat het scherm in een geheel los zal komen en biedt een structuur die het mogelijk maakt om je scherm eruit te liften.
-
-
-
Als het scherm warm aanvoelt, kun je de zuignap aan de bovenkant van het scherm plaatsen.
-
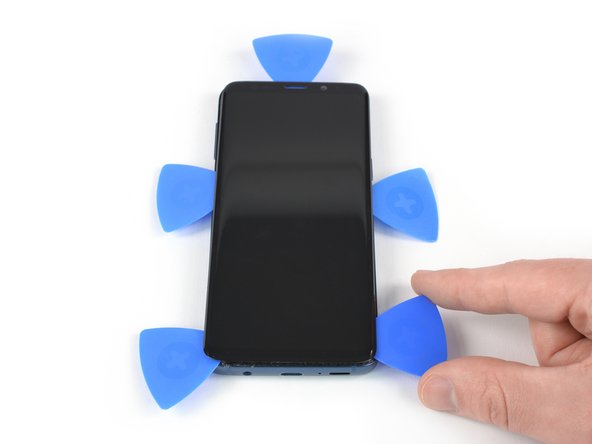
Schuif een openingsplectrum in de opening die je hebt gecreëerd en begin met het lossnijden van de lijm door je plectrum naar de linker bovenhoek te schuiven.
-
-
-
Schuif vervolgens een vierde openingsplectrum in de linkerzijde van het frame en schuif deze naar de linker onderhoek van de telefoon om daar de lijm door te snijden.
-
Schuif nu een vijfde openingsplectrum in de telefoon aan de rechterkant van de telefoon en snijd de overgebleven lijm daar ook door.
-


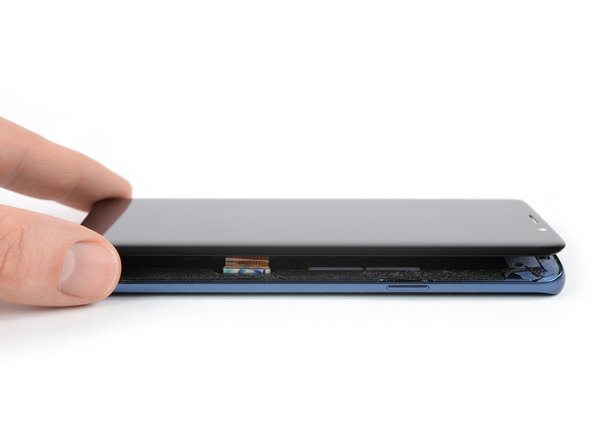

De beste manier om je scherm te bevestigen is met behulp van een op maat uitgesneden stuk dubbelzijdige tape. Plak de tape op de achterkant van het scherm, dirigeer vervolgens de schermkabel door het frame. Plaats het scherm in de juiste positie en druk het op z'n plek.
Om je toestel weer in elkaar te zetten, volg je deze instructies in omgekeerde volgorde.
Zet je telefoon aan en test, indien mogelijk, of je reparatie is geslaagd voordat je de nieuwe kleefstrips aanbrengt en je je telefoon weer afsluit.
Breng je e-afval naar een R2 of e-Stewards gecertificeerde recycler.
Ging je reparatie niet zoals gepland? Check dan ons Antwoordenforum voor hulp bij het oplossen van je problemen.
Annuleren: ik heb deze handleiding niet afgemaakt.
75 andere personen hebben deze handleiding voltooid.
Met dank aan deze vertalers:
90%

Thomas Keulemans helpt ons de wereld te herstellen! Wil je bijdragen?
Begin met vertalen ›


5 opmerkingen
A bit of guidance on where the adhesive seal goes would be nice. I believe I got it right.
digitizer is stuck to glass, and came apart
I followed the entire guide and still got a black screen of death.
Na het uitvoeren van alle stappen kwam ik een goudfolie tegen achter het scherm. Deze zie ik niet terug in jouw beschrijving. Wat kan ik doen?
Nightmare. Impossible to get the back off so far. Being trying using the iOpener with hair dryer for last 1hr. No chance.
Chris Bunney - Antwoord
You’re right Chris. I’ve tried on 3 separate occasions now and haven’t been able to budge that back. All that has happened is the pick has taken a piece out of the glass back leaving a rough edge now.
grahamcatto - Antwoord
it was not easy but doable.
Clinton Stark - Antwoord
It’s difficult, but the trick I did to get it was to wrap the hot iOpener around a bottom corner, apply the suction cup, then I covered the opener and phone with a paper plate, better insulating the area. Then I set my blow dryer to high heat and low velocity and heated the area under the plate for about a minute. Right after turning off the blower, I took off the plate and pulled the suction cup with a cutter at hand. You’ll hear a bit of a cracking/popping noise when the adhesive is starting to give, just apply a little more force and push the cutter at the seam. This method worked great for me, so good luck and just keep at it — you’ve got this!
Nicholas Weger - Antwoord
I used nearly boiling water in a storage zip bag on the phone for 10 minutes. I can’t really recommend this method, but thankfully the bag did not leak - an iOpener is probably a much better way to go. Regardless, the bag covered the entire back of the phone, and the phone was too hot to hold, but I still could not get the glass to budge with the suction cup after struggling with it for about an hour and multiple reheats. I ended up epoxying a 2”x2” square of PVC board to the bottom of the cover and built a relatively complex fixture that pulled on the PVC with the turn of a screw while it held down the frame by the edges. After heating the edges up again It did lift the glass enough to get a pick underneath it, but it cracked the glass and it was a pain to slide a pick around the edge while the glass was cracking all the way around. Once I finally got all the glass off, I spent the next 30 minutes (which is what this entire process is supposed to take… what a joke!) cleaning the adhesive off the phone.
drbenton815 - Antwoord
Heavy Duty Heat Gun from popular discount tool store for the win!
Jesse Meyer - Antwoord
Well, it is not obvious how to do this. I have no iOpener, but a heat cushion for remedy hurting muscles and sometimes a backpain. It is filled with grain of some kind and it is to be heated in a microwave oven for about 3 minutes. After that I enveloped this cushion round the phone and brewed myself a cup of tea. After ten miutes the phone was warm (almost hot) and I was able to press the tip of a small (very small) knife above the charging port into the connection between the phone body and the backplate. A very small opening emerged slowly (this is the critical point in this process) and I was able to start using the iFixit opening picks. It became obvious to me that the opening picks are too blunt to achive this with them. But after starting carefully with the (very small and very sharp) knife, everything went straight forward. Thou I had to give the phone a second heatpush with my heat cushion before the backplate came loose.
borutberg - Antwoord
I used my 3D printer heat bed and heated it to 90 Celcius to succeed.
gahute - Antwoord
It took about 3 minutes on my 90 C printbed to get the first pick in. If the suction cup gives up before the adhesive does, try using some Isopropyl alcohol to clean the back of the phone, and it should stick better. Also, don't apply heat to the screen, just in case that wasn't clear.
Evan Newman -
Used a corn bag (usually used for sore muscles) and incased the phone. It was hot to the touch, but it did the trick. Also needed a knife to have a small enough edge to start prying the back off and get the adhesive to finally pop.
Laurie Hallberg - Antwoord
Don't Forget Step 0! Turn the phone Off and remove the SIM card tray. just to be safe, I'd recommend making a full backup of your phone onto a micro SD card in case the worst should happen. also, make sure anyone who needs to contact you knows you aren't currently available at your phone number.
Evan Newman - Antwoord
We went for a hairdryer. Put it on hot, low blow and put the head right up to the corner. Took maybe 5 minutes per corner!
Robert Tomohamat - Antwoord
Removing the back wasn't too difficult on my phone: several rounds of heating with the iOpener, applying gentle pressure with the suction cup, and eventually a corner lifted up without much force and I could easily slide a pick in. From there it was very straightforward and I had no trouble sliding the picks around and removing the back. The battery removal was much harder in comparison (especially as the iOpener burst when reheating in the microwave for the battery, despite following the time instructions).
Less eWaste - Antwoord