Deze versie kan foutieve bewerkingen bevatten. Schakel over naar de recentste gecontroleerde momentopname.
Wat je nodig hebt
Video overzicht
-
-
Vul een pan met genoeg water om de iOpener volledig in onder te dompelen.
-
Verwarm het water tot het kookt. Zet het vuur uit.
-
Leg je iOpener gedurende 2-3 minuten in het hete water. Zorg dat de iOpener volledig in het water ligt.
-
Gebruik een tang om de iOpener uit de pan te halen.
-
Droog je iOpener grondig met een handdoek.
-
Je iOpener is gereed om te worden gebruikt! als je je iOpener opnieuw op wilt warmen, verwarm je het water weer tot het kookt, zet je het vuur uit en plaats je de iOpener gedurende 2-3 minuten in het water.
-
-
-
Verwarm een iOpener en leg deze gedurende twee minuten op de lange kant van de S8.
-
-
-
In de volgende stappen zul je de lijm langs de zijkanten van de glazen achterkant door gaan snijden.
-
De lijm rondom de glazen achterkant is aangebracht op de plekken die op de eerste foto worden aangegeven.
-
Op de tweede foto zie je wat je kunt verwachten tijdens het wrikken:
-
De rode gebieden geven dikke lagen lijm aan
-
De oranje gebieden geven dunne lagen lijm aan
-
Zorg dat je niet in de gele gebieden wrikt, aangezien de vingerafdruksensor zich hier bevindt en je deze mogelijk kunt beschadigen.
-
-
-
Als je je tool eenmaal stevig in je toestel aan hebt gebracht, verwarm je de iOpener opnieuw en leg je deze nog een keer op je telefoon.
-
-
-
Gebruik een pincet om alle resterende lijm uit het chassis van de telefoon te verwijderen. Maak de vooraf gelijmde gebieden vervolgens schoon met hooggeconcentreerde isopropyl alcohol (>90%) en een stuk stofvrij doek om de gebieden klaar te maken voor een nieuwe laag lijm.
-
Trek de folie van de kleefstrips die op de nieuwe glazen achterkant zitten los en breng een zijkant van de nieuwe achterkant op de juiste plek door deze op de zijkant van het chassis te plaatsen. Druk het glas vervolgens stevig vast op de telefoon.
-
-
-
Deze stap is niet vertaald. Help het te vertalen
-
Insert a SIM card opening tool into the small hole on the left side of the top edge of the phone.
-
Press to eject the tray.
-
Remove the SIM card tray from the phone.
-
-
-
Gebruik het platte einde van een spudger om de batterijaansluiting los te koppelen.
-
-
Deze stap is niet vertaald. Help het te vertalen
-
Use the flat end of a spudger to disconnect the sensor array connector.
-
-
Deze stap is niet vertaald. Help het te vertalen
-
Use the flat end of a spudger to disconnect the front-facing camera connector.
-
-
Deze stap is niet vertaald. Help het te vertalen
-
Use the flat end of a spudger to disconnect the display and digitizer connector.
-
-
Deze stap is niet vertaald. Help het te vertalen
-
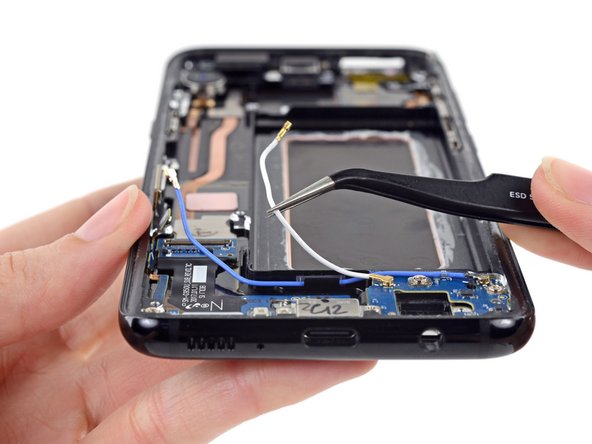
Use the point of a spudger to disconnect two antenna cables that connect the motherboard to the daughterboard.
-
-
Deze stap is niet vertaald. Help het te vertalen
-
Use the flat end of a spudger to disconnect an antenna ribbon cable that connects the motherboard to the daughterboard.
-
-
Deze stap is niet vertaald. Help het te vertalen
-
Use the flat end of a spudger to lift the motherboard and disconnect it from the daughterboard.
-
-
Deze stap is niet vertaald. Help het te vertalen
-
Use the point of a spudger to disconnect the headphone jack connector.
-
-
Deze stap is niet vertaald. Help het te vertalen
-
Insert the point of a spudger in between the headphone jack and the board, against the corner of the jack closest to the ribbon cable.
-
Use the spudger to gently pry the headphone jack out of the board.
-
Remove the headphone jack.
-
-
Deze stap is niet vertaald. Help het te vertalen
-
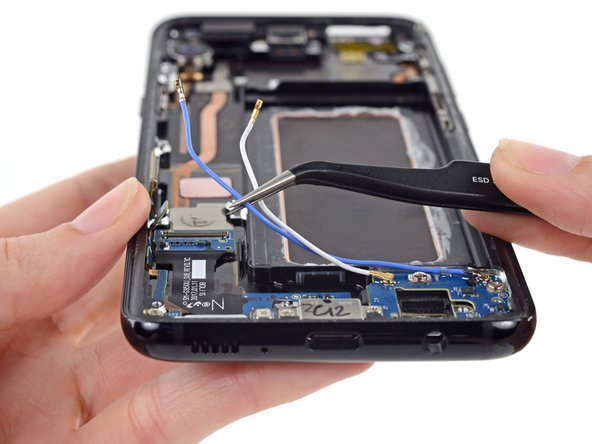
Use tweezers to pull the two antenna cables out of their slot next to the battery compartment.
-
-
Deze stap is niet vertaald. Help het te vertalen
-
Use tweezers to continue to remove the antenna cables from their slot.
-
-
Deze stap is niet vertaald. Help het te vertalen
-
Gently fold the motherboard connector toward the bottom of the phone and out of the way of the antenna ribbon cable.
-
-
Deze stap is niet vertaald. Help het te vertalen
-
Use tweezers to gently peel the antenna ribbon cable off of the side of the case.
-
-
Deze stap is niet vertaald. Help het te vertalen
-
Use tweezers to lift the daughterboard out of the case.
-


Annuleren: ik heb deze handleiding niet afgemaakt.
51 andere personen hebben deze handleiding voltooid.

9 opmerkingen
Something you should add is that the battery temperature sensor is actually on the wireless charging coil. Unless you screw that part on, adding a new daughter board and plugging it in will result in the phone thinking the battery temperature is too low and thus it won't charge
Hi i just change the motherboard and the battery is new the display show ( ! ) is not working. Can you help me to solve the problem. Thank you
Step 22 does not apply to the Samsung galaxy s8 SM-G950F, the daughterboard is different and does not have that connector for anyone trying to source one !
sm-g930F, daughter board does not have the 3mm screws .it seems to use an elastic at each en to hold in place. has anyone successfully replaced this daughterboard?
Andrew Murray28/09/2020
That battery temperature thing really confused me while testing as I put things back together. Makes sense it worked fine when I put back together after I'd had enough.
I found the finger print reader easier to put on after removing it from the case. My finger print reader didn't work after I put it back together. But started working the next day.
I found it easier to connect the motherboard to the daughter board when the daughter board is fixed in, then you just hold the motherboard vertically, click them together and tilt the motherboard back into place while using something to poke the flap connectors out the way.
Those two wires/ arieals? They loop under the motherboard for when the speaker goes back on.
As you're testing as you put things back together, the volume buttons only work when everything is screwed back in. I've come across this before on other samsung phones, killed me the first time trying to figure it out!!