Ga door naar hoofdinhoud

Samsung Galaxy S Vibrant Camera Lens Replacement

Wat je nodig hebt

  1. Samsung Galaxy S Vibrant Camera Lens Replacement, Battery: stap 1, afbeelding 1 van 3 Samsung Galaxy S Vibrant Camera Lens Replacement, Battery: stap 1, afbeelding 2 van 3 Samsung Galaxy S Vibrant Camera Lens Replacement, Battery: stap 1, afbeelding 3 van 3
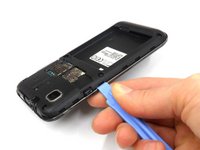
    • Locate the small slit on the bottom edge of the device between the back and front cases.

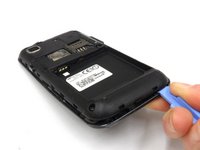
    • Pop the back case off by inserting your finger and pulling the case away from the phone.

    • If necessary (it shouldn't be), use the Plastic Opening Tools to pry the back case off.

  2. Samsung Galaxy S Vibrant Camera Lens Replacement: stap 2, afbeelding 1 van 2 Samsung Galaxy S Vibrant Camera Lens Replacement: stap 2, afbeelding 2 van 2
    • Remove the battery by pushing the bottom edge of the battery up and away from the phone

    • If you would prefer, you may use the Plastic Opening Tools for this step as well.

  3. Samsung Galaxy S Vibrant Camera Lens Replacement, Midframe: stap 3, afbeelding 1 van 1
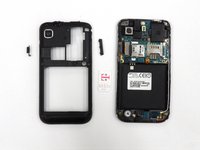
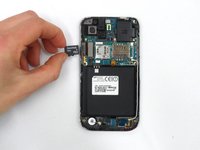
    • Remove SIM card by pushing down and away from the slot, then pulling it out toward the bottom edge of the phone.

  4. Samsung Galaxy S Vibrant Camera Lens Replacement: stap 4, afbeelding 1 van 1
    • Remove the seven 4.5 mm Phillips #00 screws along the perimeter of the phone.

  5. Samsung Galaxy S Vibrant Camera Lens Replacement: stap 5, afbeelding 1 van 3 Samsung Galaxy S Vibrant Camera Lens Replacement: stap 5, afbeelding 2 van 3 Samsung Galaxy S Vibrant Camera Lens Replacement: stap 5, afbeelding 3 van 3
    • Staring near the power button, use a plastic opening tool to disengage the plastic clips securing the midframe.

    • Work carefully, and disengage all of the clips before removing the midframe.

    • The power button and the volume control button on the sides of the phone will fall out when the midframe is removed.

  6. Samsung Galaxy S Vibrant Camera Lens Replacement: stap 6, afbeelding 1 van 2 Samsung Galaxy S Vibrant Camera Lens Replacement: stap 6, afbeelding 2 van 2
    • Slide the SD card out of its slot.

  7. Samsung Galaxy S Vibrant Camera Lens Replacement, Camera Lens: stap 7, afbeelding 1 van 1
    Gereedschap gebruikt in deze stap:
    Tweezers
    $4.99
    Koop
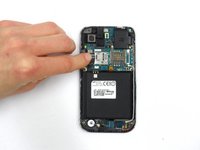
    • Disconnect the ribbon cable and camera lens by tugging gently at the base of the ribbon cable either by pinching with fingers or with the Tweezers.

    • Only use the pinching method when the camera lens is already broken so as to avoid damage.

Conclusie

To reassemble your device, follow these instructions in reverse order.

Taylor Catlin

Lid sinds: 01/15/13

79 Reputatie

6 handleidingen geschreven

Team

Cal Poly, Team 18-37, Regan Winter 2013 Lid van Cal Poly, Team 18-37, Regan Winter 2013

CPSU-REGAN-W13S18G37

4 Leden

8 handleidingen geschreven

0 opmerkingen

Voeg opmerking toe

Weergavestatistieken:

Afgelopen 24 uren: 0

Afgelopen 7 dagen: 1

Afgelopen 30 dagen: 2

Altijd: 2,479