Deze vertaling geeft mogelijk niet de meest recente updates van de bronhandleiding weer. Help ons met het updaten van de vertaling of bekijk de bronhandleiding.
Inleiding
Deze handleiding laat zien hoe je op maat gesneden kleefstrips op je batterij aanbrengt wanneer je deze vervangt.
Als je in plaats daarvan dubbelzijdige tape gebruikt, gebruik dan deze handleiding als algemene richtlijn voor het aanbrengen van de tape.
Wat je nodig hebt
-
-
Verwijder eventuele lijmresten van het telefoonframe en reinig de voorheen gelijmde delen met wat isopropyl alcohol en een pluisvrije doek.
-
-
-
-
Als je voorgesneden plakstrip treklipjes heeft die naar het middelste gat zijn gericht, zul je de kleefstrip eerst in de batterijruimte in het frame bevestigen.
-
Als je voorgesneden kleefstrip treklipjes heeft aan de buitenrand, zal de lijm eerst aan de batterij hechten.
-
Trek de doorzichtige plastic folie van de voorgesneden plakstrip, zodat de lijm zichtbaar wordt.
-
Breng de lange zijde van de kleefstrip op een lijn met het juiste oppervlak, zoals hierboven is aangegeven.
-
Leg de lijm voorzichtig op het oppervlak.
Test the battery before doing anything with adhesive. Also, the adhesive is entirely optional - it is NOT necessary for the phone to function well, as the battery is a tight enough fit not to wiggle any connectors loose.
Für das Samsung S10 die dopplseitigen Klebestreifen (im Set die breiten) verwenden.
-
-
-
Zodra de lijm is uitgelijnd, gebruik je je vingers om de lijm op zijn plaats te drukken.
-
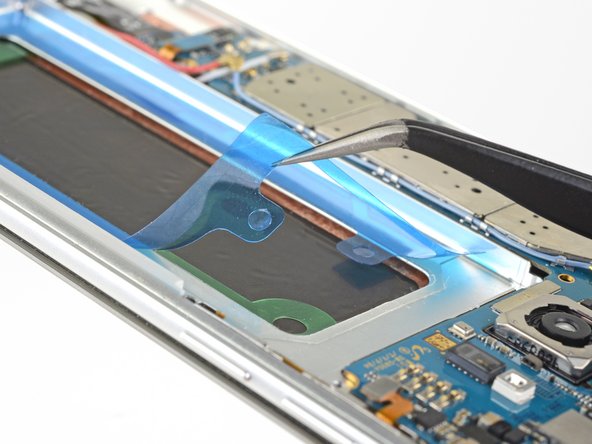
Wanneer je klaar bent om de batterij op het frame te plakken, trek je voorzichtig de blauwe plastic folie weg om de lijm bloot te leggen.
-
Plaats de batterij lichtjes op zijn plaats.
-
Sluit de batterijaansluiting tijdelijk aan om zeker te weten dat de kabel het contact bereikt.
-
Druk met je vingers stevig op de omtrek van de batterij om de lijm te helpen hechten.
-
Koppel de batterij los voordat je de montage hervat.
the plug is actually not so easy to mount. luckily, I tried before removing the blue plastic liners. I ended up plugging the battery in before glueing it in place, just to be sure I could connect it at all, which worked fine for me.
also, I recommend checking if the battery loads and whether the phone still works, before glueing the back cover on the phone
Based on Michael’s comment above, I wanted to test to see how hard it was to electrically connect the battery. I am glad I did, as it would have been difficult to connect after the battery was mounted with adhesive (depending on where the battery sat within its compartment).
My steps:
1. Connect the battery electrically
2. Cut the adhesive into a couple 1” strips, attach them to the back of the battery. (I tried to attach the whole adhesive to the battery and then pull the backing off, but it became kind of a hassle and didnt work too smoothly. I figured a couple strips would be adequate and it was)
3. Press the battery into its compartment.
The directions mention that the adhesive can be repositioned if it’s not aligned correctly. This was definitely not the case for me. Once I put the adhesive onto the battery, I noticed it was slightly off, so I tried to lift it up to reposition it, and it ended up stretching and then getting crumpled. Not too big a deal for the battery, but could be an issue for the case.
Hi Dennis,
Thanks for the comment! I’ll adjust the instructions to include your findings.
Replaced battery. Have always had success doing that on my Samsung phones, but this time when set to charge it flashes for about 5 seconds with the percentage sign not even zero percentage sign, and then it goes off for three seconds, on for 5 seconds off for 3 seconds, on for 5 seconds off for 3 seconds. I feel like it's trying to tell me something but what? no problem opening the phone back up again but hesitant to do so as obviously I was not successful with battery replacement. Any suggestions?
Deborah B
mummafor2@yahoo.com
Hi Deborah! Please post your question in our forum, where more people will see it and be able to help you.
Place the battery by aligning the top to the top of the well, then put it down lightly.
The battery (that I received) is slightly smaller than the well. Optionally, as in the 1st comments, first plug in the connector, test it with usb connect and powering on. Then usb disconnect and power off. You can leave the battery connected while placing carefully to ensure connectability.
I placed the battery aligning the bottom side first, since that side was partly no adhesive, discovering a small gap between the top side of the battery and the well. The connector could not reach the socket. Luckily, the battery was not yet adhered that much and I could lift the battery again.
For me the battery connector could not be aligned properly once the battery was positioned in place due to torsion on the battery cable. You must first position the connector so it is square with the connector in the phone, press it in, and only THEN move the battery into its final resting place. When I did it that way it was easy. With the battery already in place (but not yet fully stuck), it was impossible.
I agree you should connect the connector first. It has to be just in the right place, and also the length of the cable on the iFixit battery was slightly longer than on the original Samsung battery, so putting the battery back where the old one was didn't automatically put the cable in the right place. I had to hold the phone sideways and so I could watch the connector and the socket on the phone come together, and I had to bend the cable a little with the spudger. Then I installed the battery (using the original adhesive).
Finally, there's absolutely no reason to "disconnect the battery before resuming re-assembly." The very next step (at least on a Samsung S10e) is to reinstall the midframe, which will cover the battery connector anyway.
-


Kalibreer je batterij na het voltooien van deze handleiding om ervoor te zorgen dat je batterij optimaal kan functioneren.
Kalibreer je batterij na het voltooien van deze handleiding om ervoor te zorgen dat je batterij optimaal kan functioneren.
Annuleren: ik heb deze handleiding niet afgemaakt.
145 andere personen hebben deze handleiding voltooid.
Met dank aan deze vertalers:
83%


Deze vertalers helpen ons de wereld te repareren! Wil je bijdragen?
Begin met vertalen ›


20 opmerkingen
Fantastic job on the instructions ! I only wish I was able to find a solution, for removing the original glue from the back cover.
That is all I have left to do, and I have been unsuccessful for 6 to 8 hours of trying to find a way to get it off.
Hey Lee,
Your best chance is using high concentration (over 90%) isopropyl alcohol . If you can’t get the surface completely clean, that’s alright. Just try to get all large adhesive residue off, so that the battery and new adhesive will lie flat in the battery well.
I accidentally rubbed off some of the black paste thing under the battery when cleaning it for the new battery adhesive strip. Should I be worried??
Hi Henry,
The black paste is possibly the graphite pad stuck onto the back of the display, which channels heat from the phone to dissipate through the display. There shouldn’t be any damage to your phone!
Hi Arthur,
A big respect & thank you for the instruction to replace the battery. I couldn't be more happier because I did it myself thanks to you & ifixit team. It only took 30 minutes from start to finish. Just waiting on the back glass to arrive other wise excellent job on your side and awesome job to ifixit. I will have to buy higher concentration of isopropyl to wipe those big adhesive before I put the glass.
I’m glad to hear of your success! Keep fixing things!
The Old Battery Connector SNAPS into place. but not the new battery i was sent. Could there be different Connectors??
Hey Ted,
This is a general guide for battery adhesive, so I can’t tell which phone you’re working on. Which phone are you replacing the battery for?
91% percent isopropyl alcohol removes the residue very well. It is available at the local drug store about 2 dollars for a quart.
Greeting Arthur,
Thank you for the excellent, detailed instructions. I was able to replace my OEM battery without any problems. I do have a question related to charging the new battery. Your direction is: For optimal performance, calibrate your newly installed battery: Charge it to 100% and keep charging it for at least 2 more hours. Then use your device until it shuts off due to low battery. Finally, charge it uninterrupted to 100%. The instructions that IFIXIT sent with the kit was to allow it to run down to 10% then charge it to 100%. Is there a big difference here or are both methods okay?
Hi Robert,
I’m glad you’re able to replace the battery! The proper way to calibrate the battery is to allow the device to run until it shuts off. This allows the battery management hardware to have a point of reference on what 0% is, and potentially reset any counter errors. For more details, check out this page.
oops, forgot to clean off the old adhesive. is that going to be an issue? I already stuck on the new one...
Hi Emily,
For the most part it should be fine, as long as there weren’t large uneven chunks of adhesive.
This is only half the work. The pictures don't match at all. Now that the glue strip is in, now what. What are these other strips for?
I was directed here from the Samsung S6 battery removal. The images for the frame of this phone do not match the S6 that I have. Also, the parts and adhesives referenced here are not for the S6 either. This parts list show S7, S8, and S9 parts, implying this guide is NOT for S6 phones.
Also, there was no replacement adhesive for the front part that fits the frame in the kit sold from ifixit. The adhesive for the battery and back part seemed to be in the kit.
Hi Michael!
You're right—this is a general battery adhesive guide for Samsung phones. Your S6 will look differently from the images, but the procedure should be the same. I'll update the intro to reflect this.
Thank you, Arthur. I also wasn't careful in reading, I assumed it would cover replacing the midframe also.
The battery guide didn't provide a guide for that procedure, and no adhesive replacement was issued with the repair kit.
I appreciate it!
Micheal -
Where can I get Galaxy S10 Battery Adhesive Strips?
While it's been 2.5 months and I doubt Oliver is still breathlessly awaiting an answer to this question, for the benefit of anyone else who may wander by in the future wondering the same thing:
For (possibly) every phone where iFixit has written a specific-model battery-replacement guide, up to (but not including) the S22 series, that guide has links to the battery adhesive for the model covered in the guide.
The reason the S22 series isn't included, AFAICT, is because starting with those models, Samsung themselves (finally!) sell self-repair kits/parts for the devices. So, iFixit doesn't sell the necessary adhesive, because it can be purchased direct from the manufacturer instead.
But the adhesive appears in the Parts list on the battery-replacement guide for at least the S10 Oliver was asking about, as well as the newer S21 models. (Those two and the S22/S23 were all I checked, sorry. I'm lazy.)
FeRD -