Ga door naar hoofdinhoud

Samsung Galaxy S Plus Front Panel Assembly Replacement

Wat je nodig hebt

  1. Samsung Galaxy S Plus Front Panel Assembly Replacement, Front Panel Assembly: stap 1, afbeelding 1 van 2 Samsung Galaxy S Plus Front Panel Assembly Replacement, Front Panel Assembly: stap 1, afbeelding 2 van 2
    • Unscrew 7 screws on the rear using a Phillips screw driver.

  2. Samsung Galaxy S Plus Front Panel Assembly Replacement: stap 2, afbeelding 1 van 3 Samsung Galaxy S Plus Front Panel Assembly Replacement: stap 2, afbeelding 2 van 3 Samsung Galaxy S Plus Front Panel Assembly Replacement: stap 2, afbeelding 3 van 3
    • Unhook the rear using a soft plastic prying tool to remove the rear cover

    • Be careful not to damage the rear cover when unhooking it.

  3. Samsung Galaxy S Plus Front Panel Assembly Replacement: stap 3, afbeelding 1 van 1
    • Detach the Power Key FPCB, that is stick to the bracket by a double-sided tape, using tweezers. Make sure to remove all remaining tape on the bracket.

  4. Samsung Galaxy S Plus Front Panel Assembly Replacement: stap 4, afbeelding 1 van 1
    • Disconnect LCD Connector,Receiver Connector, Sub-touch Key Connector and Antenna cable from the Main PBA

    • Disconnecting the camera connector isn't necessary!

  5. Samsung Galaxy S Plus Front Panel Assembly Replacement: stap 5, afbeelding 1 van 1
    • After disconnecting the connectors carefully pull the Main PBA out of the bracket.

    • Make sure that the Power Key FPCB does not get stuck!

  6. Samsung Galaxy S Plus Front Panel Assembly Replacement: stap 6, afbeelding 1 van 3 Samsung Galaxy S Plus Front Panel Assembly Replacement: stap 6, afbeelding 2 van 3 Samsung Galaxy S Plus Front Panel Assembly Replacement: stap 6, afbeelding 3 van 3
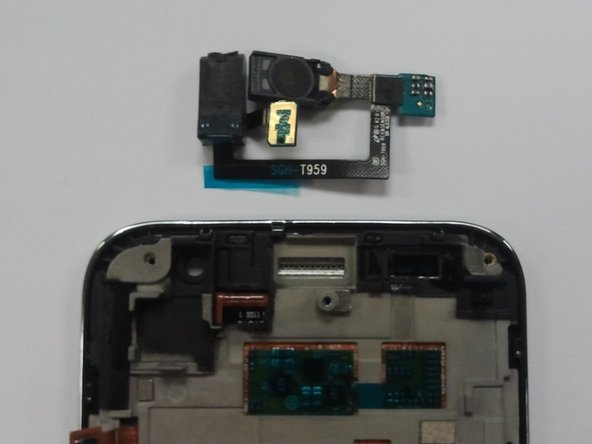
    • Remove the antenna cable from the main Antenna PCB on the sub-touch key module of your broken Screen Digitizer Frame

    • Pull out the Receiver module from the bracket. Be careful not to damage the FPC.

    • Now assembly both Receiver module and antenna cable into the new Screen Digitizer Frame and reverse the process of disassembly!

Conclusie

To reassemble your device, follow these instructions in reverse order.

13 andere personen hebben deze handleiding voltooid.

Joao de Matos

Lid sinds: 07/02/13

362 Reputatie

1 Handleiding geschreven

0 opmerkingen

Voeg opmerking toe

Weergavestatistieken:

Afgelopen 24 uren: 0

Afgelopen 7 dagen: 2

Afgelopen 30 dagen: 10

Altijd: 8,524