Ga door naar hoofdinhoud

Samsung Galaxy J3 Luna Pro Headphone jack Replacement

Wat je nodig hebt

  1. Samsung Galaxy J3 Luna Pro Headphone jack Replacement, Motherboard Change: stap 1, afbeelding 1 van 1
    • Turn off the phone.

    • Remove the back cover and battery

  2. Samsung Galaxy J3 Luna Pro Headphone jack Replacement: stap 2, afbeelding 1 van 3 Samsung Galaxy J3 Luna Pro Headphone jack Replacement: stap 2, afbeelding 2 van 3 Samsung Galaxy J3 Luna Pro Headphone jack Replacement: stap 2, afbeelding 3 van 3
    • Attach a suction cup to the screen and pry upwards.

    • Insert the plastic opening tool into the gap under the screen and work your way around the perimeter.

    • Don't remove the screen completely as there are cables still connection the two pieces.

  3. Samsung Galaxy J3 Luna Pro Headphone jack Replacement: stap 3, afbeelding 1 van 3 Samsung Galaxy J3 Luna Pro Headphone jack Replacement: stap 3, afbeelding 2 van 3 Samsung Galaxy J3 Luna Pro Headphone jack Replacement: stap 3, afbeelding 3 van 3
    • Use the pointy end of a spudger to remove the white plastic cover from the display cover.

    • Use the spudger to pry up the display cable from the motherboard.

    • Remove the screen.

  4. Samsung Galaxy J3 Luna Pro Headphone jack Replacement: stap 4, afbeelding 1 van 3 Samsung Galaxy J3 Luna Pro Headphone jack Replacement: stap 4, afbeelding 2 van 3 Samsung Galaxy J3 Luna Pro Headphone jack Replacement: stap 4, afbeelding 3 van 3
    • Remove the eleven JIS 00 screws from the mid-frame.

    • Using a spudger, pry the mid-frame from the screen.

  5. Samsung Galaxy J3 Luna Pro Headphone jack Replacement: stap 5, afbeelding 1 van 3 Samsung Galaxy J3 Luna Pro Headphone jack Replacement: stap 5, afbeelding 2 van 3 Samsung Galaxy J3 Luna Pro Headphone jack Replacement: stap 5, afbeelding 3 van 3
    • Remove the motherboard from the mid-frame.

  6. Samsung Galaxy J3 Luna Pro Headphone jack Replacement, Headphone jack: stap 6, afbeelding 1 van 2 Samsung Galaxy J3 Luna Pro Headphone jack Replacement, Headphone jack: stap 6, afbeelding 2 van 2
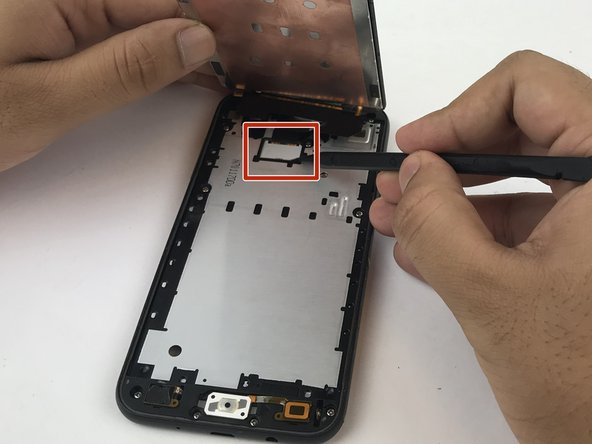
    • Use the flat end of a spudger to pry up the headphone jack cable connector from its socket on the motherboard.

Conclusie

To reassemble your device, follow these instructions in reverse order.

Één andere persoon heeft deze handleiding voltooid.

Brandon Mendoza

Lid sinds: 01/29/18

646 Reputatie

2 handleidingen geschreven

Team

USF Tampa, Team S5-G5, Passmore Spring 2018 Lid van USF Tampa, Team S5-G5, Passmore Spring 2018

USFT-PASSMORE-S18S5G5

5 Leden

5 handleidingen geschreven

0 opmerkingen

Voeg opmerking toe

Weergavestatistieken:

Afgelopen 24 uren: 0

Afgelopen 7 dagen: 0

Afgelopen 30 dagen: 1

Altijd: 1,187