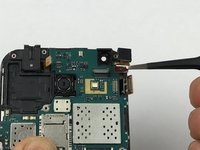
Ga door naar hoofdinhoud

Samsung Galaxy J1 Motherboard Replacement

Wat je nodig hebt

  1. Samsung Galaxy J1 Motherboard Replacement, Midframe: stap 1, afbeelding 1 van 1
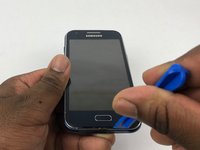
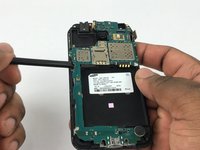
    • Insert a finger nail or plastic opening tool between the back cover and the device.

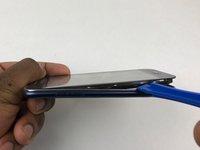
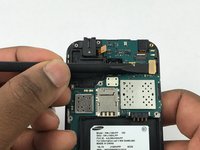
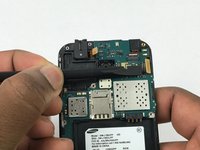
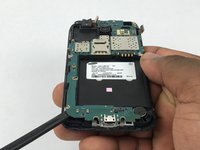
    • Gently pry the rear cover off of the back of the phone.

  2. Samsung Galaxy J1 Motherboard Replacement: stap 2, afbeelding 1 van 2 Samsung Galaxy J1 Motherboard Replacement: stap 2, afbeelding 2 van 2
    • Using a finger, pull the SIM card down out of its slot.

    • Remove the SIM card.

    • The pictured device is missing the SIM card and battery.

  3. Samsung Galaxy J1 Motherboard Replacement: stap 3, afbeelding 1 van 1
    • Using a Phillips #00 screwdriver remove the eleven 3 mm screws.

  4. Samsung Galaxy J1 Motherboard Replacement: stap 4, afbeelding 1 van 3 Samsung Galaxy J1 Motherboard Replacement: stap 4, afbeelding 2 van 3 Samsung Galaxy J1 Motherboard Replacement: stap 4, afbeelding 3 van 3
    • Insert a plastic opening tool between the screen and the back of the device.

    • Starting at the bottom of the device, gently slide the tool along the edges of the screen.

    • Gently pry the main assembly from the midframe of the device.

    • When removing the main assembly, pry gently so as to not crack the glass screen or break any clips within the device.

  5. Samsung Galaxy J1 Motherboard Replacement, Motherboard: stap 5, afbeelding 1 van 2 Samsung Galaxy J1 Motherboard Replacement, Motherboard: stap 5, afbeelding 2 van 2
    • Use the flat edge of a spudger to disconnect the ear speaker connector.

  6. Samsung Galaxy J1 Motherboard Replacement: stap 6, afbeelding 1 van 2 Samsung Galaxy J1 Motherboard Replacement: stap 6, afbeelding 2 van 2
    • Use the flat end of a spudger disconnect the digitizer connector.

  7. Samsung Galaxy J1 Motherboard Replacement: stap 7, afbeelding 1 van 2 Samsung Galaxy J1 Motherboard Replacement: stap 7, afbeelding 2 van 2
    • Use the flat end of a spudger disconnect the front-facing camera cable connector.

  8. Samsung Galaxy J1 Motherboard Replacement: stap 8, afbeelding 1 van 2 Samsung Galaxy J1 Motherboard Replacement: stap 8, afbeelding 2 van 2
    • Remove the front-facing camera.

  9. Samsung Galaxy J1 Motherboard Replacement: stap 9, afbeelding 1 van 3 Samsung Galaxy J1 Motherboard Replacement: stap 9, afbeelding 2 van 3 Samsung Galaxy J1 Motherboard Replacement: stap 9, afbeelding 3 van 3
    • Use the flat end of a spudger to gently pry under the motherboard.

    • Remove the motherboard.

  10. Samsung Galaxy J1 Motherboard Replacement: stap 10, afbeelding 1 van 1
    • Use the flat end of a spudger to disconnect the rear camera cable connector.

  11. Samsung Galaxy J1 Motherboard Replacement: stap 11, afbeelding 1 van 2 Samsung Galaxy J1 Motherboard Replacement: stap 11, afbeelding 2 van 2
    • Remove the rear camera.

Conclusie

To reassemble your device, follow these instructions in reverse order.

22 andere personen hebben deze handleiding voltooid.

Sean Kramer

Lid sinds: 02/14/18

1.452 Reputatie

6 handleidingen geschreven

Team

USF Tampa, Team S5-G4, Eyestone Spring 2018 Lid van USF Tampa, Team S5-G4, Eyestone Spring 2018

USFT-EYESTONE-S18S5G4

3 Leden

6 handleidingen geschreven

4 opmerkingen

can you plz give use a amazon link to part

Sean Gynn - Antwoord

Very good illustration..where can I get a motherboard?

Isaac Samuels - Antwoord

Where can I get a motherboard for this phone Samsung J100?

Isaac Samuels - Antwoord

I need the details of the motherboard

FUN FIRST - Antwoord

Voeg opmerking toe

Weergavestatistieken:

Afgelopen 24 uren: 1

Afgelopen 7 dagen: 11

Afgelopen 30 dagen: 34

Altijd: 6,635