Deze vertaling geeft mogelijk niet de meest recente updates van de bronhandleiding weer. Help ons met het updaten van de vertaling of bekijk de bronhandleiding.
Inleiding
Gebruik deze handleiding om een gebarsten of kapot scherm in je Samsung Galaxy A50 te vervangen.
Let op: De functies van de vingerafdruksensor kunnen verloren gaan door en na deze schermvervanging. Veiligheidspatches die na september 2020 zijn geïnstalleerd ondersteunen deze reparatie niet.
Deze handleiding laat je zien hoe je enkel het scherm vervangt terwijl je het originele frame en het moederbord op hun plek laat zitten. Sommige vervangende schermen worden echter geleverd in een nieuw frame (a.k.a. chassis), wat een heel andere procedure vereist. Zorg dat je het juiste vervangende onderdeel hebt voordat je met deze handleiding begint.
Ontlaad je batterij, voor je eigen veiligheid, tot onder de 25% voordat je je telefoon uit elkaar gaat halen. De batterij kan in brand vliegen en/of exploderen als deze per ongeluk wordt doorboord. Als je je batterij ontlaadt, verklein je dit risico tot het minimum.
Je zult vervangende kleefstrips nodig hebben om sommige onderdelen weer te installeren bij het weer in elkaar zetten van je telefoon.
Wat je nodig hebt
-
-
Steek een SIM-kaart uitwerptool, een SIM-uitwerpbitje of een rechtgebogen paperclip in het kleine gat in de SIM-kaarthouder, welke aan de linkerkant van de telefoon zit.
-
Druk je tool stevig in het gat om de kaarthouder uit te werpen.
-
Verwijder de SIM-kaarthouder.
-
-
-
Schakel allereerst je telefoon uit.
-
Verwarm een iOpener en leg deze op de achterste behuizing om de lijm die het vasthoudt te verzwakken.
Überhitzen das Gerät nicht, das AMOLED-Display und der Akku sind sehr hitzeempfindlich.
Nur ein kleiner Tippfehler-Hinweis: (Überhitze das Gerät nicht)
OK, korrigiert. Das kann übrigens jeder machen, iFixit ist ein Wiki.
VauWeh -
how long should the heat pack be used for?
The heat pack is in the wrong position in photo - the glue that you are heating is actually all around the edge of the phone!
-
-
-
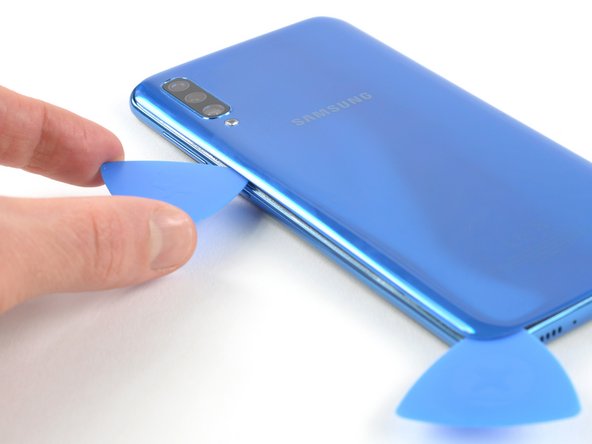
Steek een openingsplectrum in de onderkant van de telefoon, dichtbij de USB-C poort.
-
Schuif je openingsplectrum richting de linker onderhoek.
It would be much better to attempt the opening from the top of the phone as there is a delicate flex PCB antenna at the bottom just where you stick the pick in that can get damaged.
-
-
-
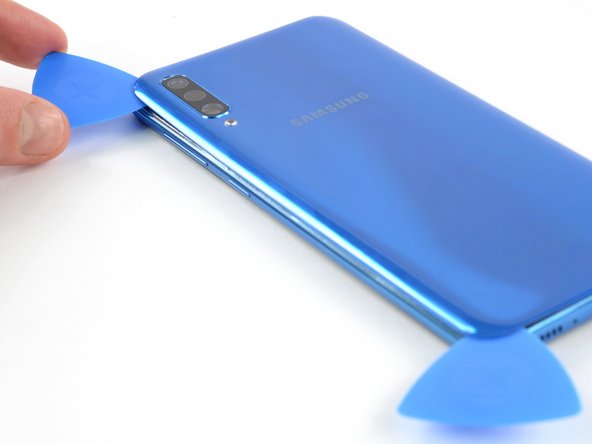
Steek een vierde openingsplectrum onder de achterste behuizing in de rechter bovenhoek.
-
Schuif het puntje van je plectrum langs de zijkant van de telefoon, richting de rechter onderhoek, om de lijm onderweg door te snijden.
-
Laat je openingsplectrum in de rechter onderhoek zitten om te voorkomen dat de lijm zich opnieuw gaat hechten.
-
-
-
Verwijder de achterste behuizing.
Very straight forward and simple replacement to do with the right tools, I used my hot air gun work station so this might have been alot easier for me then someone without one? Hair dryers work too, just in case a hot airgun station is not available to you dont worry you can do this repair without, but some form of heat will make life alot simpler :)
-
-
-
Verwijder de 13 Phillips #00 schroeven (4 mm lengte).
To separate the screen from the mid-frame a few pointers I picked up from a video
1. use a hard pry tool such as iFixit Opening Tool
2. start on a long side about quarter way down from corner
3. work around the frame careful not hook the button assembly -
-
-
-
Gebruik een spudger om de batterij los te koppelen door de batterijaansluiting in een rechte beweging uit het contact omhoog te duwen.
-
-
-
Gebruik een spudger om de aansluiting van de voorste camera los te koppelen door deze in een rechte beweging uit het contact omhoog te duwen.
-
-
-
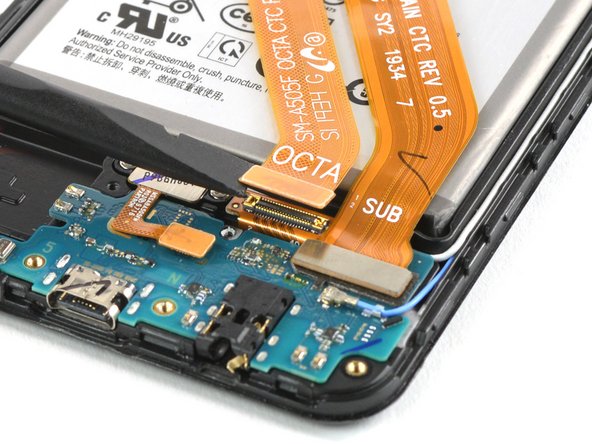
Gebruik het platte einde van een spudger om de interconnect- en schermflexkabels van het dochterbord omhoog te duwen en los te koppelen.
-
Buig beide kabels op voorzichtige wijze uit de weg.
-
-
-
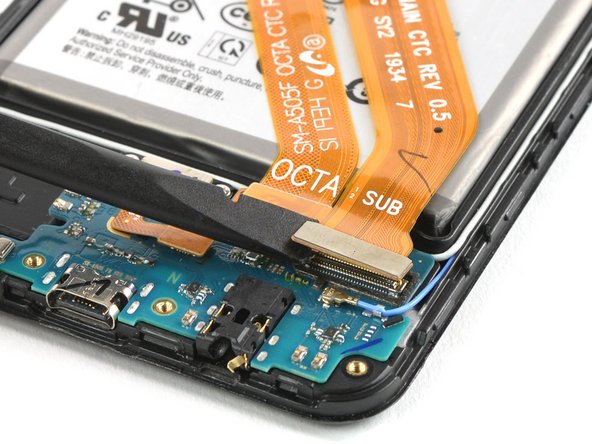
Gebruik de punt van een spudger om de schermaansluiting boven het dochterbord los te maken.
-
-
-
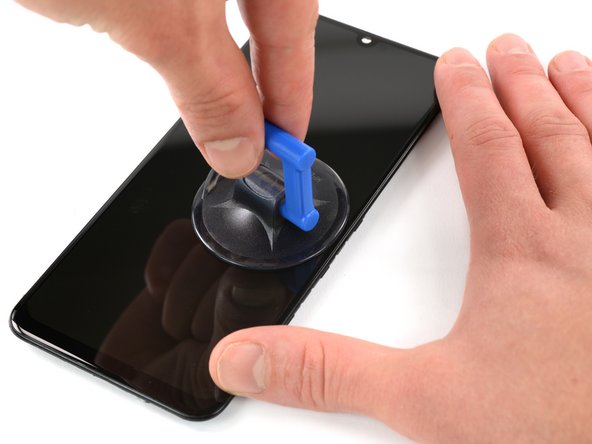
Verwarm een iOpener en leg deze op het scherm gedurende minstens twee minuten om de lijm eronder te verzwakken.
-
Plaats een zuignap dichtbij de rechterkant van het scherm en trek deze met een stevige, constante kracht naar boven gedurende 30 seconde om de lijm los te maken.
-
-
-
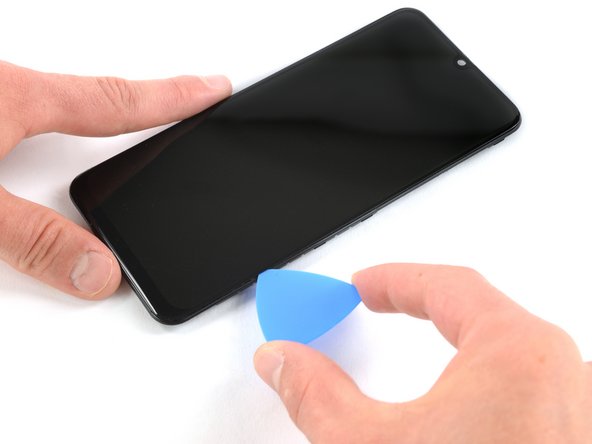
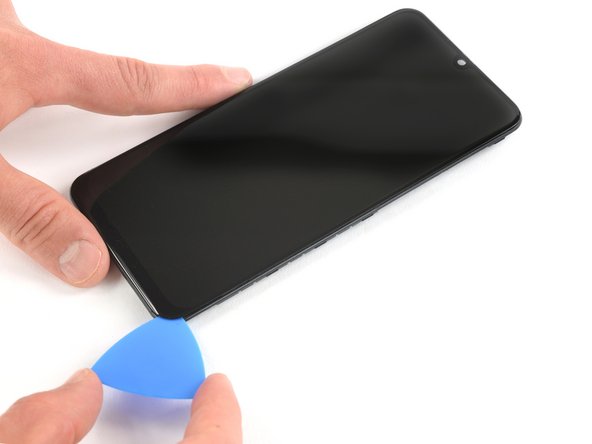
Leg een verwarmde iOpener op het scherm om de lijm onder het scherm te verzachten.
-
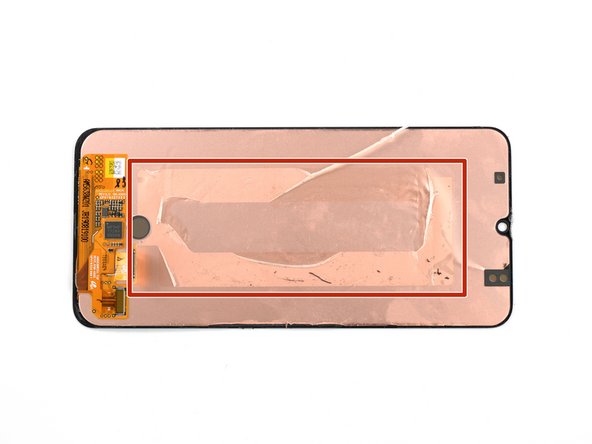
Kijk, tijdens het wachten, alvast naar de rechthoekige kleefstrip die op de achterkant van het scherm geplaatst is.
Beste
Hoe kan ik de achterkant van het scherm bekijken wanneer ik deze pas loskrijg twee stappen later?
Met vriendelijke groeten
Sébastien
-


Schakel indien mogelijk je apparaat in en test de functies van je toestel voordat je nieuwe kleefstrips installeert en je je toestel weer sluit.
De beste manier om het nieuwe scherm te bevestigen, is door op maat gesneden stukken dubbelzijdige tape op de achterkant van het scherm aan te brengen.
Volg deze instructies in omgekeerde volgorde om je apparaat weer in elkaar te zetten. Breng waar nodig nieuwe lijm of tape aan na reiniging van de betreffende gebieden met isopropyl alcohol (>90%).
Breng je e-afval naar een door R2 of e-Stewards gecertificeerd recycle-station.
Reparatie niet volgens plan verlopen? Bezoek onze algemene probleemoplossingspagina of stel je vraag op ons Antwoordenforum voor hulp bij het oplossen van je probleem.
Annuleren: ik heb deze handleiding niet afgemaakt.
69 andere personen hebben deze handleiding voltooid.
Met dank aan deze vertalers:
93%


Deze vertalers helpen ons de wereld te repareren! Wil je bijdragen?
Begin met vertalen ›


24 opmerkingen
considering it is embedded within the display assembly, any chance that the fingerprint sensor is affected by replacing the screen?
Hi Steve, the fingerprint sensor is not embedded within the display as you can see here. The sensor is fixed under the frame and can be seen through the hole in the frame.
Hey, I followed this procedure to replace my screen and now, whenever I am charging my phone it keeps on rebooting itself every 3-5 seconds, or even when it’s not charging and is just idle. I tried to open it up and realign everything however it didn’t help and kept rebooting. So I am not quite sure what I did wrong and was wondering if you have ever experienced that, and what to do about it.
sounds like you may have damaged the battery in some way, try replacing the battery!
Which one is easier way to replace the screen on a50? With or without frame? Thank you.
With the frame. Without the frame you have to follow this guide. With the frame you only have to remove all the internals and place on the new mid-frame that is pre-attached to the new display.
BAM5 -
With frame is significantly easier (but more expensive)
jcage19 -
I replaced the screen with a frame. Yes, it was pretty easy. Few things I would like to note up: the back cover was in this particulary phone pretty tight. I warmed it and tried to extract, but still it bended enough to crack the paint inside. Kind of spider web crackling if you get my idea. So try not to bend it too much. Other thing was with the ear speaker. It was placed on a “cradle” or “hub”, dont know exact word, but anyway the speaker came out in two pieces. Adhesive tape inside it was not so strong. I could see the electric wires inside. So when taking it off, pry it from beneath, not from side. I put the ear piece back together and it was not harmed.
One more question about this. I hope you have experience about it. The finger print sensor doesn’t work with new screen. It took daughterboard out and I projected the brightest led through the finger print sensor hole. I was in dark toilet. No light whatsoever came thorough. And this finger print sensor technique is optical. I paid 66e from this screen from China. I thought you would get a decent one with that price. Has this happened anyone?
A friend has given me A50 Ear speaker not working on calls, I cant hear them they can hear me.
Tried tests receive dosent give dial tone.
apparently had new screen (not fitted by me) do i need to replace complete new screen or just ear piece Speaker?
any help gratefull.
Try just with new ear piece first, its cheaper. (By now you propably already did…) the ear piece is a separated component from screen.
I went through this repair and when I powered it on, the LCD came on, but there was no touch. Thinking it was just a defective LCD, I sent it back and got a replacement; the replacement they sent me didn’t come with a midframe, but didn’t respond to touch either (one of the comments above said “if you change the screen without a midframe, it will not work. “). I ordered a new cable and STILL no touch. Is it possible for the port on the board to be bad? The LCD and Digitizer are together on the same cable, but one works and the other doesn’t. Is there something (like the aforementioned midframe) that causes the digitizer not to function, but allows the LCD to?
Hello I have this question / problem, too. Could anybody please help us?
Try power on safe mode. Triple check cables. Understand that woth vary bad luck you really got defective screens. I’m done with buying screens from china. Getting perfect quality screen is like a lottery.
Let me guess… you insist we BUY an Iopener… %#*@ half this repair read was advertising. Annoying as F&^%#
Hi @nicole, in this guide the iOpener is used, but a hair dryer or heat gun could also be used.
I'm sorry that your repair didn't worked. Have you tried some basic troubleshooting, or asked our Answers community for help?
I accidentally damaged the “E4” antenna at the bottom while opening it, as you can see here https://i.imgur.com/XfvVt3Q.png
What was this antenna for? Where can I get a replacement?
What adhesive do I need for the back cover? Is a regular double-sided tape enough? Thanks.
Hi @knezi! Yes, regular thin double-sided tape works fine. In our store we offer also pre-cut tapes for your use: Tesa 61395 Tape
I connected tft display to my a50 and the light underneath the display works but the display itself doesn't and also this is the second display that i tried the first one was amoled from aliexpress and it worked for like a month and then i once placed it on the table and only the touch part of the display worked but it didn't show anything
Hii, I tried to fix new screen in samsung A50 and now the screen shows nothing.